Ever wondered about making your own compost but felt a little overwhelmed? You’re not alone! Choosing the right compost bag can seem tricky with so many options out there. But don’t sweat it! We’re here to break it all down. Think of this as your friendly guide to finding the best compost bags, making composting simple and successful, no matter your yard size. Ready to turn your kitchen scraps into garden gold? Let’s get started!
Compost Bags: Your Garden’s Secret Weapon
Hey neighbors! Troy D Harn here from TopChooser. Today, we’re diving into something super practical for anyone looking to be a little more eco-friendly and give their garden a boost: compost bags! If you’ve ever tossed coffee grounds or veggie peels in the trash and thought, “there has to be a better way,” you’re in the right place. Composting turns kitchen and yard waste into nutrient-rich soil amendment, and compost bags are a fantastic, beginner-friendly way to do it.
Why compost bags, you ask? They’re like a contained composting system. Unlike a big, open bin that might seem daunting or attract unwanted critters, compost bags offer a more controlled, tidier approach. They’re perfect for smaller spaces, renters, or just folks who like things neat and tidy. Plus, they can speed up the composting process!
We’ll cover what makes a compost bag “best,” the different types you can find, how to use them effectively, and even some tips for keeping your composting journey smooth and successful. By the end of this guide, you’ll be well-equipped to choose and use compost bags like a pro. Let’s dig in!
What Exactly Are Compost Bags?
Think of a compost bag as a mini composting system in a sack. These bags are designed to hold your compostable materials – think fruit peels, vegetable scraps, coffee grounds, yard trimmings – and allow the magic of decomposition to happen efficiently and contained. They’re typically made from breathable, durable materials that let air in and moisture out, creating the ideal environment for microorganisms to break down organic matter.
Unlike traditional compost bins that can be large and sometimes messy, compost bags are compact and versatile. You can often place them in a corner of your yard, on a balcony, or even on a patio. They come in various sizes and designs, catering to different needs and composting volumes. The goal is simple: make composting accessible, less intimidating, and more effective.
Why Use Compost Bags? The Awesome Benefits
You might be wondering, “Why go with a bag instead of a traditional bin?” Great question! Compost bags offer a unique set of advantages, especially for beginners or those with space limitations.
- Space Savers: Perfect for small yards, balconies, or even indoor setups. No need for a huge compost pile.
- Speedy Composting: Many bags are designed to retain heat and moisture, which can accelerate the decomposition process, giving you usable compost faster.
- Odor Control: A well-functioning compost bag can help contain smells, making it a more pleasant experience for you and your neighbors.
- Pest Deterrence: The enclosed nature of a bag can help keep out unwanted visitors like rodents.
- Easy to Use & Move: They’re generally lighter and easier to manage than heavy bins. Some are even designed for turning, making aeration simple.
- Cost-Effective: Often less expensive upfront than larger, more complex composting systems.
Types of Compost Bags: Finding Your Perfect Match
Not all compost bags are created equal! The “best” one for you depends on your needs, how much organic material you generate, and your space. Here’s a rundown of the common types you’ll encounter:
1. Breathable Fabric Compost Bags
These are often your go-to for good aeration. Made from materials like felt or heavy-duty woven polypropylene, they have small pores or perforations that allow air to circulate freely. This is crucial for aerobic composting (the good kind that doesn’t smell bad!).
- Pros: Excellent air flow, lightweight, often durable, can be easily moved.
- Cons: Can dry out faster in hot, dry climates, might require more frequent watering.
- Best for: Gardeners prioritizing aeration, those in moderate climates, people who want to easily move their compost.
2. Sealed Biodegradable Liners
These are often used inside another bin or container. They are typically made from plant-based materials that break down over time. Their primary job is to make emptying and cleaning out your compost bin much easier, and to help manage moisture and odor within a primary receptacle.
- Pros: Convenient for emptying, help contain odors and liquids, eco-friendly as they degrade.
- Cons: Not a standalone composting solution, they need to be placed inside something else.
- Best for: People using countertop compost pails or larger bins who want an easy way to transfer materials.
3. Kiln-Treated Paper Compost Bags
These are often seen for collecting food scraps for commercial composting services or for smaller home composting needs. They are made from treated paper to withstand some moisture while still breaking down. They are usually compostable themselves!
- Pros: Biodegradable, often very affordable, good for short-term storage of scraps.
- Cons: Can become soggy if overloaded with wet materials or left for too long, less durable than fabric bags.
- Best for: Collecting kitchen scraps for curbside composting programs or for very small, short-term home composting projects.
4. Heavy-Duty Plastic Compost Sacks
Some thicker plastic bags are marketed for composting. These often have reinforced seams and are designed to be more durable. However, it’s crucial to ensure they are specifically designed for composting, as regular plastic bags won’t allow for proper aeration and can hinder the process.
- Pros: Very durable, waterproof (which can be good for containing moisture in dry areas).
- Cons: Poor aeration unless specifically perforated, can trap too much moisture leading to anaerobic conditions (stinky!), not as eco-friendly as other options if not compostable themselves.
- Best for: Specific composting systems that manage aeration through other means, or for holding compostable materials temporarily.
Pro Tip: When looking for the “best” compost bags, always check the manufacturer’s description. They should specify the material, durability, and intended use (e.g., aeration, odor control, temporary collection).
What Makes a Compost Bag the “Best”? Key Features to Look For
When you’re shopping for your compost bag, keep these features in mind. They’ll help you pick a bag that will actually work well for you!
- Material Quality: Is it made from durable, breathable, and ideally compostable or recyclable material? For fabric bags, look for strong stitching. For paper or biodegradable options, ensure they feel sturdy enough for your intended use.
- Size and Capacity: How much organic waste do you generate? A small household might do well with a 10-gallon bag, while a larger family or avid gardener might need 30 gallons or more.
- Aeration Features: This is super important! Look for bags with perforations, mesh panels, or breathable fabric that allows air to get in. Oxygen is vital for healthy, non-smelly compost.
- Moisture Management: While you want some moisture, you don’t want a soggy mess. Good bags allow excess moisture to drain or evaporate.
- Ease of Use: Does it have handles for easy carrying or turning? Is it designed for simple filling and emptying?
- Durability: You want a bag that can withstand the weight of the compost materials and the elements for a reasonable amount of time.
- Compostability/Biodegradability: If the bag itself is meant to break down (like biodegradable liners or some paper bags), make sure it’s certified to break down in a compost environment.
How to Use Your Compost Bag: A Step-by-Step Guide
Using a compost bag is straightforward. Here’s how to get started and keep your compost happy:
Step 1: Choose Your Location
Find a level spot in your yard. It should be easily accessible but not right next to your main seating area. Partial sun is often ideal – too much direct sun can dry it out, and too much shade might keep it too cool. If you’re using a smaller bag on a balcony, consider what surfaces it might sit on; a tray underneath can catch any drips.
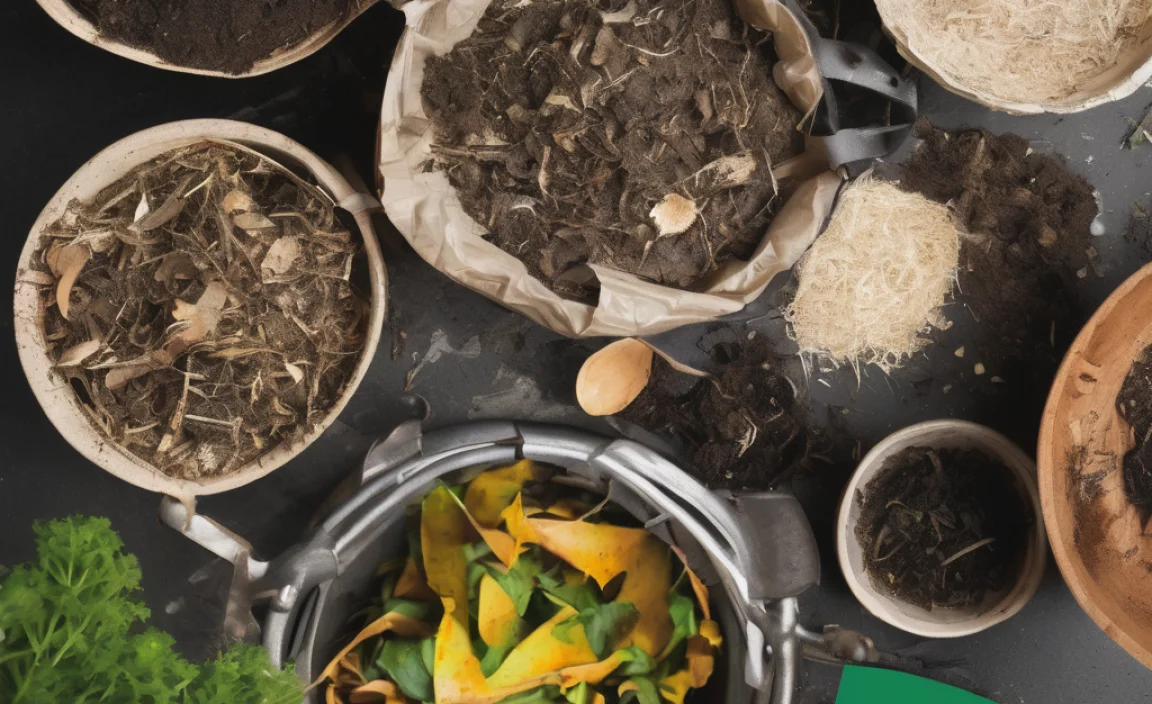
Step 2: Gather Your “Greens” and “Browns”
Composting works best with a good balance of nitrogen-rich “greens” and carbon-rich “browns.” Aim for roughly a 1:2 or 1:3 ratio of greens to browns.
- Greens (Nitrogen-rich): Fruit and vegetable scraps, coffee grounds, tea bags, grass clippings, plant trimmings, eggshells.
- Browns (Carbon-rich): Dry leaves, shredded newspaper or cardboard (uncoated, no glossy print), straw, sawdust (use sparingly), small twigs.
Important Note: Avoid meat, dairy, oily foods, diseased plants, and pet waste. These can cause odors, attract pests, or contain pathogens.
Step 3: Start Filling Your Bag
Begin by adding a layer of “browns” at the bottom. This helps with drainage and airflow. Then, start adding your kitchen scraps (greens) and other yard waste (more browns!).
A good layering technique is to add a layer of greens, then cover it with a layer of browns. This helps prevent odors and discourages flies.
Step 4: Maintain Moisture Levels
Your compost pile should be as damp as a wrung-out sponge. If it feels dry, add some water. If it feels too wet and clumpy, add more browns and gently mix.
Step 5: Ensure Aeration
This is where the “bag” aspect can be helpful. For fabric bags, the material itself allows air in. For other types, you might need to occasionally:
- Turn the Bag: If your bag has handles, carefully lift and turn it a bit.
- Mix the Contents: Gently stir the materials inside with a compost fork or tool.
- Shake It: Some bags are designed to be shaken to mix layers and introduce air.
Check the manufacturer’s instructions for the best way to aerate your specific bag.
Step 6: Be Patient and Harvest!
Composting takes time! Depending on your materials, climate, and how well you manage your bag, it can take anywhere from a few weeks to several months. You’ll know your compost is ready when it’s dark, crumbly, and smells earthy.
To harvest, you can often empty the bag and sift out any larger, unfinished bits to put back into the bag for the next batch. The finished compost is fantastic for amending your garden beds, potting plants, or top-dressing your lawn.
Troubleshooting Common Compost Bag Issues
Even with the best intentions, compost bags can sometimes present puzzles. Here are a few common hiccups and how to fix them:
- Smelly Compost: This is usually a sign of too many “greens” or too much moisture, leading to anaerobic conditions.
- Solution: Add more “browns” (like shredded newspaper or dry leaves) and mix thoroughly to introduce air. Ensure your bag has good aeration.
- Compost Too Dry: This slows down decomposition.
- Solution: Water the contents. If it’s a fabric bag, you might need to water more regularly, especially in hot weather.
- Compost Too Wet/Slimy: This can also lead to smells and slow decomposition.
- Solution: Add more dry “browns” to absorb the excess moisture. Ensure any drainage holes aren’t blocked.
- Pests (Flies, etc.): Usually attracted by exposed food scraps.
- Solution: Make sure all food scraps are buried under a layer of “browns.” A well-functioning, enclosed bag helps deter pests.
- Slow Decomposition: Could be due to lack of moisture, air, or the compost being too cool.
- Solution: Check moisture levels, ensure good aeration, and consider relocating the bag to a spot with more sun if it’s too cool. Chop materials into smaller pieces.
DIY Compost Bags: Can You Make Your Own?
While buying a purpose-built compost bag is often the easiest route, you can certainly create your own DIY version, especially if you’re crafty or on a tight budget!
Simple DIY Fabric Compost Bag
You can create a basic compost bag from sturdy, breathable fabric like landscape fabric or heavy-duty outdoor material.
- Cut your fabric: You’ll need a large rectangle. The size depends on how big you want your bag – consider a piece about 3 feet by 6 feet to make a good-sized cylinder when rolled.
- Form a cylinder: Roll the fabric into a cylinder and overlap the edges by a few inches.
- Sew or fasten: Use heavy-duty thread to sew a strong seam down the overlapped edge, or use sturdy grommets and ties to secure it.
- Create a base (optional): For extra durability, you can cut a circle for the bottom and attach it with a strong seam or industrial-strength adhesive.
- Add handles: Sew loops of strong webbing or rope to the top sides for easy carrying.
This DIY version will provide good aeration but might dry out faster than some commercial options. You’ll also need to manage turning it yourself!
External Resources for Composting Knowledge
Want to dive even deeper? The world of composting is vast and fascinating! Here are some fantastic resources to help you expand your knowledge:
- EPA’s Composting Basics: The U.S. Environmental Protection Agency offers comprehensive guides on composting, including what can and cannot be composted. Check out their resources at epa.gov/recycle/composting-home.
- University Extension Offices: Many university extension programs (like those associated with state universities, e.g., Purdue Extension) provide excellent, localized gardening and composting advice. Search for your local extension office online!
- The Rodale Institute: A renowned leader in organic agriculture research, The Rodale Institute offers a wealth of information on sustainable gardening practices, including composting. Visit them at rodaleinstitute.org.
Compost Bags vs. Other Composting Methods
It’s helpful to see how compost bags stack up against other popular composting methods:
| Method | Pros | Cons | Best For |
|---|---|---|---|
| Compost Bags | Space-efficient, portable, can speed up composting, good odor/pest control. | Can dry out quickly, may need frequent turning, limited capacity for some. | Beginners, small spaces, renters, faster composters. |
| Open Compost Bins | Simple to build/buy, good capacity, easy access. | Can be messy, less effective odor/pest control, can take longer. | Larger yards, those with more yard waste, budget-conscious. |
| Compost Tumblers | Enclosed, easy to turn, speed up composting, deter pests. | Can be expensive, limited capacity, can get heavy. | People who want to speed up compost and dislike manual turning, pest concerns. |
| Worm Composting (Vermicomposting) | Excellent for kitchen scraps, produces high-quality compost (worm castings), can be done indoors. | Requires specific management for worms, can’t handle large volumes of yard waste. | Apartment dwellers, small households focused on kitchen scraps. |
Frequently Asked Questions About Compost Bags
Got more questions swirling around your head? Here are some common ones:
Q1: Can I compost everything in a compost bag?
A1: Almost! Stick to kitchen scraps (fruits, veggies, coffee grounds, tea leaves, eggshells), yard waste (leaves, grass clippings,

I am passionate about home engineering. I specialize in designing, installing, and maintaining heating, ventilation, and air conditioning systems. My goal is to help people stay comfortable in their homes all year long.