Hey there, fellow gardeners! Ever look at your kitchen scraps and yard waste and think, “There’s got to be a better way than the trash can?” You’re in luck! Making your own compost is surprisingly simple, incredibly rewarding, and a fantastic way to boost your garden. It might seem a little daunting at first, but I’m here to break down compost DIY into easy steps. Get ready to turn that “waste” into “black gold” for your plants. Let’s get started!
Compost DIY: Turn Your Kitchen & Yard Scraps into Garden Gold
Welcome to the wonderful world of DIY composting! As Troy D Harn, I’ve helped countless folks transform their homes and gardens, and I can tell you, composting is one of the most satisfying and budget-friendly projects you can tackle. It’s a bit like magic, turning everyday discards into a nutrient-rich powerhouse for your plants. No fancy equipment or complicated science needed. We’re going to keep this super simple, step-by-step, so you can start making fantastic compost right away. Ready to dig in?
Why Compost? The Big Benefits for Your Garden & Wallet
Composting isn’t just a trendy gardening practice; it’s a smart one. It’s a natural recycling process that benefits your garden in so many ways. Plus, it reduces what you send to the landfill, which is a win for everyone.
Benefits for Your Garden:
- Nutrient Powerhouse: Compost is packed with essential nutrients that your plants will absolutely love. It’s like giving your garden a superfood smoothie.
- Improved Soil Structure: Adding compost to your soil loosens heavy clay and helps sandy soil retain moisture. This means better drainage, aeration, and root growth.
- Healthy Microbes: Compost is teeming with beneficial microorganisms that help plants fight off diseases and pests.
- Water Retention: Compost acts like a sponge in your soil, holding onto moisture and reducing the need for frequent watering.
- Natural Weed Suppressor: Healthy soil from composting makes your plants stronger and better able to outcompete weeds naturally.
Benefits for Your Budget & the Planet:
- Less Waste, Less Spending: You’ll buy fewer fertilizers and soil amendments. Plus, you’ll reduce your household waste, potentially lowering trash disposal fees.
- Environmental Friendliness: Composting diverts organic waste from landfills, where it produces harmful methane gas. You’re actively contributing to a healthier planet.
- Rewarding Sustainability: There’s a unique satisfaction in creating something valuable from what would otherwise be thrown away. It’s DIY sustainability at its finest.
Getting Started with Compost DIY: What You Need
Don’t let the word “compost” intimidate you. You don’t need a huge backyard or a fancy bin to start. We’ll cover a few simple options. The core idea is to provide a space for organic materials to break down.
Choosing Your Composting Method:
There are a few popular ways to compost, each with its own pros and cons. For beginners, simplicity is key!
- Compost Bin (Open or Closed): This is the most common method. You can buy one, build one, or even just use a simple pile. Open bins are easy to access but can look a bit messy. Closed bins are tidier and can speed up the process.
- Tumbler Composter: These are rotating bins that make turning your compost easy and quick. Great if you want to speed things up and they keep critters out.
- Worm Composting (Vermicomposting): This is perfect for apartment dwellers or those with very limited space. Red wiggler worms do the hard work of breaking down food scraps. It’s a bit different but super effective!
For this guide, we’ll focus on the most common method: a simple compost bin or pile. It’s the most beginner-friendly approach.
Essential Tools (You Probably Have Most of Them!):
You don’t need a professional setup. Here’s what will make your compost DIY journey smoother:
- A Shovel or Pitchfork: For turning your compost pile.
- A Garden Hose or Watering Can: To keep your compost moist.
- A Wheelbarrow (Optional but Handy): For moving finished compost or materials.
- A Sieve or Screen (Optional): To sift out larger, unfinished pieces.
- Gloves: To keep your hands clean.
- A Kitchen Compost Pail (Optional but Recommended): To collect food scraps before taking them to your main bin.
The “Greens” and “Browns”: Your Compost Recipe
Composting works by balancing two types of materials: “greens” and “browns.” Think of them as the fuel for your compost fire. Too much of one, and it won’t heat up properly or will get stinky.
What are Greens? (Nitrogen-Rich Materials)
Greens are typically moist materials that are rich in nitrogen. They provide the protein for the microorganisms that break down the compost.
- Fruit and vegetable scraps (peels, cores, rinds)
- Coffee grounds and tea bags
- Grass clippings (in thin layers)
- Plant trimmings (non-woody)
- Manure (from herbivores like chickens, rabbits, cows, and horses – avoid pet waste)
- Seaweed
What are Browns? (Carbon-Rich Materials)
Browns are drier, carbon-rich materials. They provide the energy for the microorganisms and help with aeration, preventing the pile from becoming a soggy mess.
- Dry leaves
- Straw or hay
- Shredded newspaper (avoid glossy paper)
- Cardboard (torn into small pieces, avoid tape and labels)
- Wood chips or sawdust (use sparingly, as they break down slowly)
- Pine needles
- Twigs and small branches (chopped up)
What NOT to Compost (Avoid These!):
Some things can cause problems or simply won’t break down well. It’s important to keep these out of your compost bin.
- Meat, fish, and bones (attract pests and can smell)
- Dairy products and oily foods (attract pests and can smell)
- Diseased plants (can spread disease back to your garden)
- Weeds that have gone to seed (you’ll just be spreading weeds)
- Pet waste (dog or cat feces can contain pathogens)
- Treated wood or sawdust from treated wood
- Coal ash or charcoal briquettes
- Glossy magazines or colored inks
The Ideal Compost Ratio: A Balancing Act
The magic happens when you get the right mix. A good starting point is to aim for roughly 2 parts Browns to 1 part Greens by volume. So, for every two shovelfuls of dry leaves, add one shovelful of vegetable peels.
Don’t get too stressed about perfection. This is a flexible guideline. If your compost is too wet and smelly, add more browns. If it’s dry and not breaking down, add more greens and moisture.
| Material Type | Examples | Purpose |
|---|---|---|
| Greens (Nitrogen-Rich) | Fruit/Veggie Scraps, Coffee Grounds, Grass Clippings, Manure | Provide moisture and nitrogen for microbial activity and heat generation. |
| Browns (Carbon-Rich) | Dry Leaves, Straw, Shredded Paper/Cardboard, Twigs | Provide carbon for energy, add bulk, and aid aeration. |
Step-by-Step: Building Your First Compost Pile
Ready to get your hands dirty? Here’s how to build your compost pile, step-by-step.
Step 1: Choose Your Location
- Sun or Shade? A spot that gets some sun but is not in direct, baking sunlight all day is ideal. This helps keep it warm but not dried out.
- Drainage: Make sure the spot has good drainage so your pile doesn’t become waterlogged.
- Accessibility: Pick a spot that’s easy to get to with your kitchen scraps and garden waste, and easy to access with a shovel for turning.
- Aesthetics: If you’re using an open pile or a bin, consider how it looks. Some people prefer to place it at the back of the garden.
Step 2: Start Layering Your Materials
Think of building your pile like making a lasagna, but with organic stuff. Start with a base layer to ensure good airflow.
- Base Layer (Browns): Begin with a 4-6 inch layer of coarse brown materials like twigs, straw, or wood chips. This allows air to circulate from the bottom.
- Add Greens: Next, add a layer of “greens” – your kitchen scraps, grass clippings, etc.
- Add Browns: Top the greens with another thicker layer of “browns” – dry leaves, shredded paper, etc.
- Water Lightly: Lightly water each layer as you go. The goal is for the compost to be as damp as a wrung-out sponge.
- Continue Layering: Keep adding alternating layers of greens and browns. Chop or shred larger items to speed up decomposition.
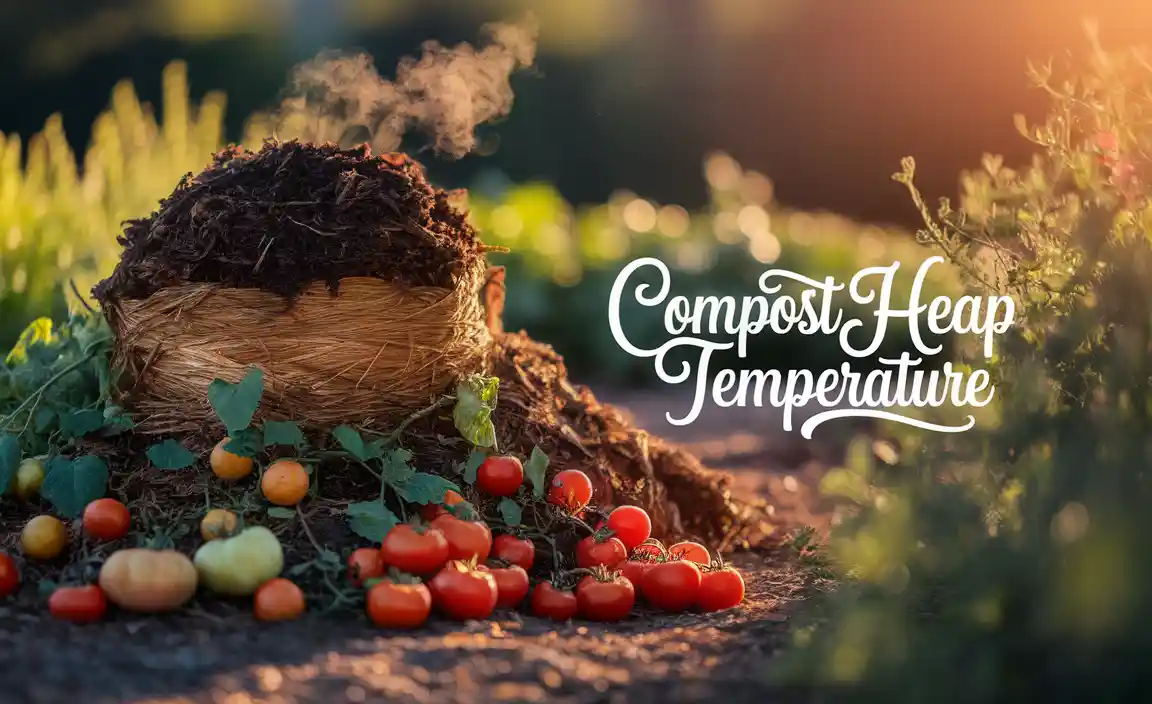
Step 3: The “Turning” Process
This is crucial for good compost! Turning aerates the pile, which is essential for the microbes that break everything down. It also helps mix greens and browns uniformly.
- How Often? Aim to turn your compost pile every 1-2 weeks. If you’re using a tumbler, just give it a few spins.
- How to Turn: Use your shovel or pitchfork to move the outer layers to the center and the inner layers to the outside. This exposes all the material to air and moisture.
- What to Look For: If your pile is hot in the center, you’re doing great! If it smells like ammonia, it’s too wet and needs more browns and turning. If it’s dry and not heating up, it needs more moisture and greens.
For those of you with space and a bit more ambition, here’s a link to the EPA’s excellent guide on composting. They offer more detailed insights into the science behind it!
Step 4: Monitor Moisture Levels
Your compost pile needs to stay consistently moist but not soggy. Think of a damp sponge.
- Too Dry: If it feels dry, add water and turn the pile to distribute it.
- Too Wet: If it’s soggy or smells bad, add more dry brown materials and turn it well to introduce air.
Step 5: Be Patient!
Composting is a natural process and takes time. Depending on the materials you use, the size of your pile, and how often you turn it, it can take anywhere from a few months to a year to produce finished compost. The key is consistency with turning and moisture.
Troubleshooting Common Compost Problems
Even with the best intentions, sometimes your compost pile might act up. Don’t worry, these are common issues with easy fixes.
Problem: My compost pile smells bad (like rotten eggs or ammonia).
Cause: Too much green material, not enough air, or too much moisture.
Solution:
- Add more brown materials (leaves, shredded paper, cardboard).
- Turn the pile thoroughly to aerate it.
- Ensure good drainage.
Problem: My compost pile isn’t heating up or breaking down.
Cause: Too many brown materials, not enough moisture, or the pile is too small.
Solution:
- Add more green materials.
- Add water and turn the pile to help distribute moisture.
- Ensure you have a decent-sized pile (at least 3x3x3 feet is ideal for good heat generation).
Problem: I’m seeing lots of flies or other pests.
Cause: Exposed food scraps, meat, dairy, or oily products in the pile.
Solution:
- Bury all food scraps deep within the pile, covered by browns.
- Avoid adding meat, dairy, and oily foods.
- Make sure your compost bin has a lid or is covered.
- Turn the pile regularly.
Problem: My compost is taking forever to break down.
Cause: Materials are too large, not enough turning, or moisture/aeration issues.
Solution:
- Chop or shred larger items before adding them.
- Turn the pile more frequently.
- Check moisture levels and ensure good aeration.
Recognizing Finished Compost
How do you know your compost is ready to use? It’s like magic when it happens!
Finished compost will:
- Look dark brown and crumbly, like rich soil.
- Smell earthy and pleasant – not sour or rotten.
- Have no discernible original materials (you won’t see recognizable food scraps or leaves).
- Feel cool to the touch, even if it was recently hot.
If you find larger, unfinished pieces, don’t throw them back out! You can put them in a new compost pile or sift them out with a screen and add them back to the top of your current active pile.
Using Your DIY Compost: The Garden’s Reward
Once you have beautiful, finished compost, it’s time to put it to work in your garden! It’s incredibly versatile.
How to Use Your Amazing Compost:
- Soil Amendment: Mix a few inches of compost into your garden beds before planting. This is the best way to improve your soil structure and fertility long-term.
- Top Dressing: Spread a thin layer of compost around existing plants, shrubs, and trees. This feeds the soil and helps retain moisture.
- Potting Mix: Mix compost with potting soil and perlite to create a fantastic, nutrient-rich mix for your container plants. A common ratio is 1/3 compost, 1/3 potting soil, and 1/3 perlite or vermiculite.
- Compost Tea: You can steep compost in water to create a liquid fertilizer. Just soak a shovelful of compost in a bucket of water for a day or two, strain, and use to water your plants.
- Lawn Dressing: Lightly spread compost over your lawn in the spring or fall to improve soil health and grass vitality.
For more in-depth information on soil health and amendments, sites like UC Agriculture and Natural Resources offer fantastic resources.
Quick Summary of Genius Compost DIY Tips
Here’s a fast recap to keep your composting journey on track:
- Balance is Key: Aim for a 2:1 ratio of Browns to Greens.
- Moisture Matters: Keep it as damp as a wrung-out sponge.
- Aerate Regularly: Turn your pile every 1-2 weeks.
- Chop It Up: Smaller pieces break down faster.
- Be Patient: Good compost takes time.
- Troubleshoot Smart: Smell, pests, and slow decomposition have simple fixes.
- Use It Generously: Your plants will thank you!
Frequently Asked Questions About Compost DIY
Q1: How long does it take to make compost?
A: It varies! Depending on what you’re composting, how often you turn it, and the conditions, it can take anywhere from 2 months to over a year. Smaller, actively managed piles with consistent turning and moisture will be faster.
Q2: Do I need a special bin?
A: Not necessarily! You can start with a simple pile in a corner of your yard. However, a bin (DIY or store-bought) can help keep things tidy, retain heat, and deter pests. Tumblers are great if you want speed and ease of turning.
Q3: Can I compost all my kitchen scraps?
A: Most fruit and vegetable scraps, coffee grounds

I am passionate about home engineering. I specialize in designing, installing, and maintaining heating, ventilation, and air conditioning systems. My goal is to help people stay comfortable in their homes all year long.