Want to give your garden a super boost without buying expensive stuff? Making your own compost fertilizer is easier than you think! It’s like a secret ingredient that picky plants absolutely love. Don’t worry if you’ve never done this before. We’ll walk through it step-by-step, and you’ll be composting like a pro in no time. Get ready to turn kitchen scraps and yard waste into gardening gold!
Compost Fertilizer Guide: Essential Tips for a Thriving Garden
Hey there, garden enthusiasts and aspiring green thumbs! Troy D Harn here from TopChooser, ready to help you unlock the magic of compost fertilizer. If you’re looking to enrich your soil, boost plant growth, and give your garden that extra sparkle, you’ve come to the right place. Forget those pricey bags from the store; we’re going to dive into how you can create your own nutrient-rich compost right at home. It’s a fantastic way to reduce waste, save money, and create a truly happy, healthy garden.
This guide is tailor-made for beginners. We’ll break down everything you need to know, from what to put in your compost bin to how to get the best results. No confusing jargon, just practical advice that works. Ready to turn your kitchen scraps and yard trimmings into garden gold? Let’s get started!
Why Compost Fertilizer? The Big Benefits
Before we get our hands dirty, let’s talk about why composting is such a game-changer for your garden. It’s more than just a way to get rid of leftovers; it’s a powerful tool for plant health and soil improvement.
- Rich in Nutrients: Compost is packed with essential nutrients like nitrogen, phosphorus, and potassium that plants need to grow strong and healthy. It’s like a multivitamin for your soil!
- Improves Soil Structure: Whether you have clay soil that’s hard as rock or sandy soil that drains too fast, compost helps balance things out. It improves drainage in heavy soils and helps sandy soils retain moisture.
- Boosts Beneficial Microbes: Healthy soil is alive! Compost introduces a host of beneficial microorganisms, fungi, and earthworms that break down organic matter further and make nutrients available to plants.
- Reduces Waste: A significant portion of household waste can be composted. By composting, you’re diverting organic materials from landfills, which helps reduce methane gas production – a potent greenhouse gas.
- Saves Money: Making your own compost fertilizer means you don’t have to buy expensive soil amendments and fertilizers. It’s a sustainable and budget-friendly way to garden.
- Environmentally Friendly: Composting is a natural process that recycles nutrients and reduces your environmental footprint. It’s a win-win for your garden and the planet.
What Can You Compost? The “Greens” and “Browns”
The secret to great compost is a good mix of what we call “greens” and “browns.” Think of it like a balanced diet for your compost pile. You need both to get the decomposition process working efficiently.
“Greens” (Nitrogen-Rich Materials)
These are typically moist, nitrogen-rich materials that provide the fuel for the microorganisms to do their work. They tend to break down quickly.
- Fruit and vegetable scraps (peels, cores, rinds, wilted greens)
- Coffee grounds and tea bags
- Grass clippings (in moderation, they can mat down if too much is added at once)
- Plant trimmings (non-diseased, non-woody parts)
- Eggshells (crushed)
- Manure from herbivores (cow, horse, rabbit, chicken – make sure it’s aged if possible)
“Browns” (Carbon-Rich Materials)
These are typically dry, carbon-rich materials that provide the energy source for the microbes and help with airflow in the pile. They break down more slowly.
- Dry leaves
- Straw and hay
- Shredded newspaper and cardboard (avoid glossy or heavily inked types)
- Sawdust and wood chips (from untreated wood)
- Pine needles
- Dryer lint
- Twigs and small branches (chopped or shredded)
What to AVOID Composting
It’s just as important to know what not to put in your compost bin. These items can attract pests, create bad odors, or introduce harmful pathogens or weed seeds.
- Meat, fish, and bones
- Dairy products (milk, cheese, yogurt)
- Oily or greasy foods
- Diseased plants or weeds that have gone to seed
- Pet waste (dog or cat feces)
- Chemically treated wood or yard waste
- Synthetic materials (plastics, synthetic fabrics)
- Weeds that spread easily by root or invasive seeds
Choosing Your Composting Method: Bin or Pile?
There are several ways to compost, and the best method for you depends on your space, budget, and how much time you have. Here are a few popular options:
1. Open Compost Piles
Best for: Those with ample yard space and a steady supply of organic materials. This is the simplest method.
How it works: Simply pile your greens and browns in a designated outdoor area. You’ll want to turn it occasionally to aerate. It’s less contained, so some folks find it can look a bit messy if not managed well.
Pros: Easy setup, no cost for a bin, can handle large volumes.
Cons: Can take longer to break down, potential for messiness, might attract more pests if not managed properly, requires more space.
2. Enclosed Compost Bins
Best for: Most home gardeners, especially those with smaller yards or who want a neater appearance and better pest control.
Types: You can buy pre-made bins (plastic tumblers, stationary bins) or build your own using wood or wire mesh. Tumbling composters make turning easy, while stationary bins often have lids.
Pros: Neater appearance, better pest control, can speed up decomposition, more controlled environment.
Cons: Can be an initial cost, may have capacity limitations, DIY can require some basic tools and effort.
3. Worm Composting (Vermicomposting)
Best for: Those with limited outdoor space (apartments, small balconies) or who want to compost kitchen scraps specifically. This method uses red wiggler worms!
How it works: Special bins are set up with bedding material, and red wigglers consume your food scraps, producing nutrient-rich worm castings.
Pros: Great for small spaces, produces very high-quality fertilizer (worm castings), fast processing of kitchen scraps, minimal odor if managed correctly.
Cons: Requires specific types of worms, temperature sensitive, cannot handle large volumes or certain types of food scraps (like citrus in large amounts), initial setup can be a bit finicky to get right.
For beginners, a simple enclosed bin or a well-managed open pile is usually the most straightforward starting point. If you’re really tight on space, vermicomposting is a fantastic option, but it’s a slightly different process.
Getting Started: Your Step-by-Step Compost Fertilizer Guide
Ready to make some magic happen? Let’s break down the process into simple, manageable steps. Don’t get overwhelmed; many experienced gardeners started right here!
Step 1: Choose Your Location and Bin/Pile
Location: Find a spot that’s convenient to access from your kitchen and garden. It should be on bare soil or grass if possible (to allow microbes and worms to enter and moisture to drain). Partial shade is ideal to prevent the pile from drying out too quickly in the summer heat.
Bin/Pile: Set up your chosen composting system (pile or bin). If building your own, make sure it has good airflow. For a pile, aim for at least 3x3x3 feet for effective heating. For bins, follow the manufacturer’s instructions.
Step 2: Start Layering Your Materials
The Ratio is Key: Aim for roughly a 2:1 or 3:1 ratio of browns to greens. This means for every one part of green material, you add two or three parts of brown material. This balance prevents a soggy, smelly pile and ensures good decomposition.
Layering Technique:
- Start with a base layer of coarse brown material, like twigs or straw, for drainage and airflow.
- Add a layer of “greens” (kitchen scraps, grass clippings).
- Cover the greens with a layer of “browns” (dry leaves, shredded paper). This helps retain moisture and deter pests.
- Continue alternating layers of greens and browns.
- If you have finished compost or healthy garden soil, adding a small shovel-full to your new pile can help introduce beneficial microbes to kickstart the process.
Step 3: Maintain Moisture Levels
The Sponge Test: Your compost pile should be as moist as a wrung-out sponge – damp, but not soggy. If it’s too dry, decomposition slows down. If it’s too wet, it can become anaerobic and smelly.
How to Adjust:
- Too Dry: Add water. You can use a hose or watering can, turning the pile as you go to distribute moisture evenly.
- Too Wet: Add more brown materials (dry leaves, shredded cardboard) to absorb excess moisture. Ensure good airflow by turning the pile.
Step 4: Aerate Your Compost Pile
Why Aerate? Microorganisms that break down organic matter need oxygen. Turning your compost pile introduces air, which speeds up decomposition and prevents bad odors.
How Often: Aim to turn your pile at least once every 1-4 weeks. More frequent turning will result in faster compost. You can use a garden fork or a compost aerator tool.
Turning Technique: Dig into the pile and turn the outer layers into the center, and the inner layers to the outside. This ensures all materials get a chance to decompose evenly.
Step 5: Monitor and Troubleshoot
As your compost breaks down, keep an eye on it. Here are some common issues and how to fix them:
- Smells Foul (Ammonia/Rotten Eggs): Usually means too much green material or it’s too wet. Add more browns and turn the pile thoroughly. Ensure good airflow.
- Not Heating Up: Pile is too small, too dry, or lacks enough green material. Try adding more greens and water, and ensure the pile is at least 3x3x3 feet.
- Attracting Pests (Rodents, Flies): Ensure you’re not adding meat, dairy, or oily foods. Bury kitchen scraps deep within the pile, and always cover greens with a layer of browns.
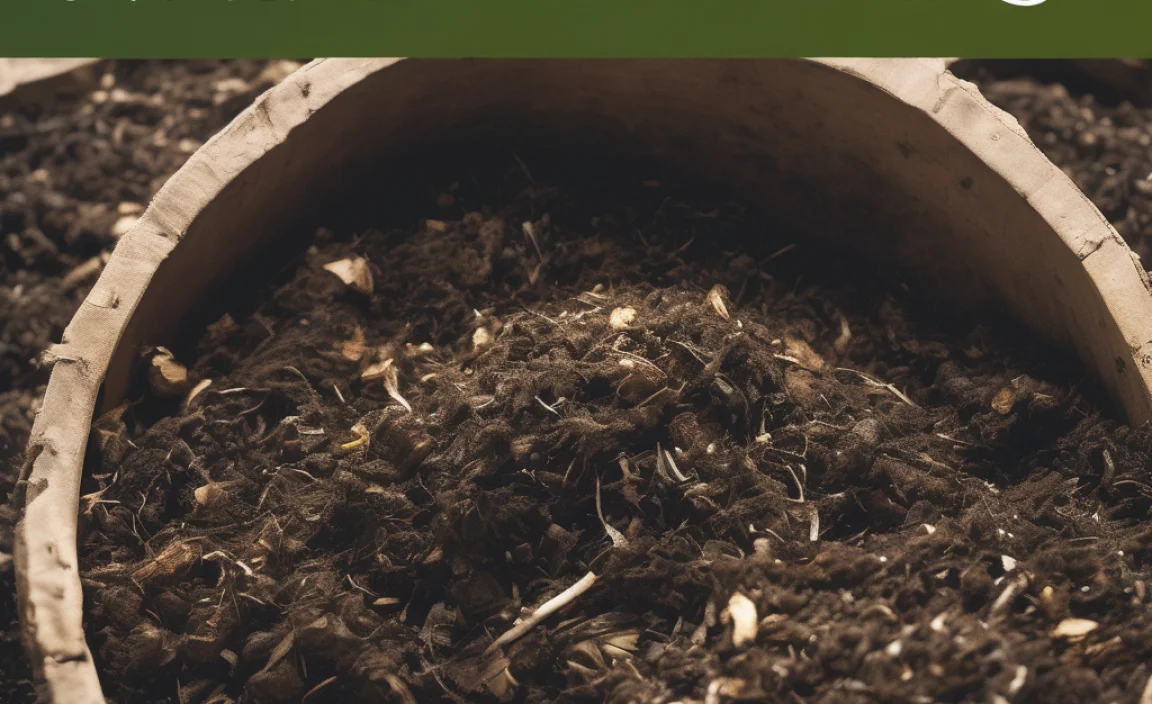
Step 6: Know When It’s Ready
Signs of Finished Compost: Compost is ready to use when it’s dark, crumbly, smells earthy (like a forest floor), and you can no longer recognize the original materials you put in. This process can take anywhere from a few months to a year, depending on your method, materials, and how often you turn it.
Using Your Homemade Compost Fertilizer
Congratulations! You’ve successfully made compost fertilizer. Now, let’s put it to work in your garden.
- As a Soil Amendment: Mix compost into planting beds before planting. Dig it into the top 6-8 inches of soil. This is excellent for preparing new garden areas or refreshing old ones.
- As a Top Dressing: Spread a 1-2 inch layer of compost around the base of established plants, shrubs, and trees. This provides a slow release of nutrients and helps retain soil moisture.
- In Potting Mixes: Mix compost with other materials like peat moss, perlite, or coco coir to create a nutrient-rich potting mix for containers and hanging baskets. A common ratio is 1 part compost, 1 part peat moss, and 1 part perlite.
- For Seed Starting: While some people use it, very young seedlings might be sensitive to its high nutrient content. It’s often best to use a finer, specially formulated seed-starting mix for the first few weeks, then transplant into soil amended with compost.
You can sift your compost if you want a finer texture for specific uses, but it’s not always necessary for general garden use.
Composting Quick Reference Table
Here’s a handy chart to help you remember the basics of what to compost and how to manage your pile.
| Item | Category | Notes |
|---|---|---|
| Fruit & Veggie Scraps | Green | Good source of nitrogen. |
| Coffee Grounds | Green | Adds nitrogen and trace minerals. |
| Grass Clippings | Green | Add in thin layers to avoid matting. |
| Leaves (dry) | Brown | Excellent source of carbon. |
| Shredded Newspaper | Brown | Use non-glossy, black and white ink. |
| Cardboard (torn) | Brown | Remove tape and labels. |
| Wood Chips/Sawdust | Brown | Use sparingly, from untreated wood. |
| Meat/Dairy/Oils | Avoid | Attracts pests, causes odors. |
| Diseased Plants | Avoid | Can spread disease. |
| Pet Waste | Avoid | Potential pathogen risk. |
Composting Troubleshooting Tips
Even with the best intentions, you might run into a snag or two. Here are some common composting problems and their solutions:
Problem: My compost smells bad.
Cause: Too much nitrogen (greens), not enough air, or too wet.
Solution: Add more “browns” (leaves, shredded cardboard), turn the pile to introduce air, and ensure good drainage. If it’s too wet, mix in dry browns.
Problem: My compost isn’t heating up.
Cause: Pile is too small, too dry, or lacks enough nitrogen (greens).
Solution: Make sure your pile is at least 3x3x3 feet. Add more “green” materials, water the pile, and turn it. A starter like a shovel-full of finished compost or soil can help.
Problem: My compost is too dry.
Cause: Not enough moisture, too much sun, or too many “browns.”
Solution: Water the pile thoroughly while turning it. Consider moving the pile to a shadier spot or covering it loosely with a tarp. Add more “green” materials.
Problem: My compost is attracting pests (flies, rodents).
Cause: Adding prohibited items like meat, dairy, or oily foods; not burying kitchen scraps well.
Solution: Strictly avoid meat, dairy, and oily items. Always bury fresh kitchen scraps deep within the pile and cover them with a layer of brown material. Ensure your bin has a secure lid.
Problem: Decomposition is too slow.
Cause: Lack of aeration, incorrect moisture levels, materials are too large, or insufficient “green” material.
Solution: Turn the pile more frequently. Ensure it’s moist but not waterlogged. Chop or shred larger items before adding them. Add more nitrogen-rich “green” materials.
External Resources for Deeper Dives
Want to learn even more? Here are some helpful resources from reputable organizations:
- EPA – Composting at Home: The U.S. Environmental Protection Agency offers comprehensive guides on composting basics, benefits, and methods. Check out their resources at epa.gov/recycle/composting-home for detailed information.
- University Extension Services: Many university cooperative extension services provide excellent, locally-tailored gardening and composting advice. A quick search for “[Your State] University Extension Composting” will likely yield valuable results. For example, the <a href="https://extension.unh.edu/

I am passionate about home engineering. I specialize in designing, installing, and maintaining heating, ventilation, and air conditioning systems. My goal is to help people stay comfortable in their homes all year long.