Are your potted plants looking a little sad? Maybe their leaves aren’t as green as they used to be, or they just aren’t growing like you hoped. It’s a super common problem for plant parents! The good news is, there’s a simple, natural fix, and it’s called compost. Think of it as a superfood for your plants!
Many store-bought potting mixes are okay, but they don’t always have that long-lasting goodness that compost provides. Plus, making your own compost or knowing how to choose the best store-bought option can save you money. This guide will walk you through everything you need to know about using compost for your potted plants, making them happier and healthier. We’ll cover what compost is, why it’s great for containers, how to make it or pick the best kind, and how to use it. Let’s dig in!
Why Compost is a Game-Changer for Potted Plants
Imagine giving your plants a delicious, nutrient-rich meal. That’s essentially what compost does! Unlike plain soil or basic potting mix, compost is packed with a buffet of goodies that your plants will absolutely love. It’s not just about feeding them; it’s about creating the best possible environment for their roots to thrive. It’s the secret ingredient that many gardeners swear by, and once you see the difference it makes, you’ll be a convert too!
The Magic Ingredients in Compost
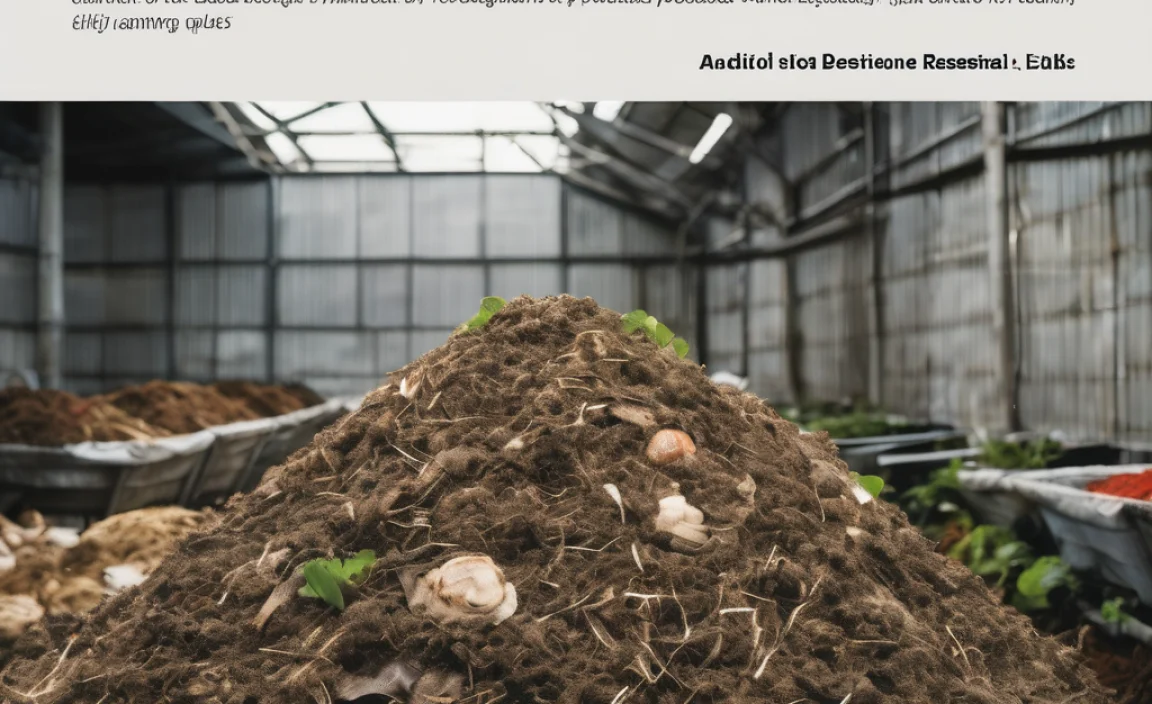
Compost is basically decomposed organic matter – think kitchen scraps, yard waste, and more – transformed into a dark, crumbly, soil-like material. This transformation process is carried out by a tiny army of microbes, worms, and other beneficial critters working tirelessly. This “black gold” is rich in:
- Nutrients: Compost slowly releases essential nutrients like nitrogen, phosphorus, and potassium, which plants need to grow strong and healthy.
- Beneficial Microbes: These tiny organisms help plants absorb nutrients, fight off diseases, and build resilience. It’s like a natural immune system booster for your plants!
- Improved Soil Structure: Even in a pot, compost helps soil drain better while also retaining just enough moisture. This is crucial for preventing root rot and ensuring roots get the air they need.
- Humic Acids: These organic compounds help further improve nutrient availability and soil structure, making everything more efficient for your plant.
Compost vs. Regular Potting Mix
While good quality potting mix is a decent start, it often lacks the complex biological activity and the slow-release nutrient power of compost. Potting mixes can sometimes be pretty sterile, meaning they don’t have those helpful microbes. They might also provide a quick boost of nutrients that washes away easily with watering. Compost, on the other hand, builds soil health over time. It’s a living, breathing soil amendment that makes a lasting difference.
For potted plants, it’s especially important because they live in a confined space. Their roots can’t spread out to find more resources. Providing them with compost ensures they have a consistent supply of what they need right in their pot. It’s like giving them a five-star meal every day!
Choosing the Best Compost for Your Potted Plants
Not all compost is created equal, and for potted plants, you want the good stuff. You have a couple of main options: making your own or buying it. Both have their pros and cons, but the key is quality and knowing what to look for.
Option 1: Buying Compost
This is the quickest and easiest route for many people. You can find compost at garden centers, nurseries, and even some hardware stores. When you’re shopping, keep these tips in mind:
- Look for “Finished” Compost: This means it’s fully decomposed and no longer smells, well, like compost (i.e., it shouldn’t smell sour or like rotten eggs). It should be dark brown and crumbly.
- Check the Ingredients: A good compost will list ingredients like composted plant material, composted manure, or worm castings. Avoid anything with synthetic fertilizers or a long list of unpronounceable chemicals.
- Consider Specialty Blends: Some brands offer compost specifically for containers or organic gardening. These can be a great choice.
- Bagged vs. Bulk: If you need a lot, bulk compost delivered might be cheaper. For just a few pots, bagged is more convenient.
A great example of high-quality bagged compost you might find is from well-regarded brands that focus on organic inputs and proper composting processes. Always read the label!
Option 2: Making Your Own Compost
While it takes a little time and effort, making your own compost is incredibly rewarding and can be very cost-effective. Plus, you know exactly what goes into it! For beginners, it’s easier than you might think.
What You’ll Need:
- A Composting Bin or Pile: This can be a simple pile in a corner of your yard, a purchased tumbling composter, or a DIY bin made from pallets. Tumbling composters are great because they’re contained and make turning easier. Check out resources from your local cooperative extension for DIY bin plans. Some universities, like Penn State Extension, offer excellent guides on building and managing compost bins.
- “Greens” (Nitrogen-Rich Materials): Fruit and vegetable scraps, coffee grounds, tea bags, grass clippings, and fresh plant trimmings.
- “Browns” (Carbon-Rich Materials): Dried leaves, shredded newspaper or cardboard (uncoated), straw, wood chips, and twigs.
- Water: For moisture.
- A Pitchfork or Shovel: For turning.
The Basic Process:
- Layering: Start with a layer of browns (like twigs for aeration), then add greens, then more browns. Aim for a good mix – roughly two to three parts browns to one part greens.
- Moisture: Your compost pile should be about as damp as a wrung-out sponge. If it’s too dry, add water. If it’s too wet, add more browns.
- Aeration: Turn your compost pile regularly (every week or two) with a pitchfork or shovel. This introduces oxygen, which is vital for the microbes and speeds up decomposition. Tumbling composters make this step simpler.
- Patience: Depending on the method, temperature, and materials, compost can take anywhere from a few months to a year to be ready.
Once it’s ready, it should look and smell like rich, dark earth. You’ll be able to sift out any larger, un-decomposed pieces to add back to your next batch.
How to Use Compost in Potted Plants
Using compost effectively in pots is key to maximizing its benefits. You can use it in a few different ways, depending on your plant’s needs and whether you’re potting up a new plant or refreshing an existing one.
1. As a Soil Amendment for New Plants
When you’re potting a new plant or repotting an existing one, this is the perfect time to introduce compost. You’ll want to mix it with your potting soil. A good starting ratio is:
- 50% Potting Soil: This provides drainage and aeration.
- 25% Compost: This adds nutrients and beneficial microbes.
- 25% Other Amendments (Optional): This could include perlite or vermiculite for extra drainage and aeration, or coco coir for moisture retention.
Simply combine these ingredients in a large container or wheelbarrow, mix thoroughly, and then use this blend to pot your plant. Make sure your potting soil is a quality one designed for containers, as garden soil can compact too much in pots.
2. Top-Dressing Existing Plants
This is a super easy way to give your potted plants a nutrient boost throughout the growing season without repotting them. Top-dressing is simply adding a layer of compost to the surface of the soil.
- How to Do It: Gently remove about an inch of the old soil from the top of the pot. Then, add a layer of finished compost. Gently water it in.
- When to Do It: This is best done in the spring when plants start actively growing, and you can repeat it every few months if needed.
- What to Use: This method works best with well-finished, fine compost, like worm castings, to avoid adding too much bulk or potential weed seeds.
Avoid this method if your plant is already suffering from overwatering, as adding more organic matter can hold more moisture.
3. Compost Tea: A Liquid Boost
For a quick nutrient shot and a dose of beneficial microbes delivered directly to the roots, consider compost tea. It’s like a nutrient-packed herbal tea for your plants!
Simple Compost Tea Recipe:
- Gather Materials: You’ll need a bucket, finished compost (worm castings are excellent for tea), an aquarium pump with an airstone, and water.
- Mix: Fill your bucket about a third full with water. Add a generous amount of compost (e.g., a couple of shovelfuls or a pound of worm castings).
- Aerate: Place the airstone in the bucket and turn on the pump. Let it bubble for 24-48 hours. This keeps the microbes alive and active.
- Strain and Use: Strain the liquid to remove solid bits (you can add these solids back to your compost pile). Dilute the tea with more water until it’s the color of weak tea.
- Water Your Plants: Use this diluted compost tea to water your potted plants. You can also use it as a foliar spray, misting the leaves.
Compost tea is a fantastic way to give your plants an immediate boost and introduce beneficial microbes. For more advanced brewing methods, look to resources like University of California Agriculture and Natural Resources for detailed instructions and best practices.
What Kind of Compost is Best for Different Plants?
While generally beneficial, the “best” compost or how you use it might vary slightly depending on what you’re growing.
Vegetables and Herbs
These plants are often hungry and benefit from nutrient-rich compost. A mix of well-rotted composted manure, kitchen scraps, and yard waste is ideal. For vegetables and herbs, you can use a higher percentage of compost in your potting mix (up to 50%) if you have excellent drainage.
Key for Veggies & Herbs: Focus on compost that contains a good balance of nitrogen for leafy growth and phosphorus for flowering and fruiting.
Flowering Plants
Flowering plants need phosphorus to produce blooms. Compost made with a good mix of greens and browns, especially some that might have been higher in phosphorus (like certain manures, though ensure it’s well composted to avoid burning roots), can be beneficial. Compost tea can be particularly good for encouraging blooms.
Key for Flowers: Ensure good drainage alongside nutrient boost. Look for compost that helps retain a good balance of moisture without becoming waterlogged.
Fruiting Plants (Tomatoes, Peppers, etc.)
Similar to vegetables, these plants require a steady supply of nutrients. Potassium is also important for fruit quality. A compost with a diverse range of organic materials will provide this broad spectrum of nutrients.
Key for Fruiting Plants: Consistent feeding is important. Top-dressing or using compost in your potting mix will support continuous fruit production.
Succulents and Cacti
These plants are very sensitive to overwatering and require excellent drainage. While they still benefit from organic matter, the proportion of compost in their potting mix should be much lower. They thrive in gritty, fast-draining mixes.
Key for Succulents & Cacti: Use compost sparingly, perhaps 10-20% mixed with a very gritty, sandy potting mix. The compost provides a few nutrients but the main focus is drainage.
Seed Starting
For delicate seedlings, you want a fine, nearly sterile mix. While fully composted compost can be used in very small amounts (around 10-20%) in a seed-starting mix, it’s often best to use a specific seed-starting mix. Once seedlings have their first true leaves, you can gradually introduce them to mixes with more compost.
Key for Seedlings: Keep it simple and fine. Avoid “hot” compost or very fresh compost that might burn seedlings. Fine worm castings are a good choice if you want to add compost.
Tips for Success with Compost in Pots
Using compost in containers is mostly straightforward, but a few expert tips can make all the difference for your plants!
- Start with Quality: Whether buying or making, ensure your compost is fully finished. Unfinished compost can tie up nitrogen, attract pests, or even burn plant roots.
- Drainage is King: This is the MOST important factor for potted plants. Always ensure your potting mix (with or without compost) has excellent drainage. If your compost seems dense, mix it with perlite, pumice, or coarse sand.
- Don’t Overdo It: Especially for succulents and cacti, too much compost can lead to overly wet soil and root rot. Follow the recommended ratios for different plant types.
- Weed Seed Caution: If you’re making your own compost, especially if you don’t maintain high temperatures, you might introduce weed seeds. Sift your finished compost finely and be prepared to pull any stray sprouts.
- Observe Your Plants: Your plants will tell you if something is wrong. Yellowing leaves could mean a nutrient deficiency (add more compost or a balanced fertilizer) or overwatering (improve drainage).
- Compost Helps with Watering: Because compost improves soil structure, it helps the soil hold onto the right amount of moisture. You might find you need to water slightly less often than with a basic potting mix, but always check the soil first.
Composting Materials Quick Guide
It’s helpful to know what goes into your compost bin. Here’s a quick breakdown:
| “Greens” (Nitrogen) | “Browns” (Carbon) | Avoid! |
|---|---|---|
| Fruit scraps | Dried leaves | Meat, dairy, oils, fats |
| Vegetable scraps | Shredded newspaper (uncoated) | Diseased plant material |
| Coffee grounds | Shredded cardboard (uncoated) | Weeds that have gone to seed |
| Tea bags | Straw | Pet waste (dog/cat feces) |
| Grass clippings | Twigs and small branches | Chemically treated wood |
| Fresh plant trimmings | Sawdust (use sparingly) | Coal or charcoal ash |
Remember, the goal is a good balance. “Greens” provide the nitrogen that microbes need to work, while “Browns” provide the carbon for energy and help keep the pile airy. A good ratio, as mentioned before, is roughly 2-3 parts Browns to 1 part Greens by volume.
Troubleshooting Common Compost Issues
Don’t get discouraged if you run into a few hiccups. Here’s how to fix common compost problems:
- Smells Bad (Ammonia/Rotten Eggs): This usually means the pile is too wet or has too many “greens.” Solution: Add more “browns” (like dried leaves or shredded cardboard) to absorb moisture and balance the nitrogen. Turn the pile to aerate it.
- Not Heating Up/Decomposing Slowly: The pile might be too dry, too small, or lack enough “greens.” Solution: Add water until it’s damp as a wrung-out sponge. Add more “greens” to boost nitrogen. Ensure your pile is at least 3x3x3 feet if you’re not using a tumbler. Turn it to mix materials and encourage microbial activity.
- Attracting Pests (Flies, Rodents): This often happens if you add meat, dairy, or oily foods, or if the pile is too wet and the material isn’t covered. Solution: Bury food scraps deep within the pile. Avoid adding forbidden items. Ensure a good balance of greens and browns and turn regularly. A closed bin can help deter larger pests.
- Pile is Too Dry: Decomposition slows to a halt when it’s too dry. Solution: Water the pile thoroughly, like a wrung-out sponge, and ensure you mix in moisture when you turn it.
Most composting issues are simply a matter of adjusting the balance of materials, moisture, or aeration. It’s

I am passionate about home engineering. I specialize in designing, installing, and maintaining heating, ventilation, and air conditioning systems. My goal is to help people stay comfortable in their homes all year long.