Dreaming of a greener lifestyle but stuck in a small apartment? You might think composting is out of reach. It’s easy to feel like you need a big backyard and a huge pile of scraps. But what if I told you that you can absolutely compost, even with limited space? It’s more achievable than you think! We’ll break down simple, apartment-friendly ways to turn your kitchen waste into valuable compost. Get ready to feel good about reducing waste and maybe even growing a little something!
Composting for Small Apartments: Genius Solutions
Hey everyone, Troy D Harn here from TopChooser! I get it. The thought of composting can bring up images of vast gardens and overflowing bins. For those of us living in apartments, it can feel like a distant dream. But the truth is, you don’t need a lot of space to make a big difference. Composting is all about breaking down organic materials, and you can do it right in your kitchen or on your balcony. It’s a fantastic way to cut down on landfill waste and create nutrient-rich food for plants. Let’s dive into some clever ways you can compost in even the smallest of spaces.
Why Compost in an Apartment?
Even if you don’t have a sprawling garden, composting for small apartments offers a heap of benefits. It’s a proactive step towards a more sustainable lifestyle. Here’s why it’s worth considering:
- Reduces Waste: A significant portion of household waste is food scraps and other organic materials that can be composted. Keeping this out of landfills means less methane gas production, a potent greenhouse gas.
- Creates Nutrient-Rich Soil: Compost is often called “black gold” by gardeners. It’s an excellent natural fertilizer that improves soil structure, water retention, and provides essential nutrients for plants.
- Saves Money: If you’re a plant parent, buying potting soil and fertilizers can add up. Making your own compost can significantly reduce these costs.
- Connects You to Nature: It’s a rewarding process to see your kitchen scraps transform into something beneficial for plant life.
- Educational: It’s a great way to learn about the natural decomposition process and understand where our food comes from and where it goes.
Common Challenges for Apartment Composting (and How to Beat Them!)
Living in an apartment presents unique challenges when it comes to composting. But don’t let these deter you – they are totally manageable with the right approach.
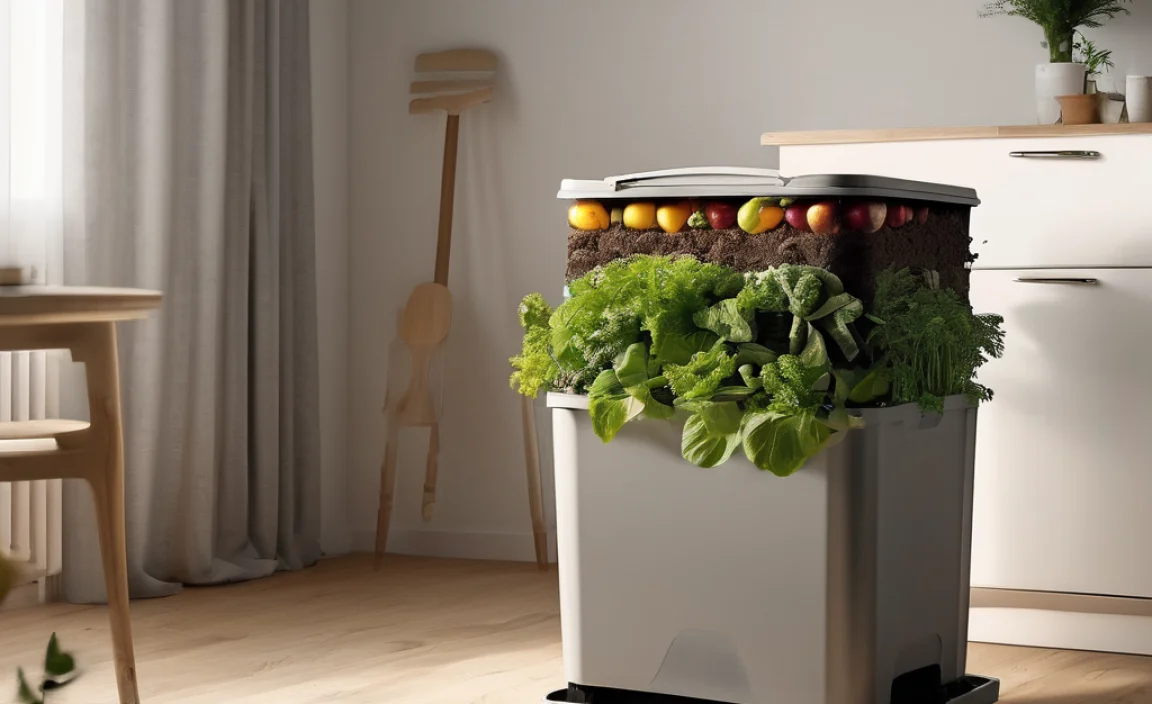
- Limited Space: This is the big one! Traditional compost piles are simply not feasible. However, there are compact composting systems designed specifically for indoor or small-space use.
- Odors: The fear of smelly compost is a real one. However, a properly managed composting system, whether indoor or outdoor, should not smell bad. Bad smells usually indicate an imbalance (too much wet stuff, not enough air).
- Pests: Nobody wants uninvited guests. Again, proper containment, sealing, and managing the “greens” and “browns” correctly will deter pests.
- Moisture Control: Finding the right moisture balance can be tricky, especially in a small, enclosed system. Too wet, and it gets slimy and smelly; too dry, and the microbes can’t do their work.
- Disposal of Finished Compost: If you don’t have a lot of plants, you might wonder what to do with your finished compost.
The Top Solutions for Apartment Composting
Now for the good stuff! Here are the most effective and beginner-friendly composting methods for apartment dwellers.
1. Worm Composting (Vermicomposting)
This is perhaps the most popular and efficient method for apartment composting. Worm bins are compact, relatively odor-free when managed correctly, and can produce high-quality compost and a liquid fertilizer called “worm tea.”
How it works: Specific types of worms, like Red Wigglers (Eisenia fetida), do the heavy lifting. They eat your kitchen scraps and excrete nutrient-rich castings – your compost!
What you’ll need:
- A Worm Bin: You can buy a pre-made stacking worm bin system or create your own using plastic storage totes. Look for bins with good ventilation. A common DIY setup involves two stacked totes: the top one with holes drilled for drainage and to allow worms to migrate, and the bottom one to collect “worm tea.” You can find great DIY guides on university extension websites, like those from the EPA, which often have sections on vermicomposting.
- Bedding: This is what the worms live in. Good bedding materials include shredded newspaper (avoid glossy pages), cardboard, coconut coir, or peat moss. It needs to be moist, like a wrung-out sponge.
- Red Wiggler Worms: You can typically order these online from specialized worm farms. Don’t use earthworms from your garden, as they need different conditions.
- Kitchen Scraps: This is the worms’ food.
What worms love (and hate):
| Worm Food (Greens) | Things to Avoid (or give sparingly) |
|---|---|
| Fruit and vegetable scraps (peels, cores, leaves) | Meat, fish, dairy products |
| Coffee grounds and tea bags (paper part) | Oily or greasy foods |
| Crushed eggshells (excellent grit and calcium) | Spicy foods (chili peppers) |
| Plain pasta and rice (in moderation) | Citrus and onion family (garlic, leeks) in large quantities |
| Paper products like plain paper towels and napkins | Diseased plants |
Getting Started with Worm Composting:
- Prepare the Bin: If DIYing, drill drainage holes in the lid and bottom of one tote and air holes in the sides of both. Place the bottom tote as a collection tray.
- Add Bedding: Moisten your bedding material (shredded paper, coir) until it’s like a damp sponge. Fill the top tote about halfway.
- Introduce the Worms: Gently place your Red Wigglers on top of the moist bedding. They will burrow down. Let them acclimate for a day or two before feeding.
- Start Feeding: Bury small amounts of kitchen scraps (chopped up is best) under the bedding in one corner of the bin. Avoid overfeeding, especially at first.
- Harvesting: After a few months, you’ll start seeing dark, crumbly material (worm castings). You can harvest by either migrating the worms to one side with fresh bedding or by “dump and sort” method.
2. Bokashi Composting
Bokashi is an anaerobic (oxygen-free) fermentation process that uses a special “Effective Microorganism” (EM) mixture. It can handle all food scraps, including meat and dairy, which are typically avoided in other composting methods. It doesn’t produce finished compost directly but rather pre-compost that needs to be buried or added to another compost system.
How it works: You layer food scraps with a Bokashi bran mixture in an airtight container. The microbes ferment the waste, pickling it rather than decomposing it right away.
What you’ll need:
- Bokashi Bin: These are specialized airtight buckets with a spigot at the bottom to drain off the liquid (Bokashi tea). You can buy them online or make your own with two buckets, one fitting inside the other snugly, with a lid.
- Bokashi Bran: This is a grain or sawdust inoculated with the specific microbes. You can buy this or make your own if you’re feeling adventurous, but buying is often easier for beginners.
- Kitchen Scraps: All food waste can be used.
Getting Started with Bokashi Composting:
- Layering: Add a layer of food scraps to the bin. Sprinkle a tablespoon or two of Bokashi bran over the scraps.
- Pressing: Press down the scraps to remove air. This is crucial for anaerobic fermentation.
- Airtight Seal: Close the lid tightly.
- Drain the Liquid: Every few days, drain the “Bokashi tea” from the spigot. This liquid is a potent fertilizer when diluted with water (about 1:100 ratio).
- Full Bin: Once the bin is full, let it sit sealed for another two weeks to complete fermentation.
- Bury or Further Compost: The fermented material is not finished compost. It needs to be buried in soil (in a large planter, community garden, or a friend’s garden) or added to a traditional compost bin. The microbes continue to break it down in the soil.
3. Electric Composters (Food Cyclers)
These are the high-tech answer to small-space composting. Electric composters use heat, aeration, and grinding to dehydrate and significantly reduce the volume of your food scraps in a matter of hours. They don’t produce traditional compost but a dry, nutrient-dense amendment that can be added to soil.
How it works: You put your food scraps into the machine, close the lid, and press a button. It runs a cycle, breaking down and drying the waste.
What you’ll need:
- An Electric Composter: Brands like Lomi, Vitamix FoodCycler, and others are available. They vary in size and features.
- Food Scraps: Most models can handle all food waste, including meat, dairy, and bones.
Pros and Cons of Electric Composters:
| Pros | Cons |
|---|---|
| Fast results (hours, not weeks/months) | Higher initial cost |
| Handles all food waste, including meat and dairy | Requires electricity/energy use |
| Very compact and kitchen-counter friendly | The end product is a dehydrated amendment, not biologically active compost in the traditional sense |
| Minimal odor | Can be noisy during operation |
| Easy to use | Requires periodic cleaning of filters/parts |
Getting Started:
- Plug it in.
- Add your food scraps.
- Start the cycle.
- Empty the dried material.
The dehydrated output is roughly 90% smaller than the original waste and can be mixed into potting soil or added to outdoor compost bins. It works well as a soil additive, providing nitrogen and other nutrients. For more information on reducing food waste, the EPA offers great resources regarding home composting and waste reduction strategies.
4. Small-Scale Outdoor Composting (Balcony/Patio)
If you have a small balcony or patio, you might be able to employ a small-scale outdoor composting bin. These are typically enclosed, rotomolded plastic bins designed to be compact and manage odor and pests better than open piles.
How it works: These bins work on the same principle as traditional tumbling composters or stationary bins but are much smaller. You add your “greens” (kitchen scraps) and “browns” (dry leaves, shredded paper) and turn them periodically.
What you’ll need:
- A Small Compost Bin: Look for “balcony composters” or “tumbling composters” designed for small spaces. Some are single chambers, while others are tumblers that make turning easier.
- Greens: Kitchen scraps like fruit and vegetable peels, coffee grounds.
- Browns: Dry leaves, shredded cardboard or newspaper, sawdust (from untreated wood). A good ratio of browns to greens is important to avoid sogginess and smell. Aim for roughly 2-3 parts browns to 1 part greens.
Getting Started with Balcony Composting:
- Set up your bin: Place it on a level surface on your balcony, ideally in a spot that gets some sun but not scorching heat all day.
- Add a base layer: Start with a layer of browns for drainage and aeration.
- Layer Greens and Browns: Add kitchen scraps (greens) and cover them thoroughly with browns.
- Turn Regularly: Use a compost aerator tool, small shovel, or the tumbler mechanism to mix the contents at least once a week.
- Monitor Moisture: The contents should be damp, like a wrung-out sponge. Add water if too dry, or more browns if too wet.
What to Compost and What NOT to Compost
This is a crucial part of successful composting, no matter the method. Keeping your compost balanced prevents odors and pests.
Generally Compostable Materials (Greens & Browns)
Think of these as your ingredients. You need a mix of nitrogen-rich “greens” and carbon-rich “browns.”
- Greens (Nitrogen-rich):
- Fruit and vegetable scraps
- Coffee grounds and filters
- Tea bags (remove staples)
- Eggshells (crushed)
- Grass clippings (in moderation, can get matted)
- Plant trimmings
- Browns (Carbon-rich):
- Dry leaves
- Shredded newspaper (not glossy)
- Shredded cardboard
- Paper towels and napkins (unsoiled by grease or chemicals)
- Sawdust (from untreated wood)
- Straw or hay
Materials to Avoid (Especially in Apartment Systems)
These can cause odors, attract pests, or introduce pathogens.
- Meat, fish, and bones (unless using Bokashi or electric systems)
- Dairy products (unless using Bokashi or electric systems)
- Oily or greasy foods
- Diseased plants or weeds that have gone to seed
- Pet waste (dog, cat feces – can contain harmful pathogens)
- Chemically treated wood or yard waste
- Glossy or heavily printed paper/cardboard
- Synthetic materials
Troubleshooting Common Apartment Composting Issues
Even with the best intentions, you might run into a hiccup. Here’s how to fix common problems:
- Smelly Compost: This usually means too much nitrogen (greens) or not enough air.
- Solution: Add more browns (shredded paper, leaves) to absorb moisture and balance the carbon-to-nitrogen ratio. Ensure your bin has adequate ventilation. For worm bins, check if you’re overfeeding or if the bedding is too wet.
- Too Wet/Slimy: Excess moisture.
- Solution: Add more browns to absorb moisture. If using a worm bin or Bokashi, ensure drainage holes are clear.
- Too Dry: Composting microbes need moisture to work.
- Solution: Lightly spray with water. For worm bins, the bedding might be too dry.
- Pests (Fruit Flies, Gnats): Usually attracted by exposed food scraps.
- Solution: Ensure food scraps are always covered with bedding or browns. For worm bins, bury scraps deeper and avoid overfeeding. Electric composters and Bokashi bins, being sealed, are generally pest-proof.
- Worms Trying to Escape: This can happen if the bin is too wet, too dry, too hot, too cold, or if there’s something in the food causing them distress (like too much citrus).
- Solution: Check and adjust moisture, temperature, and food inputs. Ensure the bin has proper airflow.
What to Do With Your Finished Compost
Hooray, you’ve made compost! Now what?
- Houseplants: Mix a ratio of 1 part compost to 3-4 parts potting soil. This adds vital nutrients and improves drainage.
.lwrp.link-whisper-related-posts{
margin-top: 40px;
margin-bottom: 30px;
}
.lwrp .lwrp-title{
}.lwrp .lwrp-description{
}
.lwrp .lwrp-list-container{
}
.lwrp .lwrp-list-multi-container{
display: flex;
}
.lwrp .lwrp-list-double{
width: 48%;
}
.lwrp .lwrp-list-triple{
width: 32%;
}
.lwrp .lwrp-list-row-container{
display: flex;
justify-content: space-between;
}
.lwrp .lwrp-list-row-container .lwrp-list-item{
width: calc(25% – 20px);
}
.lwrp .lwrp-list-item:not(.lwrp-no-posts-message-item){
max-width: 150px;
}
.lwrp .lwrp-list-item img{
max-width: 100%;
height: auto;
object-fit: cover;
aspect-ratio: 1 / 1;
}
.lwrp .lwrp-list-item.lwrp-empty-list-item{
background: initial !important;
}
.lwrp .lwrp-list-item .lwrp-list-link .lwrp-list-link-title-text,
.lwrp .lwrp-list-item .lwrp-list-no-posts-message{
}@media screen and (max-width: 480px) {
.lwrp.link-whisper-related-posts{
}
.lwrp .lwrp-title{
}.lwrp .lwrp-description{
}
.lwrp .lwrp-list-multi-container{
flex-direction: column;
}
.lwrp .lwrp-list-multi-container ul.lwrp-list{
margin-top: 0px;
margin-bottom: 0px;
padding-top: 0px;
padding-bottom: 0px;
}
.lwrp .lwrp-list-double,
.lwrp .lwrp-list-triple{
width: 100%;
}
.lwrp .lwrp-list-row-container{
justify-content: initial;
flex-direction: column;
}
.lwrp .lwrp-list-row-container .lwrp-list-item{
width: 100%;
}
.lwrp .lwrp-list-item:not(.lwrp-no-posts-message-item){
max-width: initial;
}
.lwrp .lwrp-list-item .lwrp-list-link .lwrp-list-link-title-text,
.lwrp .lwrp-list-item .lwrp-list-no-posts-message{
};
}

I am passionate about home engineering. I specialize in designing, installing, and maintaining heating, ventilation, and air conditioning systems. My goal is to help people stay comfortable in their homes all year long.