Hey there! Ever feel like your kitchen scraps are just… going to waste? You’re not alone. Tossing food scraps into the trash feels like a missed opportunity to help your garden and the planet. But the good news is, you don’t need a huge backyard to compost! Indoor composting is totally doable, even in a Canadian apartment or small home. I’m Troy D Harn from TopChooser, and I’m here to walk you through making your own compost right inside your home, step-by-step. Let’s transform those scraps into something amazing!
Why Compost Indoors in Canada?
Composting is fantastic for your garden, giving your plants the nutrients they crave. But for us Canadians, especially those in apartments or smaller homes, starting a compost pile outside can seem impossible. The cold winters can be tough on outdoor compost, and space is often limited. That’s where indoor composting shines! It lets you reduce food waste, create valuable fertilizer for your houseplants or patio garden, and do your bit for the environment – all year round, no matter the weather outside.
Plus, think about this: a significant chunk of what we throw away is organic material that could be composted. Diverting this from landfills reduces methane gas, a potent greenhouse gas. Indoor composting makes that easy and accessible. It’s a win-win for your home and the Earth.
Choosing Your Indoor Composting Method
There are a few popular ways to compost indoors, and the best one for you depends on your space, how much waste you generate, and what you’re comfortable with. Here’s a look at the most common types:
1. Vermicomposting (Worm Composting)
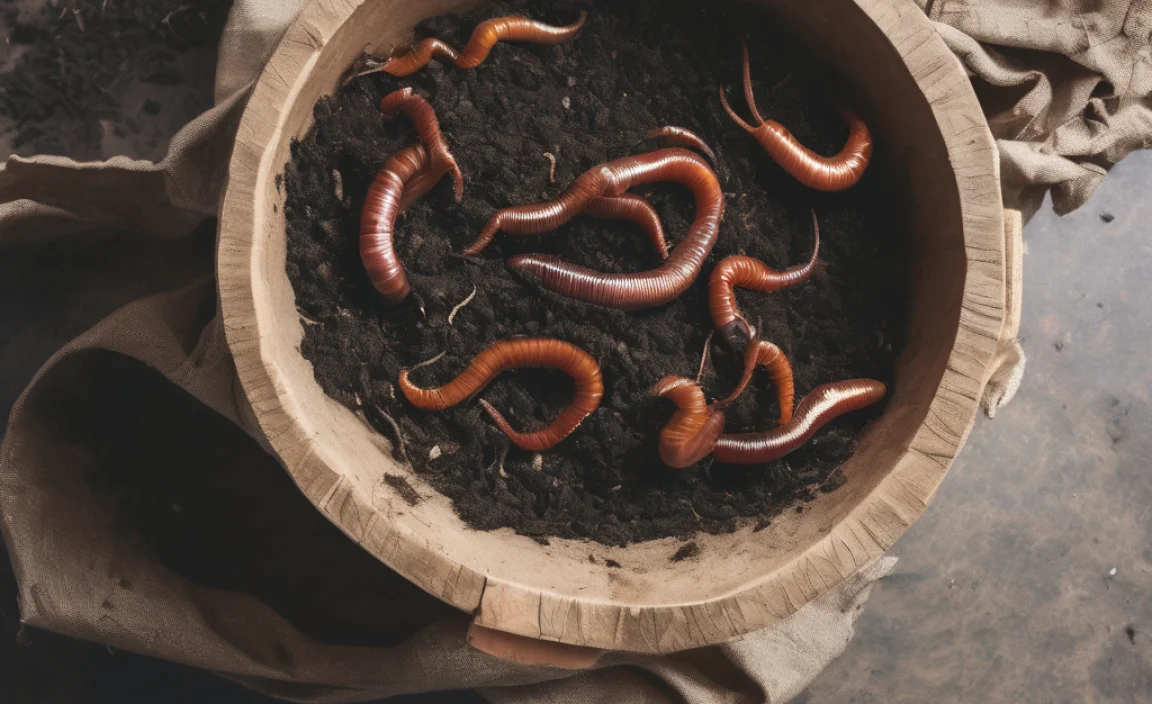
This is probably the most well-known indoor composting method. You use special composting worms (like Red Wigglers, not earthworms from your garden!) to eat your food scraps and produce nutrient-rich worm castings – often called “worm poop,” which is amazing for your plants.
Pros:
- Produces high-quality compost (worm castings) very quickly.
- Relatively odorless if managed properly.
- Worms are fascinating to watch!
- Great for small spaces.
Cons:
- Requires a bit more attention to temperature and moisture.
- Some people are squeamish about worms.
- Can’t handle large amounts of food scraps at once.
- Need to purchase composting worms.
Ideal For: Small households, apartment dwellers, and those who want nutrient-dense fertilizer.
2. Bokashi Composting
Bokashi is a fermentation process. You use a special Bokashi bin and an “activator” (a mixture of bran and microbes). It pickles your food scraps, breaking them down anaerobically (without oxygen). It can handle almost all food scraps, including meat and dairy, which are generally avoided in other composting methods.
Pros:
- Can compost meat, dairy, and oily foods.
- Quick, with a fermentation period of about 2 weeks.
- Produces a nutrient-rich liquid “tea” that can be diluted for fertilizer.
- Minimal odor during the fermentation process.
- Space-efficient.
Cons:
- The fermented material is not finished compost; it needs to be buried in soil (in a garden, planters, or even a larger compost bin) to fully decompose.
- Requires purchasing the Bokashi bran/activator.
- Can have a slightly sour, pickled smell when you open the bin.
Ideal For: Those who want to compost all food scraps, including meat and dairy, and have a place to finish the decomposition process.
3. Electric Composter/Food Recycler
These are countertop appliances that use heat and aeration to dehydrate and break down food scraps into a dry, soil-like material in a matter of hours. They are very convenient and can significantly reduce food waste volume.
Pros:
- Extremely fast processing time.
- Can handle a wide variety of food scraps.
- Reduces waste volume by up to 90%.
- Very little odour.
- Simple to operate – just load and press a button.
Cons:
- High upfront cost for the appliance.
- Uses electricity, so there’s an ongoing energy cost.
- The end product is not true compost in the biological sense; it’s more like dehydrated food matter that can be mixed into soil.
- Requires regular cleaning.
Ideal For: Busy individuals or families who want a quick, odour-free solution and don’t mind the initial investment.
Getting Started with Vermicomposting (Worm Composting)
This is a fantastic starting point for many beginners. It’s rewarding to see your worms turn scraps into black gold!
What You’ll Need for Vermicomposting:
- A Worm Bin: You can buy a pre-made one or make your own. Aim for a bin approx. 10-20 gallons (35-75 litres). Common DIY options include plastic storage bins with holes drilled into them for ventilation and drainage.
- Composting Worms: Red Wigglers (Eisenia fetida) are the best for this. You can usually buy them online from specialized worm farms. You’ll need about 1/2 to 1 pound (about 250-500g) to start.
- Bedding: This is what the worms live in. Shredded newspaper (avoid glossy paper), cardboard, coconut coir, or peat moss work well. It needs to be moist, like a wrung-out sponge.
- Food Scraps: Your kitchen waste! (More on what to feed them below).
- A Small Shovel or Trowel: For moving the bedding and castings.
- A Spray Bottle: For keeping the bedding moist.
- Optional: Worm Castings Tea Collector: If your bin has a spigot, you can collect the liquid that drains off.
Step-by-Step Guide to Setting Up Your Worm Bin:
- Prepare the Bin: If you’re making your own, drill plenty of small holes (about 1/4-inch or 6mm) around the sides and bottom for air circulation and drainage. Also, drill some holes in the lid. If you have a pre-made bin, check that it has good ventilation.
- Add Bedding: Shred some newspaper or cardboard into thin strips. Moisten it thoroughly by soaking it in water and then squeezing out the excess water until it feels like a damp sponge. Fill the bin about half to two-thirds full with this moist bedding. Fluff it up so there are air pockets.
- Introduce the Worms: Gently place your composting worms onto the surface of the bedding. Leave the lid off for about 30 minutes to an hour to allow them to settle in. They prefer darkness, so they’ll burrow down.
- Feed Your Worms: Bury a small amount of food scraps (see “What to Feed Your Worms” below) a few inches down into the bedding, away from the edges. This encourages them to forage. Start with just a cup or two of scraps.
- Moisture Check: The bedding should always feel like a wrung-out sponge. If it seems dry, lightly mist it with water from your spray bottle. If it’s too wet, add more dry bedding.
- Close the Lid: Put the lid on your bin. Ensure there’s enough ventilation.
- Placement: Find a cool, dark spot for your bin. Worms prefer temperatures between 55-77°F (13-25°C). A closet, under the sink (if it’s not too warm), or a basement corner are good options. Avoid direct sunlight or places near heat sources.
What Can You Feed Worms? (The “Yes” List)
Worms are vegetarians! Stick to these:
- Fruit scraps (apple cores, banana peels, citrus peels in moderation since they can be acidic)
- Vegetable scraps (carrot tops, lettuce leaves, onion skins in moderation, potato peels)
- Coffee grounds and paper filters
- Tea bags (remove staples)
- Crushed eggshells (washed and dried)
- Cooked pasta, rice, or bread (in small amounts)
What to Avoid Feeding Worms (The “No” List):
- Meat, fish, or bones
- Dairy products (cheese, milk, yogurt)
- Oily foods or grease
- Spicy foods
- Citrus peels in large quantities (can make the bin too acidic)
- Diseased plants
- Pet waste (cat or dog feces)
- Glossy or coloured paper/cardboard
How to Feed and Maintain Your Worm Bin:
- Start Small: Always begin with a small amount of food scraps. You can gradually increase the amount as your worm population grows and you see they are processing it effectively. A general rule is that worms can eat about half their weight per day.
- Bury the Food: Don’t just dump scraps on top. Dig a little hole in the bedding and bury the food. This helps prevent odours and fruit flies.
- Rotate Feeding Spots: In a few days, when you add more food, bury it in a different spot in the bin. This way, the worms will process scraps more evenly throughout the bin.
- Chop It Up: Smaller pieces of food break down faster. Chop up larger scraps like peels or cores.
- Observe: Regularly check the moisture level and the worms’ activity. If they are trying to escape, it might mean the bin is too wet, too dry, too acidic, or there’s too much food.
- Harvesting: After 3-6 months, you’ll start seeing a significant amount of dark, crumbly worm castings. To harvest, you can gently push the finished castings to one side and add fresh bedding and food to the other, let the worms migrate, or gently sift them out.
Bokashi Composting: Fermenting Your Scraps
Bokashi is like a magical pickling process for your food waste. It’s surprisingly simple and great for busy households that want to compost everything.
What You’ll Need for Bokashi Composting:
- Bokashi Bin(s): These are airtight containers, usually with a spigot at the bottom to drain liquid. You can buy them or make your own by using two identical airtight buckets, one inside the other, with the top one having holes drilled in the bottom.
- Bokashi Activating Bran: This is a mixture of wheat or rice bran inoculated with effective microorganisms (EM). You can buy this online or at some garden centres.
- Food Scraps: Bokashi can handle almost everything.
- A Small Scoop or Cup: For the bran.
- A Container to Collect Drip Liquid: To catch the “Bokashi tea.”
- A Place to Bury the Fermented Scraps: This is crucial for the final decomposition stage.
Step-by-Step Guide to Bokashi Composting:
- Layering is Key: Start by adding a layer of food scraps to your Bokashi bin. Try to chop larger items into smaller pieces.
- Add the Bran: Sprinkle a generous layer of Bokashi bran over the food scraps. The general recommendation is about 1-2 tablespoons of bran per layer of food scraps, but follow the instructions on your specific bokashi product.
- Press Down: Press the food scraps down firmly to remove air. This is important for the fermentation process.
- Seal the Bin: Close the lid tightly to ensure an airtight seal. Airtight is the goal!
- Repeat: Continue adding food scraps, bran, and pressing them down each time.
- Drain the Liquid: Regularly (every 1-3 days) open the spigot at the bottom to drain off the “Bokashi tea.” This liquid is full of beneficial microbes and nutrients. Dilute it with water (about 1:100 ratio – 1 part tea to 100 parts water) and use it to water your plants, or pour it down drains to help keep them clear.
- End of Fermentation: Once the bin is full, do not add any more food. Ensure the lid is sealed tightly and leave it to ferment for at least 2 weeks. During this time, the microbes do their work, pickling the food.
- Bury the Fermented Scraps: After the 2-week fermentation, the contents will look much the same but will have a pleasant, slightly pickled smell. This is NOT finished compost yet. You need to bury this material in soil. You can dig it into garden beds, pots, or even a larger outdoor compost bin. It will fully decompose in the soil within another 2-4 weeks.
What Bokashi Can Handle:
- All fruit and vegetable scraps
- Meat, fish, and bones
- Dairy products
- Cooked foods
- Coffee grounds and tea bags
- Eggshells
- Small amounts of oil/grease
What to Avoid (Generally):
- Large amounts of liquid (like soup)
- Excessive amounts of oil
- Lots of paper or cardboard (this method is for food scraps)
- Non-organic materials (plastics, metal, glass – obviously!)
Electric Composter/Food Recycler Quick Guide
These appliances are the definition of modern convenience for composting.
How They Work:
You simply toss your food scraps into the bucket inside the machine. Close the lid, press a button, and the machine goes to work. It uses gentle heat and aeration to dehydrate and break down the food waste over several hours (typically 4-8 hours). The noise level is usually comparable to a dishwasher.
What They Produce:
The end result is a dry, odourless, soil-like material. This isn’t technically “compost” in the biological, microbial sense because the intense heat kills off a lot of the beneficial microorganisms. However, it’s an excellent soil amendment that adds organic matter and some nutrients back into your soil, helping to improve soil structure and water retention. Think of it as a concentrated food additive for your plants.
Maintenance:
Maintenance is usually minimal. You’ll need to empty the bucket and clean it regularly after each cycle. Most have removable buckets that are dishwasher-safe or easy to wash by hand.
Considerations:
- Cost: These machines are an investment, often costing several hundred dollars.
- Electricity Use: They consume electricity each time they run.
- Volume Reduction: They significantly reduce the volume of food waste going to landfill, which is a major benefit.
If you value speed, convenience, odour control, and can afford the upfront cost, an electric composter is an excellent option.
Troubleshooting Common Indoor Composting Issues
Even with the best intentions, you might run into a few hiccups. Here’s how to fix them: