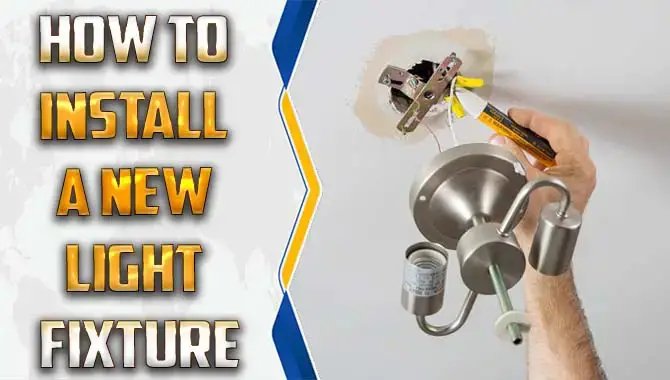
Updating your home’s lighting fixtures can make a huge difference in your space’s overall aesthetic and ambiance. Installing new light fixtures doesn’t have to be daunting, even if you’re not an electrician.
You can install a new light fixture like a pro with a few tips and tricks. Proper planning can make installing a new light fixture like a pro easy. The key is to prioritize safety from the get-go and follow certain steps.
Here we’ve broken down the installation process into simple steps to guide you. We’ve covered you, from gathering the necessary tools to testing the light fixture. By the end of this post, you’ll be ready to tackle your next lighting project with confidence and ease. So let’s dive in.
Safety Precautions To Take Before Starting The Installation Process
Installing a new light fixture can be a great way to update the look of your home, but it’s important to take safety precautions before beginning the installation process. First and foremost, ensure the power is turned off in the room where you will be working.
You can do this by turning off the circuit breaker or removing the fuse that controls the area. It’s also a good idea to wear rubber-soled shoes and gloves to protect yourself from electric shock.
Before handling any electrical components, use a voltage tester to ensure no current flows through the wires. Finally, if you’re unsure about any installation process, don’t hesitate to consult a professional electrician for guidance and assistance. By taking these safety precautions, you can ensure that your new light fixture installation goes smoothly and safely.
Ways For Installing A New Light Fixture Like A Pro
clighting fixture involves turning off the breaker and testing your wiring with a voltage detector before beginning. You must have all essential tools, such as wire strippers or screwdrivers while following manufacturer instructions carefully.
The wiring must be connected correctly and securely, with a proper mounting bracket attachment using screws. Before completing the installation, double-check if testing the new light works correctly. Here is how to install a new light fixture like a pro.
1. Remove The Existing Fixture

To safely remove an existing fixture, always start by turning off the power supply by switching off the circuit breaker or removing the fuse. Then, remove the screws or bolts holding the old fixture in place and gently detach it from its location on either wall or ceiling. Ensure not to cause any harm to wiring while doing so and verify no electrical current using a voltage tester. Having a helper with you during this process is a good idea.
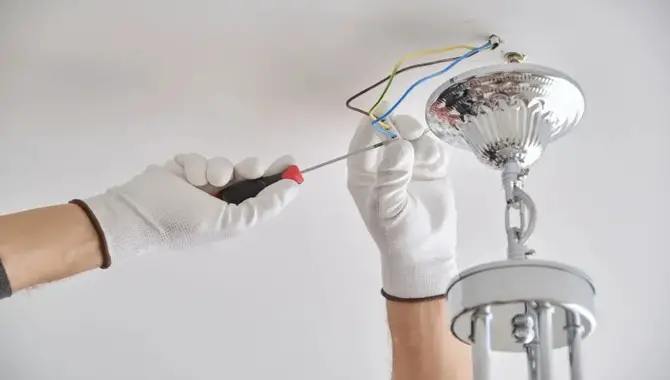
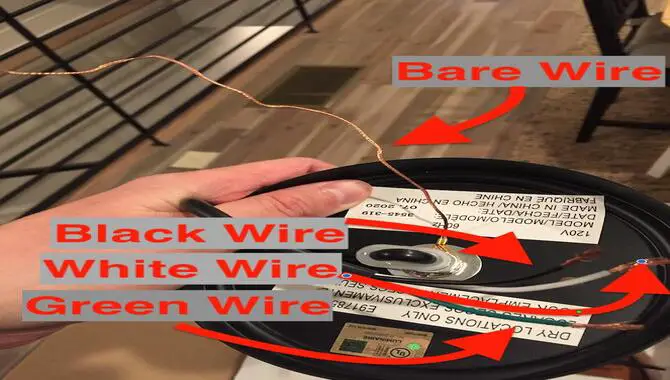
2. Connect The Wires
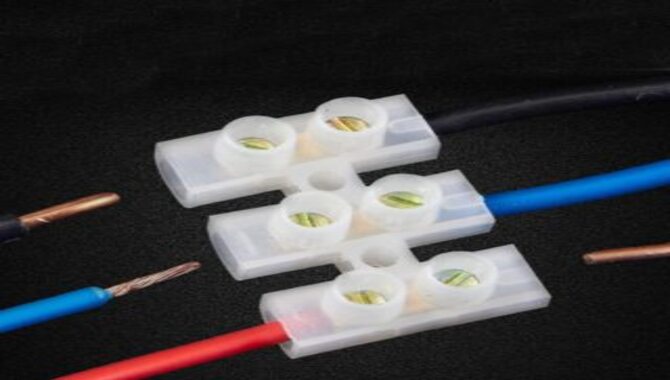
Always prioritize safety when connecting the wires of a new light fixture like a pro. Make sure that the power is turned off before attempting any wiring. To ensure a secure connection between the fixture and your electrical box, strip about ¾ inch of insulation from each wire and match their colors.
Using a voltage tester or detector can also help you check for any issues with your wiring. To prevent loose connections or electrical issues, twist your wires together clockwise and secure them using high-quality wire connectors. If you’re unsure about any aspect of this process, consider seeking the assistance of a licensed electrician or professional handyman.
3. Secure The Fixture
Before installing your new lighting fixture like a pro, it is essential to take all necessary precautions. Begin by turning off the power at the breaker or removing the fuse and carefully removing the old light without damaging the wiring.
Next, install the new bracket using appropriate screws and anchors to prevent it from becoming loose over time. If you’re working with heavier fixtures such as chandeliers or ceiling fans, utilize a stud finder while following manufacturer instructions for installation details. Seek help from an electrician if necessary.
4. Test The Light Fixture
To ensure your new lighting fixture works correctly, testing it before installing it is essential. Testing ensures that you can assess the brightness of the bulbs and determine if they suit your needs. Before testing, always turn off the circuit breaker to avoid potential electrocution hazards.
If there are any defects or issues with the fixture, address them before installation. Remember to check if any voltage testers or detectors in your toolbox will help test the wiring and bulbs of your new light. Testing is an important part of installing a new fixture like a pro.
How To Turn Off The Electricity In The Room Safely
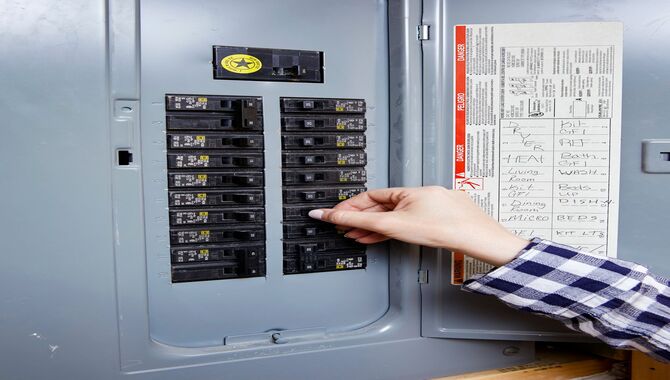
Installing a new light fixture can be daunting, but with the right tools and knowledge, you can do it like a pro. When installing a new light fixture, it is crucial to turn off the electricity in the room to ensure your safety and avoid any electrical accidents. Here are some steps you can take to turn off the electricity safely:
- Find your circuit breaker panel. This is typically located in a utility room or basement.
- Identify which circuit controls the room where you will be working.
- Flip the switch to turn off the power to that circuit. You may want to use a voltage tester to confirm that there is no electricity flowing before proceeding with your installation.
- If you cannot find your circuit breaker panel or are unsure which circuit controls the room, consult a licensed electrician for guidance.
Remember, safety should always be your top priority when working with electricity. Taking these precautions can help ensure a successful and safe installation of your new light fixture.
How To Remove The Old Light Fixture
Removing an old light fixture may seem daunting, but it can be done like a pro with the right tools and preparation. Before beginning, turn off the power to the fixture at the circuit breaker to ensure safety.
Next, remove any bulbs and shades from the fixture. Depending on the type of fixture, you may need to unscrew or unclip the base from the ceiling. If screws hold the fixture, use a screwdriver to remove them.
Once the base is free, carefully disconnect any wiring by unscrewing wire nuts or removing screws that hold wires in place. Be sure to take note of which wires are connected where when you install your new light fixture. With these steps, you’ll have successfully removed your old light fixture like a pro.
How To Properly Connect Your New Light Fixture To The Electrical Wiring
Installing a new light fixture may seem daunting, but with the right tools and basic knowledge, it can be done like a pro. Properly connecting your new light fixture to the electrical wiring is crucial for ensuring it functions correctly and safely. Here are some steps to help you connect your new light fixture like a pro:
- Turn off the power supply. Before you begin any work, turn off the power supply to the circuit you will work on.
- Remove the old fixture. Carefully remove the old fixture from the ceiling and disconnect any wires.
- 3. Connect the wires. Follow the manufacturer’s instructions to connect the wires from your new fixture to the existing electrical wiring in your ceiling.
- Secure the fixture. Once the wires are properly connected, secure your new fixture to the ceiling with screws or other hardware provided.
- Turn on the power supply and test. After double-checking all connections, turn on the power supply and test your new light fixture to ensure it functions properly.
Following these steps, you can confidently install your new light fixture like a pro and enjoy a well-lit space.
How To Attach The New Fixture Securely To The Ceiling Or Wall
Installing a new light fixture can seem daunting, but it can be a breeze with the right tools and techniques. Attaching a new light fixture securely to the ceiling or wall is an important part of installing it like a pro. Here are some steps to follow to ensure that your new fixture stays in place:
- Turn off the power. Before you begin, turn off the power to the circuit you will be working on. This will help prevent any electrical shocks or accidents.
- Remove the old fixture. Carefully remove the old fixture and disconnect the wires.
- Install the mounting bracket. The mounting bracket holds the fixture in place, so it is important to install it securely. Use screws and anchors if necessary to ensure that it is firmly attached to the ceiling or wall.
- Connect the wires. Carefully connect the wires from the new fixture to those in the ceiling or wall, ensuring they are securely connected, and there are no loose ends.
- Attach the fixture. Finally, attach the new fixture to the mounting bracket using screws or other hardware provided by the manufacturer. Ensure it is level and secure before turning on the power and testing it out. With these steps, you can install your new light fixture like a pro and enjoy a well-lit space in no time.
Conclusion
Now that you know how to install a new light fixture like a pro, it’s time to start. Safety comes first, so turn off the power and follow all instructions carefully. Gather all necessary tools beforehand and take your time during each step of the process.
When it comes to connecting wires, use caution and double-check your work before moving on. Once everything is secure, test your new light fixture to ensure it’s working correctly.
With these tips in mind, you’ll be able to upgrade your home’s lighting in no time. So why wait? Get started today and brighten up your living space with a beautiful new light fixture.
Frequently Asked Questions
Can An Electrician Install A Light Fixture?
Es, an electrician can certainly install a light fixture. In fact, it is generally recommended that you hire a licensed electrician for any electrical work in your home, including installing light fixtures.
How Hard Is It To Install A New Light Fixture?
The difficulty of installing a new light fixture depends on your experience level. Before any electrical work, switch off the power supply. Follow the manufacturer’s instructions and ensure you have the required tools. If unsure or uncomfortable, hiring a professional electrician for assistance is best.
Do You Need An Electrician To Install New Lights?
The need for an electrician to install new lights depends on your electrical knowledge and comfort level. If you’re confident in wiring, you may do it yourself, but consulting an electrician is recommended if unsure. They can ensure safe installation and compliance with local regulations.
How Do You Add A Light Fixture To An Existing Circuit?
When adding a light fixture to an existing circuit, safety is crucial. Start by turning off the power and double-checking it with a voltage tester. Follow the manufacturer’s instructions carefully when connecting wires to the new fixture. Test it before mounting it in place and turning the power back on.
Is It Easy To Install A New Light Fixture?
It depends on your level of experience with electrical work. If you have some basic knowledge and experience with electrical wiring, installing a new light fixture can be a relatively straightforward process.
However, if you are inexperienced or unsure about working with electrical wiring, it is best to hire a professional electrician to ensure the job is done safely and correctly

I am passionate about home engineering. I specialize in designing, installing, and maintaining heating, ventilation, and air conditioning systems. My goal is to help people stay comfortable in their homes all year long.