Got a pile of yard waste and kitchen scraps that’s taking over? Don’t you hate seeing good stuff go to waste in the landfill? You can turn those leftovers into amazing garden gold with a simple method called windrow composting. It might sound fancy, but I’ll break it down so you can start making super soil in no time. Let’s get this done!
Windrow Composting How To: Your Essential Guide
Hey there, I’m Troy D Harn from TopChooser, and I’m here to make composting simple. If you’ve got a decent amount of organic material – think grass clippings, leaves, and even some kitchen scraps – windrow composting is likely your best bet.
It’s a straightforward system that’s efficient and really doesn’t need a lot of complicated gadgets. We’ll walk through exactly what you need, how to set it up, and how to manage it so you end up with nutrient-rich compost for your garden or lawn. Ready to turn that waste into wealth for your soil?
What is Windrow Composting, Anyway?
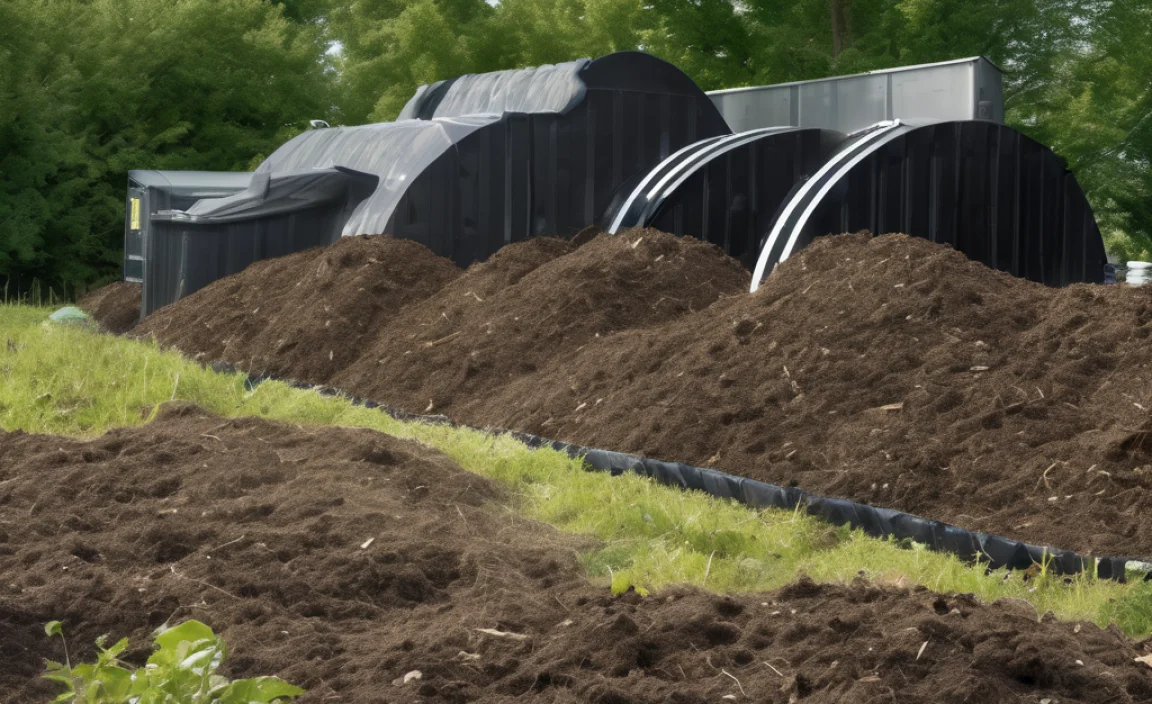
Imagine a long, sturdy pile of organic stuff, shaped like a miniature haystack or a long mound. That’s essentially a compost windrow! It’s an open-air composting method where organic materials are piled into long, narrow heaps. Unlike enclosed bins, windrows are exposed, which allows for good air circulation.
This method is ideal for larger quantities of material, making it popular for farms, large gardens, and community composting projects. But guess what? You can totally adapt it for a good-sized backyard! The magic behind windrow composting is its simplicity and its ability to process a lot of material relatively quickly.
Because the pile is exposed, air gets in easily, which is super important for the microbes that do the composting work. Plus, turning windrows – which we’ll get to – helps speed things up even more and ensures everything composts evenly.
Why Choose Windrow Composting? The Big Benefits
So, why pick windrows over other methods? Let me break down some of the key advantages:
- Volume Handling: This is the champ for large amounts of organic waste. If you generate a lot of yard trimmings or have a sizeable garden, windrows can handle it.
- Simplicity: No fancy bins, no complex machinery needed (though tools help!). Just pile it up and start.
- Aeration: The shape naturally allows for good airflow, helping the composting process move along smoothly and reducing that “stinky” smell.
- Faster Composting: With the right management (especially turning), windrows can break down materials faster than many other methods.
- Cost-Effective: You can often start with materials you already have or that are readily available.
Of course, like anything, there are trade-offs. But for beginners looking to handle a good volume of compostable material, windrows offer a great balance of efficiency and ease.
Getting Started: What You’ll Need
Don’t let the idea of a “windrow” intimidate you. You don’t need a construction crew! Here’s a breakdown of what’s helpful, from the absolute basics to things that make the job easier.
Essential Components
- Organic Materials: This is the fuel for your compost. You need to balance ‘greens’ (nitrogen-rich) and ‘browns’ (carbon-rich).
- Greens: Fruit and vegetable scraps, coffee grounds, tea bags, grass clippings, fresh plant trimmings.
- Browns: Dry leaves, straw, shredded cardboard, sawdust (untreated), small twigs, dry grass.
- Space: You’ll need an area that can accommodate the length of your windrow. A good starting size is about 3-5 feet wide and at least 5-10 feet long. More space means more compost!
- Water Source: Compost needs to be moist, like a wrung-out sponge. So, a hose with a spray nozzle is a must.
Helpful Tools (Not Strictly Required, But Make Life Easier!)
- Pitchfork or Shovel: Absolutely crucial for turning your compost pile. Electric pitchforks are a surprisingly helpful tool if you have a lot to turn.
- Garden Hose with Adjustable Nozzle: For moistening the pile.
- Optional: A Tarp: To cover the windrow if it gets too wet from rain or to retain some moisture.
- Optional: Temperature Gauge: A compost thermometer helps you monitor if your pile is heating up properly, which is a sign decomposition is active.
The “How-To” Steps: Building Your First Windrow
Alright, let’s get practical. Here’s how to actually build and manage your windrow composting system.
Step 1: Choose Your Location
Pick a spot that’s:
- Accessible: You’ll need to get to it with wheelbarrows or garden carts.
- Well-Drained: You don’t want your compost sitting in a puddle.
- Partial Shade: Full sun can dry it out too quickly, while deep shade might slow things down. A bit of dappled sun or morning sun is often ideal.
- Away from Structures: Give it some breathing room, and keep it a safe distance from your house, fences, or wooden structures to prevent moisture damage.
Step 2: Start Piling Your Materials
This is where it all begins. You’re essentially building a long mound. The ideal dimensions for a backyard windrow are typically:
- Width: 3 to 5 feet. This is wide enough to hold heat but narrow enough to allow air to penetrate.
- Height: 3 to 5 feet. This is also important for generating and retaining heat needed for efficient decomposition.
- Length: At least 5 to 10 feet, but longer is better if you have the space and material.
Pro Tip: Layering is key! Start with a base layer of coarser brown materials, like small twigs or straw. This helps with aeration right from the bottom. Then, alternate layers of greens and browns. Think of it like making a layered cake for microbes!
A good ratio to aim for is roughly 25-30 parts carbon (browns) to 1 part nitrogen (greens) by weight. In terms of volume, this often looks like about 2-3 times more browns than greens. Don’t stress too much about exact measurements at first; just try to keep a good mix.
Step 3: Add Moisture
As you build your pile, or as you add new materials, make sure it’s moist. The ideal moisture content is about 40-60%, which feels like a well-wrung-out sponge. If it’s too dry, the microbes won’t be active. If it’s too wet, it can become anaerobic (lack of air) and start to smell bad. Sprinkle water as you go, especially when adding dry brown materials.
Step 4: Aeration – The Crucial Step (Turning!)
This is where windrow composting shines and where you do the most “work.” Turning your pile introduces oxygen, which the aerobic bacteria (the good guys that decompose stuff) need to survive and thrive. Turning also helps mix materials, distribute moisture, and regulate temperature.
How Often to Turn:
- For faster composting (hot composting): Turn every 1-2 weeks. You’ll notice the pile heats up and then cools down; turning helps it heat up again.
- For slower composting (cold composting): Turn every 4-6 weeks, or even less frequently. This is more hands-off but takes longer.
How to Turn: Use your pitchfork or shovel to break up the pile and move material from the outside to the inside, and from the top to the bottom. Essentially, you want to remix everything.
What to Watch For: If your pile is getting smelly, it likely needs turning to get more air in. If it’s not heating up, it might need more greens, more moisture, or more turning.
Step 5: Monitor and Maintain
Keep an eye on your windrow. Check the moisture level regularly. If it feels dry, water it. If you get a lot of rain and it’s soggy, you might need to turn it more often or cover it temporarily. If you’re using a thermometer, aim for the core of the pile to heat up to between 130°F and 160°F (54°C and 71°C). This temperature range is hot enough to kill weed seeds and pathogens. The pile will cool down after a few days, and turning it will help it heat up again.
Step 6: Harvesting Your Compost
When is it ready? Finished compost will be:
- Dark and crumbly.
- Earthy smelling (like a forest floor).
- No longer recognizable as the original materials.
- Cool to the touch.
This can take anywhere from 2-6 months for a hot-composting windrow, or 6-12 months (or longer) for a cold-composting one. You can harvest from the bottom of the windrow while continuing to add new material to the top, or you can let the whole windrow finish before harvesting.
What Can You Compost? The Browns and Greens Breakdown
Understanding your ‘greens’ and ‘browns’ is fundamental for successful composting. It’s all about balance!
N-Rich Materials (“Greens”):
These are typically moist, nitrogen-rich materials that get the composting process going and help the pile heat up. Think soft, fresh stuff.
- Fruit and vegetable scraps from the kitchen
- Coffee grounds and tea bags (paper filter and bag are fine)
- Grass clippings (best added in thin layers to avoid matting)
- Fresh plant trimmings, weeds (before they go to seed!)
- Manure from herbivores (cows, horses, rabbits, chickens – avoid dog and cat waste)
- Alfalfa or clover
C-Rich Materials (“Browns”):
These are typically dry, carbon-rich materials that provide structure, allow airflow, and prevent the pile from becoming too dense and smelly. Think woody or dry things.
- Dry leaves
- Straw or hay
- Shredded newspaper or plain cardboard (avoid glossy or heavily inked paper)
- Sawdust or wood shavings (from untreated wood, in moderation)
- Small twigs and branches (chopped or shredded)
- Corn stalks
- Pine needles (use in moderation as they can be acidic)
What NOT to Compost:
Some things just don’t belong in your compost bin. They can attract pests, introduce diseases, or simply not break down well:
- Meat, fish, bones, and dairy products (attract pests, smell bad)
- Oily or greasy foods
- Diseased plants or weeds that have gone to seed
- Pet waste (from dogs and cats – can contain pathogens)
- Chemically treated wood or yard waste
- Inorganic materials (plastic, metal, glass)
- Coal ash or charcoal briquettes
Ideal Windrow Dimensions and Ratios
Getting the size and mix right makes a big difference. Here’s a quick reference:
| Component | Ideal Dimension/Ratio |
|---|---|
| Width | 3-5 feet (0.9-1.5 meters) |
| Height | 3-5 feet (0.9-1.5 meters) |
| Length | 5-10 feet (1.5-3 meters) or longer |
| Carbon to Nitrogen Ratio (C:N) | Approx. 25:1 to 30:1 by weight. This translates to roughly 2-3 parts Browns to 1 part Greens by volume. |
| Moisture Content | 40-60% (damp, like a wrung-out sponge) |
| Temperature (for hot composting) | 130-160°F (54-71°C) |
Troubleshooting Common Windrow Composting Problems
Even with the best intentions, sometimes compost piles can be a bit… grumpy. Here are common issues and how to fix them:
- Problem: Foul Odors (Ammonia or Rotten Egg Smell)
- Cause: Too much nitrogen (greens) or lack of air.
- Solution: Add more brown materials (leaves, shredded cardboard). Turn the pile thoroughly to introduce air. If it’s also very wet, add dry browns and turn.
- Problem: The Pile Isn’t Heating Up
- Cause: Too dry, not enough nitrogen (greens), or pile is too small.
- Solution: Add water until it’s moist. Add more green materials. Ensure the pile is at least 3x3x3 feet. Turn the pile to mix things up.
- Problem: The Pile is Too Wet and Slimy
- Cause: Excessive rain, too many greens, or poor drainage.
- Solution: Add plenty of dry brown materials like shredded cardboard or straw. Turn the pile well. Consider covering it with a tarp during heavy rain.
- Problem: Pests (Rodents, Flies)
- Cause: Attracted by exposed food scraps or certain materials.
- Solution: Bury kitchen scraps deep in the center of the pile. Avoid adding meat, dairy, or oily foods. Turning the pile regularly helps deter pests as it heats up. Ensuring the pile is well-mixed and aerated is the best defense. For a truly pest-proof solution, an enclosed bin might be better, but with attention, windrows can be managed.
- Problem: Materials Not Breaking Down
- Cause: Pile is too dry, no turning, or materials are too large.
- Solution: Ensure adequate moisture. Turn the pile more frequently. Chop or shred larger materials before adding them.
Windrow Composting vs. Other Methods
It’s good to know how windrows stack up against other popular composting choices. Each has its place!
Windrow Composting:
- Pros: Excellent for large volumes, good aeration, relatively fast if managed well, simple setup.
- Cons: Requires space, needs regular turning for best results, more exposed to elements.
Compost Bins (Tumblers, Stationary Bins):
- Pros: Neater appearance, can deter pests better, tumblers make turning easy, stationary bins can be compact.
- Cons: Limited volume, can become anaerobic if not managed well, tumblers can be expensive.
Piling (Simple Heap):
- Pros: Easiest setup, no special tools needed.
- Cons: Slowest decomposition, can become anaerobic easily, less efficient for large volumes, may look untidy.
For managing significant amounts of yard waste and kitchen scraps, windrow composting often hits the sweet spot between effort and output. Organizations like the Composting Council provide excellent resources for understanding different composting scales and best practices.
Frequently Asked Questions (FAQ)
Q1: How big does my windrow need to be?
A1: Aim for at least 3 feet wide and 3 feet high, and 5 feet long. This size helps the pile retain heat, which is crucial for efficient composting.
Q2: How often should I turn my windrow?
A2: For faster results (hot composting), turn it every 1-2 weeks. For a more hands-off approach (cold composting), turning every 4-6 weeks or even less often is fine, but it will take longer.
Q3: My compost smells bad. What’s wrong?
A3: A bad smell usually means it’s too wet or has too much nitrogen (greens) and not enough air. Mix in more high-carbon materials (browns) like dry leaves or shredded cardboard, and turn the pile to aerate it.

I am passionate about home engineering. I specialize in designing, installing, and maintaining heating, ventilation, and air conditioning systems. My goal is to help people stay comfortable in their homes all year long.