Wasting food scraps and yard trimmings feels like a shame, right? Especially when you live out in the country. You’ve got space, and you know there’s a better way than the landfill. Composting is the answer, and the “cold” method is super simple. No need for fancy equipment or constant turning. This guide will show you exactly how to get started with cold composting, even if you’re new to it. We’ll break it down step-by-step, so you can turn your waste into garden gold with minimal fuss.
Cold Composting Rural: Your Simple Guide to Easy Garden Gold
Hey there, it’s Troy D Harn from TopChooser! If you’re lucky enough to have some land out in the country, you’ve probably got a good handle on managing your space. But when it comes to kitchen scraps and yard waste, sometimes it feels like a lot to deal with. You might have heard of composting and thought it sounded complicated, involving a lot of turning and special gadgets. I’m here to tell you there’s a much easier way: cold composting. It’s perfect for rural living because it’s straightforward, requires very little effort, and can turn your organic waste into nutrient-rich compost for your garden without breaking a sweat.
Think of cold composting as the “set it and forget it” approach to making compost. Unlike hot composting, which involves carefully balancing ingredients and frequent turning to speed up decomposition, cold composting lets nature do most of the work. It takes longer, sure, but it’s incredibly forgiving and a fantastic option for busy folks or those just dipping their toes into the composting world. We’ll walk through everything you need to know, from what to put in your pile to where to put it, and what to expect. Let’s get your rural property working for you, turning waste into wonderful, earthy goodness!
What Exactly is Cold Composting?
Cold composting, also known as passive composting or low-maintenance composting, is a decomposition method where organic materials are piled up and left to break down over time with minimal intervention. Unlike hot composting, which aims for temperatures around 130-160°F (54-71°C) to kill pathogens and weed seeds quickly, cold composting relies on the slower work of microorganisms, fungi, worms, and insects at ambient temperatures. This means you don’t have to worry about achieving specific heat levels or turning the pile regularly. It’s the most beginner-friendly composting method, making it ideal for rural settings where space is abundant and immediate compost isn’t always critical.
The process is simple: you create a pile or bin and add “greens” (nitrogen-rich materials) and “browns” (carbon-rich materials) as you generate them. The key is to let the natural decomposition process occur naturally. While it might take anywhere from six months to two years for the materials to fully break down into usable compost, the effort involved is significantly less. This makes it a perfect fit for rural homeowners who want to reduce waste, improve their soil, and do it all with a low level of daily engagement.
Why Choose Cold Composting for Your Rural Property?
Living in a rural area often means you have more space to work with, making it easier to accommodate a larger compost pile or bin system. Cold composting is particularly well-suited for this lifestyle for several compelling reasons:
- Simplicity and Low Effort: This is the biggest win. You don’t need to constantly monitor temperature, turn the pile, or measure ingredients precisely. You just add materials as you get them.
- Space Efficiency: While a hot compost pile can be managed in a smaller, more contained space, cold composting can be done in a simple, open pile. This is great for rural properties where you might have a designated corner for a larger compost creation.
- Cost-Effective: No need for fancy tumblers or bins, although they can help. You can start with just a designated spot on the ground.
- Reduces Waste: It’s an excellent way to divert food scraps, yard waste, and other organic materials from landfills or burning, which is a common practice in rural areas but can have environmental drawbacks.
- Improves Soil Health: The end product is nutrient-rich compost that will feed your garden, improve soil structure, water retention, and overall plant vitality.
- Pest Deterrence (with proper management): While cold piles decompose slower, burying fresh kitchen scraps deeper within the pile can help deter pests.
Basically, if you want a sustainable way to manage waste that doesn’t demand a lot of your time or expertise, cold composting is your go-to method for your rural homestead.
What You Need to Get Started: Simple Tools & Materials
The beauty of cold composting is its simplicity. You don’t need a lot of fancy equipment. Here’s a look at what will make your composting journey smoother:
Essential Components: Greens & Browns
The foundation of any compost pile, cold or hot, is a good mix of “greens” and “browns.” These provide the nitrogen and carbon that the microorganisms need to break down the organic matter. Aim for a ratio of roughly 2 parts browns to 1 part greens by volume, but don’t stress too much about perfection in cold composting.
Greens (Nitrogen-Rich):
- Fruit and vegetable scraps (peels, cores, wilted produce)
- Coffee grounds and tea bags
- Grass clippings (in moderation to avoid matting)
- Plant trimmings (soft, green ones)
- Manure from herbivores (cow, horse, chicken, rabbit – avoid pet waste)
- Weeds (before they go to seed)
Browns (Carbon-Rich):
- Dry leaves
- Straw or hay
- Shredded newspaper and cardboard (avoid glossy inks or colored paper)
- Wood chips or sawdust (in moderation)
- Pine needles
- Eggshells (crushed)
- Twigs and small branches (chopped or shredded)
What to Avoid (The Don’ts of Composting)
Just as important as knowing what to add is knowing what to leave out. Certain items can disrupt the composting process, attract pests, or introduce harmful pathogens or chemicals.
- Meat, fish, and bones (attract pests, can smell)
- Oily or greasy foods
- Dairy products
- Diseased plants
- Weeds with persistent seeds (unless you’re sure your pile will get hot, which is unlikely with cold composting)
- Pet waste (dog or cat feces can contain pathogens harmful to humans)
- Treated wood
- Coal or charcoal ash
- Synthetic materials
For a more in-depth look at what’s compostable and what’s not, the U.S. Environmental Protection Agency (EPA) offers excellent, reliable guidance on composting best practices.
Tools for a Composting Convenience
You can literally just make a pile, but a few simple tools can make the process tidier and more efficient:
- Pitchfork or Garden Fork: Useful for turning the pile if you decide to do so occasionally, and for aerating.
- Shovel: For moving materials and eventually harvesting your compost.
- Compost Bin (Optional): While an open pile works, bins can help contain the material and keep things neater. You can buy them or build simple ones from pallets.
- Watering Can or Hose: To keep the pile moist.
- Wheelbarrow: Handy for hauling materials to and from your compost area.
- Gloves: To keep your hands clean.
Setting Up Your Cold Compost Pile: Location, Location, Location
Choosing the right spot for your cold compost pile is crucial for its success and for your convenience. Here’s what to consider:
Ideal Placement for Your Compost Pile
Think about accessibility, drainage, and sunlight. Rural properties often offer more flexibility here.
- Accessibility: Make sure you can easily get to it with a wheelbarrow or cart to add materials and later to remove finished compost. It shouldn’t be too far from your kitchen or garden.
- Drainage: Your compost pile needs to be moist, but not waterlogged. Choose a spot that drains well, so rain doesn’t turn your pile into a soggy mess. Avoid low-lying areas that collect water.
- Sunlight: A location that gets some sun can help warm the pile, aiding decomposition, but avoid full, intense sun all day, which can dry it out too quickly. Partial shade is often ideal.
- Airflow: While not as critical as in hot composting, some airflow is beneficial. Don’t place it right up against a solid fence or wall on all sides.
- Proximity to Water: Having a water source nearby (like a spigot or rain barrel) makes it easier to maintain the proper moisture level.
- Aesthetics and Odor: While a well-managed compost pile shouldn’t smell bad, it’s wise to place it away from high-traffic areas or your main outdoor entertaining spaces, especially when you’re just starting out.
Types of Cold Compost Setups for Rural Spaces
You have a few options for how to physically create your compost setup:
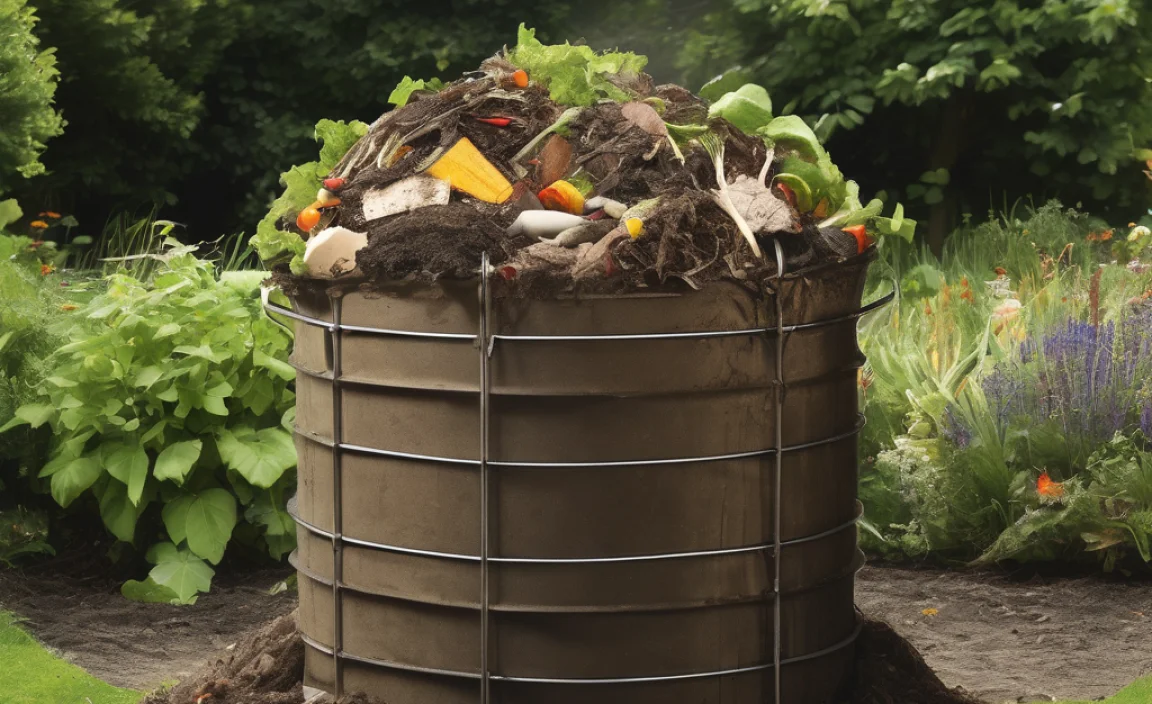
1. The Simple Open Pile
This is the most straightforward method. Simply designate an area on the ground, ideally about 3×3 feet or larger, and start layering your materials directly onto the soil. This allows beneficial microorganisms from the soil to inoculate your pile. Cover it loosely with a tarp if you have extremely wet weather or want to retain some heat and moisture.
2. Three-Bin System
For those who produce a lot of material or want a slightly more organized approach, a three-bin system is excellent for rural properties. You can build this from simple wooden pallets.
Bin 1: For adding new materials.
Bin 2: For materials that have already started decomposing. You might move the contents of Bin 1 here after a few months.
* Bin 3: For actively decomposing or nearly finished compost that’s curing.
This system allows you to manage different stages of decomposition simultaneously.
3. Enclosed Bins or Containers
Commercially available compost bins or DIY versions made from wire mesh, cinder blocks, or repurposed containers can keep things tidy. Since cold composting is slow, ensure any enclosed bin has good ventilation. These keep things looking neater and can sometimes deter pests better than an open pile.
No matter which method you choose, starting with a layer of coarse brown material at the bottom will help with drainage and airflow.
The Step-by-Step Cold Composting Process
Now that you’ve got your spot and know what goes in, let’s get that compost pile built. Remember, the key is simplicity and consistency.
Step 1: Start with a Base Layer of Browns
Begin by laying down a 4-6 inch layer of coarse brown materials like twigs, straw, or wood chips at the bottom of your chosen spot or bin. This helps with aeration and drainage right from the start. Think of it as creating a little foundation.
Step 2: Add Your First Layer of Greens
Next, add a thinner layer (about 2-3 inches) of your green materials. This could be kitchen scraps, grass clippings, or fresh plant trimmings. Try not to add large amounts of grass clippings at once, as they can mat down and prevent air from getting through.
Step 3: Cover Greens with Browns
Crucially, always cover your green layer with another layer of brown materials. This “brown blanket” is vital for several reasons: it helps absorb excess moisture from the greens, reduces odors, and acts as a barrier to deter pests like flies or rodents.
Step 4: Continue Layering
Keep adding layers of greens and browns as you generate them. For example, after breakfast, add your coffee grounds and fruit peels (greens), then cover them with dry leaves or shredded paper (browns). Remember the approximate 2:1 brown-to-green ratio, but don’t obsess over it. Your goal is to keep adding material and covering the greens.
Step 5: Maintain Moisture
Your compost pile should feel like a wrung-out sponge – moist, but not dripping wet. If it seems too dry, especially during hot, dry spells, use your watering can or hose to moisten it. If it gets too wet (perhaps after heavy rain), mix in more dry brown materials to absorb the excess moisture.
Step 6: Occasional Turning (Optional but Recommended)
Cold composting doesn’t require frequent turning, but giving your pile a turn with a pitchfork every few months can speed things up, introduce more air, and help distribute moisture and microbes. It’s not mandatory, but it can offer a slight boost.
If you’re using a three-bin system, you’d be moving material from Bin 1 to Bin 2 after it’s been accumulating for a few months, and then potentially from Bin 2 to Bin 3 for curing.
Step 7: Patience and Maturation
This is where cold composting truly tests your patience. Depending on your climate, the materials you use, and how often you add to the pile, it can take anywhere from six months to two years for the compost to fully break down. You’ll know it’s ready when it looks dark, crumbly, has an earthy smell, and you can no longer recognize the original materials.
Step 8: Harvesting Your Finished Compost
Once your compost has matured, you can harvest it. If you have an open pile, you can simply fork off the finished compost from the top or side, leaving the less-decomposed material at the bottom to continue breaking down. If you’re using a bin system, you’ll usually harvest from the bottom access door or by emptying the bin.
You can sift your compost through a screen (a piece of hardware cloth stapled to a wooden frame) to get a finer texture for seed starting or top-dressing lawns, or use it as is for general garden amendment.
Troubleshooting Common Cold Composting Issues
Even with the simplest method, a few common snags can pop up. Don’t worry; these are usually easy to fix!
Issue 1: My Compost Pile Smells Bad (Like Ammonia or Rotten Eggs)
Cause: This is almost always due to too many “greens” (nitrogen) or insufficient airflow, leading to anaerobic conditions (rotting without oxygen). Ammonia smells indicate too much nitrogen, while rotten egg smells point to anaerobic decay.
Solution:
- Add more “browns” (carbon-rich materials) like dry leaves, straw, or shredded paper.
- Turn or mix the pile to introduce more air.
- If it’s very wet, mix in dry browns to absorb moisture.
- Ensure you’re not adding materials like meat or dairy, which are more prone to foul odors.
Issue 2: My Compost Pile Isn’t Breaking Down
Cause: The pile is likely too dry, too cold, or lacks enough nitrogen (greens).
Solution:
- Check the moisture level. It should feel like a damp sponge. Add water if it’s dry.
- If your climate is very cold, decomposition will slow down. You can add more greens or insulating browns (like straw or sawdust) to help retain heat.
- Add more nitrogen-rich “greens” like fresh grass clippings, kitchen scraps, or a small amount of manure.
- Give the pile a turn to aerate it and potentially mix in some of the wetter inside material with the drier outside.
Issue 3: Pests are Visiting My Compost Pile
Cause: This usually happens if you’re adding prohibited items (meat, dairy, oils) or if kitchen scraps are left exposed on top.
Solution:
- Ensure you are strictly avoiding meat, fish, dairy, and oily foods.
- Always bury fresh kitchen scraps at least 6-8 inches deep into the pile and cover them thoroughly with a layer of brown material.
- Consider fencing off your pile if rodent issues are severe, although this is less common with a well-managed cold pile where food scraps are buried.
- Avoid adding pet waste, which is a common attractant.
Issue 4: My Compost Pile is Too Wet and Soggy
Cause: Excessive rain, poor drainage, or too many nitrogen-rich “green” materials without enough carbon.
Solution:
- Mix in plenty of dry brown materials like shredded cardboard, straw, or dry leaves.
- Turn the pile thoroughly to help it dry out.
- If the pile is in a low-lying area, consider moving it or improving drainage around it.
- If

I am passionate about home engineering. I specialize in designing, installing, and maintaining heating, ventilation, and air conditioning systems. My goal is to help people stay comfortable in their homes all year long.