Have you ever noticed your toilet making strange sounds? It might be whispering to you about a problem. One common issue is a faulty toilet flapper. Many people don’t realize how easy it is to fix. The flapper is a small piece that controls the water flow. If it’s broken, your toilet can leak. This not only wastes water but also raises your bill.
Imagine hearing a constant drip every time you walk by the bathroom. It’s annoying, right? But don’t worry! You don’t need to call a plumber. With a few simple steps, you can learn how to fix a toilet flapper yourself.
In this article, we will guide you through the process. You will discover tips, tricks, and even tools you might need. By the end, you’ll feel like a plumbing expert. So, are you ready to tackle this DIY project? Let’s dive in!
How To Fix A Toilet Flapper: Step-By-Step Guide & Tips Toilet Problems Can Disrupt Your Daily Routine, And A Faulty Toilet Flapper Is One Of The Most Common Issues. If You’Re Wondering How To Fix A Toilet Flapper, You’Re In The Right Place. Here’S A Comprehensive Guide To Help You Resolve This Problem Efficiently. Understanding The Toilet Flapper The Toilet Flapper Is A Crucial Component That Controls The Flow Of Water From The Tank To The Bowl During A Flush. When It’S Damaged Or Not Sealing Properly, It Can Cause Continuous Running Water, Leading To Increased Water Bills And Potential Damage. Understanding Its Function Will Help You Know How To Fix A Toilet Flapper Effectively. Common Signs Of A Faulty Toilet Flapper 1. **Continuous Running Water**: If You Hear Water Running Even After Flushing, The Flapper May Not Be Sealing Properly. 2. **Water Level Dropping**: You May Notice The Water Level In The Tank Dropping Unexpectedly. 3. **Flushing Issues**: The Toilet May Not Flush Completely Or May Require Multiple Flushes. Tools And Materials Needed Before You Start, Gather These Tools And Materials: – Replacement Flapper (If Necessary) – Adjustable Wrench – Screwdriver – Towel Or Sponge – Bucket Step-By-Step Guide On How To Fix A Toilet Flapper 1. **Turn Off The Water Supply**: Locate The Shut-Off Valve Usually Found Behind The Toilet And Turn It Clockwise To Stop The Water Flow. 2. **Drain The Tank**: Flush The Toilet To Empty The Tank. Use A Towel Or Sponge To Soak Up Any Remaining Water In The Tank. 3. **Inspect The Flapper**: Remove The Old Flapper By Disconnecting It From The Flush Lever And Unhooking It From The Pegs At The Bottom Of The Tank. Check For Signs Of Damage, Such As Warping Or Mineral Build-Up. 4. **Clean The Components**: Clean The Seat Where The Flapper Sits To Ensure A Proper Seal. Remove Any Debris Or Mineral Buildup. 5. **Replace The Flapper**: If The Flapper Is Damaged, Install The New Flapper By Hooking It Onto The Pegs And Connecting It To The Flush Lever. 6. **Adjust The Chain**: Ensure The Chain Connected To The Flush Lever Is Not Too Tight Or Too Loose. It Should Have A Little Slack For Proper Operation. 7. **Turn The Water Supply Back On**: Turn The Shut-Off Valve Counterclockwise To Restore Water Flow. Allow The Tank To Refill. 8. **Test The Flush**: Once The Tank Is Full, Test The Flush To Ensure Everything Is Functioning Properly. Check For Any Leaks Around The Flapper. Tips For Maintaining Your Toilet Flapper – **Regular Inspections**: Check The Flapper Periodically For Signs Of Wear. – **Use Toilet Cleaner Sparingly**: Avoid Tablets That Can Corrode The Flapper Over Time. – **Monitor Water Levels**: Keep An Eye On Your Toilet’S Water Levels To Catch Any Issues Early. Conclusion Now That You Know How To Fix A Toilet Flapper, You Can Tackle The Issue Confidently. Regular Maintenance And Prompt Repairs Will Ensure Your Toilet Operates Smoothly, Saving You Time And Money In The Long Run. Don’T Hesitate To Call A Plumber If The Issue Persists After Trying These Steps.
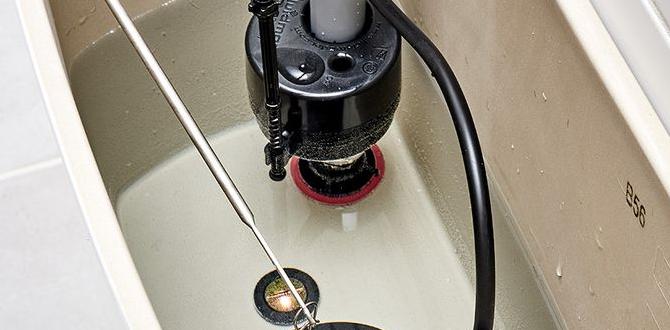
How to Fix a Toilet Flapper
A toilet flapper is a small part but can cause big problems. When it leaks, water runs and your bills go up. Fixing it can be simple! Start by turning off the water. Next, remove the old flapper and replace it with a new one. Don’t forget to ensure everything fits tightly. Did you know that a broken flapper can waste over 200 gallons of water a day? Fixing it not only saves you money but also helps the environment!Understanding the Toilet Flapper Mechanism
Explanation of the toilet flapper’s role in the flushing system. Common issues related to a malfunctioning flapper.The toilet flapper is a small but mighty part of the flushing system. It seals the tank and ensures the right amount of water flows into the bowl during a flush. When it works well, it’s like a superhero for your toilet! But if it malfunctions, you might notice constant running water or weak flushes. These issues can waste water and cause headaches. Here’s a quick look at common flapper problems:
| Issue | Description |
|---|---|
| Running Water | The flapper may not be sealing properly. |
| Weak Flush | The flapper might be stuck open. |
| Ghost Flushing | Water may trickle through the flapper when it’s closed. |
So, keep an eye out for these signs. Your toilet will thank you (and so will your water bill)!
Identifying Symptoms of a Faulty Flapper
Signs of a leaking toilet flapper. How to check for water conservation issues.Ever heard your toilet singing? That’s usually a sign your flapper might be faulty! Common clues include water running constantly or a puddle forming around the base. To check if it’s leaking, put a few drops of food coloring in the tank. If the color appears in the bowl, you’ve found your culprit. And remember, fixing that flapper can save up to 200 gallons of water a day—enough to fill your goldfish’s mansion!
| Symptom | Check For |
|---|---|
| Constant running water | Leaky flapper |
| Puddle near toilet | Flapper issue |
| Colored water in bowl | Check for leaks |
Tools and Materials Needed for the Repair
List of basic tools required for fixing a flapper. Recommended replacement flapper types and brands.To tackle a toilet flapper job, having the right tools is key. Grab a wrench and a screwdriver for some serious twisting and turning. You might also need a pair of pliers for those stubborn bits. Don’t forget rubber gloves; no one wants a toilet surprise! For flappers, consider brands like Kohler or Fluidmaster. They make reliable replacement flappers that fit most toilets.
| Tool/Material | Purpose |
|---|---|
| Wrench | Adjust tight fittings |
| Screwdriver | Remove screws easily |
| Pliers | Grip and twist things |
| Gloves | Keep your hands clean |
Step-By-Step Guide to Fixing a Toilet Flapper
Detailed instructions on removing the old flapper. Process for installing the new flapper.First, turn off the water supply to your toilet. This prevents any splashes while you work. Next, reach inside the tank and unhook the old flapper. It might be stuck like a stubborn jellybean, but a little twist should help! After that, take the new flapper and connect it where the old one was. Adjust it to fit snugly. Finally, turn the water back on and give it a flush. Voilà! Your toilet is happy once more.
| Steps | Instructions |
|---|---|
| 1. Turn off water | Stop the water supply to avoid a mini flood. |
| 2. Remove old flapper | Unhook it gently—think of it as taking off a stubborn hat! |
| 3. Install new flapper | Connect the new one in the same spot. It should fit like a glove! |
| 4. Test it | Turn the water back on and flush. Celebrate your success! |
Common Mistakes to Avoid During the Repair
Frequent errors homeowners make while fixing flappers. Tips to ensure a proper seal and function.Many homeowners stumble when fixing flappers. A common mistake is not checking for a proper seal. If it’s loose, water will keep running. Another big oops is using the wrong flapper size. Guessing won’t help! Always match the flapper to your toilet model. Sometimes, people forget to clean the area before placing the flapper. Dirt can ruin your efforts. Remember, a clean seat makes for a happy flapper!
| Common Mistake | Tip |
|---|---|
| Not checking the seal | Ensure a tight fit with no gaps. |
| Using the wrong flapper | Match it to your toilet’s requirements. |
| Ignoring dirt buildup | Clean the surface before installation. |
Maintenance Tips for Prolonging Flapper Life
Suggested maintenance routines to follow. Factors that can affect flapper durability.Taking care of your toilet flapper helps it last longer. Here are some easy maintenance tips:
- Check it regularly for signs of wear.
- Clean it with vinegar to remove buildup.
- Adjust the chain length for proper flushing.
Some factors can hurt a flapper’s life:
- Hard water can cause damage.
- High chlorine levels can wear it down.
- Old age leads to leaks.
With regular care, you can keep your flapper working well for years!
How can I make my toilet flapper last longer?
Regular checks and cleaning can greatly improve flapper life. Avoiding harsh chemicals helps too.
When to Call a Professional Plumber
Signs that indicate a need for professional help. Situations where DIY fixes may not be enough.Sometimes, your toilet may need more help than you can give it. If you hear strange noises, notice continuous leaks, or see water pooling, it’s time to consider calling a plumber. DIY fixes might not work in these cases. Think of plumbing like superhero battles; some situations require the pros. Here’s a handy table to help you decide:
| Sign | Action |
|---|---|
| Unusual Sounds | Call a professional |
| Constant Leaks | Better safe than sorry! |
| Water Pooling | Time for expert help |
If your attempts at a fix feel more like a comedy skit than skilled repair, it’s best to let a pro tackle the job!
Conclusion
In conclusion, fixing a toilet flapper is simple. First, check the flapper for wear, then replace it if needed. Adjust the chain for smooth operation. Always turn off the water before starting. With these steps, you can save water and avoid toilet troubles. If you want to learn more, check out other DIY guides! Happy fixing!FAQs
What Are The Signs That Indicate A Toilet Flapper Needs To Be Replaced?You might need to replace the toilet flapper if water runs continuously. If you hear a hissing sound, that’s another sign. You can also check for leaks at the bottom of the toilet. If the toilet doesn’t flush properly, the flapper might be the problem. If you see any cracks, it’s definitely time for a new one!
How Do I Determine The Correct Size And Type Of Flapper For My Toilet?To find the right flapper for your toilet, first look inside the tank. Check the shape and size of your old flapper. Most flappers are either round or oval. You can also measure the hole at the bottom of the tank. Take your old flapper to a store to compare it with new ones. This way, you can choose the right size and type for your toilet!
What Tools Do I Need To Fix Or Replace A Toilet Flapper?To fix or replace a toilet flapper, you need a few simple tools. Get a pair of pliers to remove old parts. You might also need a wrench for tight screws. A bucket can help catch any water that spills. Lastly, have a new flapper ready to put in!
Are There Any Common Mistakes To Avoid When Installing A New Toilet Flapper?Yes, there are common mistakes to avoid when you install a new toilet flapper. First, make sure to turn off the water before you start. Next, check that the flapper fits your toilet properly. If it’s too tight or too loose, it won’t work well. Lastly, remember to attach the chain correctly so the flapper can open and close easily.
How Can I Troubleshoot A Toilet That Continues To Run After Replacing The Flapper?If your toilet keeps running after you changed the flapper, check the chain. Make sure it’s not too tight or too loose. Next, look at the float ball. It should float high in the tank, stopping water from filling it too much. Finally, check the flush valve. It might need a better seal to stop the water.

