Organic Compost Tips: Genius & Essential

Want to give your garden a super-powered boost without buying expensive fertilizers? Making your own organic compost is the secret! It might sound complicated, but I’ll show you the easy ways to turn kitchen scraps and yard waste into black gold for your plants. We’ll cover everything you need to know, so get ready to transform your garden!

Organic Compost Tips: Genius & Essential for a Blooming Garden

Hey there, gardeners and aspiring green thumbs! Troy D Harn here from TopChooser. If you’re looking to create a healthier, happier garden that practically sings with life, then you’ve landed on the right page. We’re diving deep into the wonderful world of organic compost. Forget those chemical fertilizers that can sometimes do more harm than good. We’re talking about natural, DIY goodness that your plants will absolutely love, and your wallet will thank you for!

Composting often gets a bad rap for being smelly, messy, or just plain difficult. But trust me, it doesn’t have to be! With a few simple tricks and tips, you can easily create nutrient-rich compost right in your own backyard or even on your balcony. Think of it as nature’s ultimate recycling program, turning everyday waste into a superhero for your soil.

This guide is designed for everyone, whether you’re a seasoned gardener or just starting out. We’ll break down exactly what you need to know, from choosing the right bin to knowing what goes in and what to keep out. Ready to unlock the secrets to fantastic organic compost?

Why Bother with Organic Compost? The Amazing Benefits

Before we get our hands dirty, let’s talk about why organic compost is such a big deal. It’s not just about saving money (though that’s a nice perk!).

  • Boosts Soil Health: Compost is like a multivitamin for your soil. It improves soil structure, making it easier for water and air to get to your plant roots. This is especially great for clay soils that tend to pack down hard or sandy soils that drain too quickly.
  • Feeds Your Plants Naturally: It releases essential nutrients to your plants slowly and steadily, far better than the quick, often artificial release from synthetic fertilizers. This leads to stronger, healthier plant growth and more vibrant blooms or harvests.
  • Reduces Waste: Think about all those kitchen scraps – vegetable peels, coffee grounds, eggshells – and yard waste like leaves and grass clippings. Composting diverts this from landfills, which is a win for the environment. The U.S. Environmental Protection Agency (EPA) highlights composting as a key strategy for waste reduction.
  • Improves Water Retention: Compost acts like a sponge in the soil, helping it hold onto moisture. This means you’ll likely need to water your garden less often, saving you time and water.
  • Discourages Pests and Diseases: Healthy soil grows healthy plants, and healthy plants are naturally more resistant to pests and diseases.
  • pH Balancer: Compost can help buffer your soil’s pH, making it more neutral and hospitable for a wider range of plants.

Getting Started: Your Compost Toolkit and Setup

The first step to great compost is having the right setup. Don’t worry; it doesn’t have to be fancy or expensive!

Choosing Your Compost Bin

You have options, and the best one depends on your space and how much material you expect to compost.

  • Open Piles: This is the simplest method, especially if you have a large yard. Just designate an area and start piling your materials. It’s free and easy but can sometimes look a bit untidy and might attract unwanted critters if not managed well.
  • Enclosed Bins (DIY or Purchased): These are fantastic for keeping things neat and deterring pests.
    • Tumblers: These are rotating bins that make turning your compost super easy. Just give it a spin every few days. They are often a bit pricier but speed up the composting process and are great for smaller spaces. Check out brands like Gardnerweb for reviews on popular models.
    • Stationary Bins: These can be bought or made from wood, wire mesh, or repurposed palettes. They hold compost in place and still allow for good aeration. They’re a good middle-ground option.
  • Worm Composting (Vermicomposting): If you have very limited space (like an apartment balcony), worm bins are a great solution. Special composting worms (like red wigglers) do the work for you. It’s a bit of a different process but yields fantastic compost.

Essential Tools for Composting Success

You really only need a few things to get going:

  • A Pitchfork or Compost Aerator: For turning the pile. Breaking up clumps and introducing air is key to speeding up decomposition and preventing bad odors.
  • A Compost Collection Bin (for kitchen scraps): A small container with a lid for collecting food scraps from your kitchen before taking them out to the main compost pile or bin.
  • A Garden Hose or Watering Can: Compost needs to be moist, like a wrung-out sponge.
  • Gloves: To keep your hands clean.

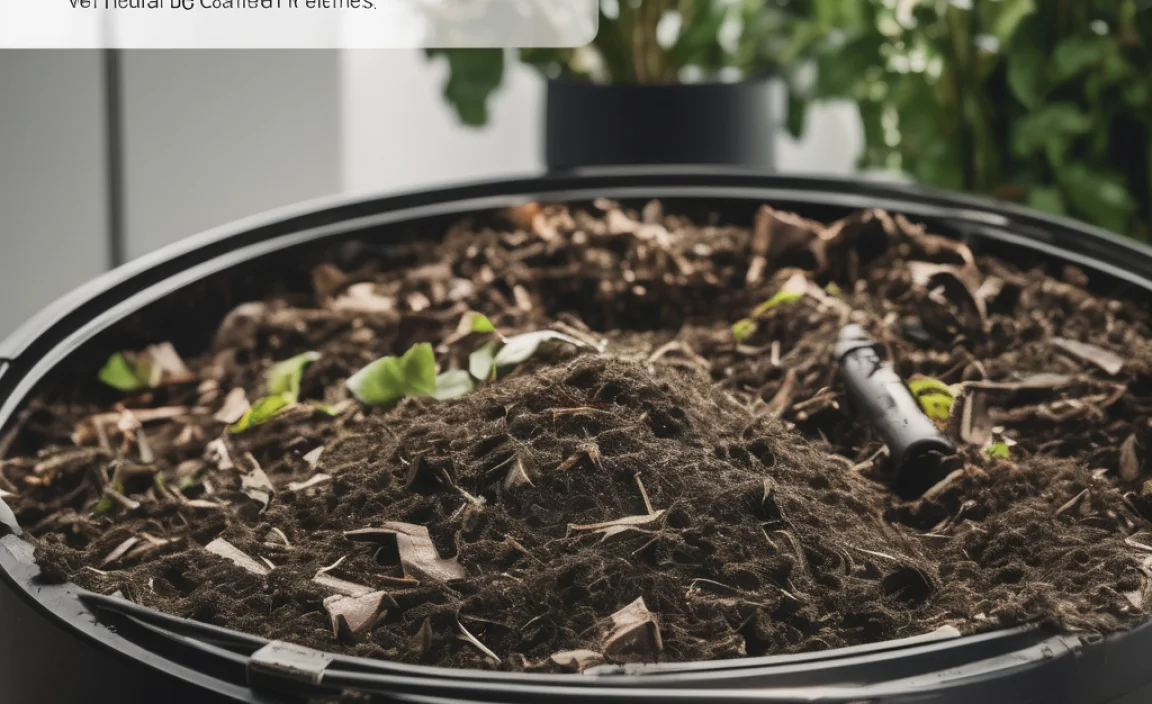
The “Greens” and “Browns”: Your Compost Recipe

Composting is all about getting the right balance of materials. Think of it like baking a cake – you need the right ingredients in the right proportions!

The two main categories are “Greens” and “Browns.” Greens are typically wet materials rich in nitrogen, while Browns are dry materials rich in carbon.

“Greens” (Nitrogen-Rich Materials)

These materials provide nitrogen, which helps the microbes that break down your compost multiply and work efficiently.

  • Fruit and vegetable scraps
  • Coffee grounds and tea bags
  • Grass clippings (in thin layers)
  • Plant trimmings (non-woody)
  • Eggshells (crushed)
  • Manure from herbivores (like rabbits, chickens, cows – avoid pet waste)

“Browns” (Carbon-Rich Materials)

These provide carbon, which is the energy source for the microbes. They also add bulk and help with airflow.

  • Dry leaves
  • Shredded newspaper and cardboard (avoid glossy paper and colored inks if possible)
  • Straw and hay
  • Wood chips and sawdust (use sparingly, especially from treated wood)
  • Twigs and small branches (chopped or shredded)
  • Paper towels and napkins (if not soiled with grease or chemicals)

What NOT to Compost: Keeping Your Pile Healthy

Just as important as knowing what to add is knowing what to avoid. These items can cause problems like odors, attract pests, or introduce diseases.

  • Meat, fish, and dairy products: These can attract pests and create foul odors.
  • Oily or greasy foods: Same reasons as above.
  • Diseased plants: You don’t want to spread plant illnesses to your compost and then back into your garden.
  • Weeds that have gone to seed: The compost might not get hot enough to kill the seeds, and you’ll end up with weeds everywhere.
  • Pet waste (dog and cat feces): These can contain pathogens that are harmful to humans.
  • Coal or charcoal ash: Can contain sulfur and iron in amounts that can be harmful to plants.
  • Glossy or coated paper: May contain plastics or chemicals.
  • Chemically treated wood: Can leach harmful substances into your compost.

The Genius Secrets: Essential Tips for Speedy & Effective Composting

Now let’s get to those genius tips that will make your composting journey smoother and more successful!

1. Layering is Key: The “Lasagna” Method

Think of building your compost pile like making lasagna. You want alternating layers of greens and browns.

Start with a base layer of coarse brown material (like twigs) for drainage and air. Then, add a layer of greens, followed by a layer of browns. Aim for a ratio of roughly 2-3 parts Browns to 1 part Greens by volume. This balance is super important for avoiding a soggy, smelly mess.

2. Chop It Up! Smaller is Faster

The smaller the pieces you add, the faster they will break down. Take the time to chop up large vegetable scraps, shred cardboard, and break down twigs. It significantly speeds up the microbial decomposition process.

3. Moisture Management: The Damp Sponge Test

Your compost pile needs to be moist, but not soaking wet. Too dry, and decomposition slows to a crawl. Too wet, and it can become anaerobic, leading to stinky, slimy conditions.

The Genius Tip: Squeeze a handful of compost. If a few drops of water come out, it’s perfect, like a well-wrung sponge. If it’s dry, add water. If water pours out, add more brown materials to soak up the excess moisture.

4. Aeration is Your Friend: Turn It Regularly

Oxygen is crucial for the aerobic microbes that do the heavy lifting in your compost pile. Turning your compost pile regularly (every 1-4 weeks, depending on how fast you want it) introduces air and mixes materials.

Genius Hack: If you have a tumbler, just give it a spin. If you have an open pile or stationary bin, use your pitchfork or compost aerator to turn the outer materials into the center and vice-versa. This also helps distribute moisture evenly.

5. Location, Location, Location

Choose a spot for your compost bin that is:

  • Accessible: You’ll be adding to it regularly and turning it.
  • Partially Shaded: This helps prevent it from drying out too quickly in hot sun, but some sun is good to help heat the pile.
  • On Bare Soil: If possible, placing your bin directly on the soil allows beneficial microorganisms and earthworms to migrate up into your compost pile, speeding things along. If you’re on a patio, that’s okay too, but it might take slightly longer.

6. The “Hot” vs. “Cold” Composting Debate

Hot Composting: This method involves carefully managing the greens-to-browns ratio, moisture, and aeration to get the pile to heat up to 130-160°F (54-71°C). This high heat kills weed seeds and pathogens. It’s faster (can be ready in 1-3 months) but requires more attention and effort. You typically need a larger pile (at least 3x3x3 feet) for it to heat effectively.

Cold Composting: This is the “set it and forget it” approach. You just pile materials up. Decomposition happens, but much more slowly (it can take 6 months to a year or even longer). Weed seeds and pathogens may survive. This is the easiest method for beginners.

Genius Tip for Beginners: Start with cold composting. As you get more comfortable, you can experiment with trying to heat up your pile for faster results.

7. Speedy Decomposition: Add the Right Activators

Want to give your compost a nudge? Some things can help kick-start the decomposition process:

  • Manure: Fresh manure from herbivores is packed with nitrogen-loving microbes.
  • Finished Compost: A shovel full of mature compost acts like a starter culture.
  • Compost Activator Products: These are commercially available and contain beneficial microbes. They are usually made from alfalfa meal or other nitrogen-rich organic materials.

8. Be Patient: Knowing When It’s Ready

Your compost is ready when it’s dark brown, crumbly, and smells earthy, like a forest floor after rain. You shouldn’t be able to recognize the original materials you put in (though the occasional twig or eggshell is fine).

Genius Sign: If it smells good and looks like rich soil, it’s ready to use! Don’t rush it. If it still smells sour or ammonia-like, it likely needs more time or better aeration/moisture management.

Troubleshooting Common Composting Problems

Even with the best tips, you might run into a snag. Here’s a quick guide to common issues:

Problem 1: Smells Bad (Rotten Egg or Ammonia Smell)

  • Cause: Too much nitrogen (too many greens) or not enough air.
  • Solution: Add more brown materials (leaves, shredded cardboard). Turn the pile thoroughly to introduce air. If it’s very wet, add dry browns and turn.

Problem 2: Pile Isn’t Heating Up or Decomposing

  • Cause: Too dry, not enough nitrogen (too many browns), or the pile is too small.
  • Solution: Add water until it’s moist like a wrung-out sponge. Add more green materials. If using a bin, ensure it’s at least 3x3x3 feet for hot composting to work effectively. Turn the pile.

Problem 3: Attracting Pests (Rodents, Flies)

Cause: Improper materials being added (meat, dairy, oils) or exposed food scraps.

Solution: Stop adding meat, dairy, and greasy foods immediately. Bury fresh kitchen scraps deep within the pile, covering them with brown materials. Ensure your bin has a secure lid. Turning the pile regularly also helps deter them.

Using Your Homemade Organic Compost

Once your compost is ready, the real fun begins! You’ve created a valuable soil amendment. Here’s how to use it:

Application How to Use Benefits
Soil Amendment/Top Dressing Spread a layer of compost 1-3 inches thick on top of your garden beds, around trees and shrubs, or in your lawn. Gently fork it into the top inch of soil or let worms do the work of incorporating it. Improves soil structure, aeration, and water retention. Provides slow-release nutrients.
Potting Mix Additive Mix compost with your regular potting soil. A common ratio is 1 part compost to 2 or 3 parts soil. Enriches potting mixes, provides essential nutrients for container plants, and improves drainage.
Seed Starting Mix Use well-sifted compost mixed with materials like vermiculite or perlite for seedlings. Ensure it’s fine-textured and free of large debris. Provides gentle nutrients and good moisture retention for delicate seedlings.
Compost Tea Steep compost in water (often with an aerator) to create a liquid fertilizer. This is a great way to give plants a quick nutrient boost. Resources like Oregon State University Extension offer detailed guides on brewing. Delivers nutrients and beneficial microbes directly to plant leaves and roots.

A Quick Summary of Organic Compost Tips

Feeling overwhelmed? Let’s recap the most important points for genius organic composting:

  • Balance is Key: Aim for a good mix of Greens (nitrogen) and Browns (carbon), roughly 1 part greens to 2-3 parts browns.
  • Chop It Small: Smaller pieces decompose much faster.
  • Keep it Moist: Like a wrung-out sponge.
  • Add Air: Turn your pile regularly.
  • Location Matters: Choose an accessible, partially shaded spot, ideally on bare soil.
  • Avoid the “No-No” List: Steer clear of meat, dairy, oils, diseased plants, and pet waste.
  • Patience Pays Off: It’s ready when it’s dark, crumbly, and smells earthy.

Frequently Asked Questions (FAQ)

Q1: How long does it take to make compost?

A: It varies! “Cold” composting can take 6-12 months or longer, while “hot” composting, managed carefully, can yield compost in 1-3 months. Your compost bin type, the materials you use, and how often you turn it all play a role.

Q2: My compost smells like ammonia, what did I do wrong?

A: That strong ammonia smell usually means there’s too much nitrogen (too many

Leave a Comment

Organic Compost Tips: Genius Essential Guide

Ever feel like your garden could use a little… well, life? And maybe your kitchen scraps are piling up? You’re not alone! Many of us want to give our plants a healthy boost and reduce waste, but the idea of composting can seem a bit bumpy. Don’t worry, it’s simpler than you think! This guide is your friendly roadmap to turning everyday discards into garden gold. We’ll break down exactly what you need to know, step-by-step. Get ready to grow a happier garden and a healthier planet, one compost pile at a time.

Organic Compost Tips: Your Genius Essential Guide from TopChooser

Hello there! Troy D Harn here from TopChooser. I know you’re looking to add some serious goodness to your garden, and what better way than with organic compost? It’s like a superfood for your plants, packed with nutrients that’ll make them flourish. Plus, it’s a fantastic way to cut down on what goes into the trash. If you’ve ever thought composting was too complicated or messy, stick with me. We’re going to make this super simple, practical, and even a little bit fun. Let’s dig in!

Why Bother With Organic Compost?

Think of organic compost as nature’s best recycler. When done right, it transforms kitchen scraps and yard waste into a rich, dark, earthy material that’s pure gold for your garden. It’s not just about healthier plants, though that’s a huge plus! Here’s why getting into organic composting is a brilliant idea:

  • Boosts Soil Health: Compost improves soil structure, making it easier for plant roots to grow and access water and air. It helps sandy soil hold moisture and loosens up clay soil so it drains better.
  • Feeds Your Plants Naturally: It releases nutrients gradually, feeding your plants over time without the risk of burning them, which can happen with some synthetic fertilizers.
  • Reduces Waste: A good chunk of what we throw away—like fruit peels, veggie scraps, coffee grounds, and yard trimmings—can be composted. This means less waste going to landfills.
  • Saves Money: High-quality compost can be expensive to buy. Making your own is free! You’ll spend less on fertilizers and soil amendments too.
  • Environmentally Friendly: Composting reduces methane emissions from landfills and lessens the need for chemical fertilizers, which can harm waterways.

Getting Started: What You Need

The beauty of composting is you don’t need fancy equipment to start. You can go from a simple pile in the corner of your yard to a multi-bin system, depending on your space and how much you want to compost. Here are the basics:

Choosing Your Composting Method

The first big decision is where and how you’ll compost. Here are a few popular options:

  • Compost Piles: This is the most straightforward method. You just designate an area in your yard (at least 3×3 feet is good) and start layering your materials. It’s easy to set up but can look a bit messy if not managed.
  • Compost Bins: These can be store-bought or DIY. They help keep things tidy, retain moisture and heat better, and can speed up the composting process. You can find plastic bins, wooden ones, or even tumbling composters that make turning easier.
  • Worm Composting (Vermicomposting): If you have limited space, like an apartment balcony, or want to compost kitchen scraps specifically, worm bins are fantastic. Red wiggler worms do the work, and you get nutrient-rich worm castings.

For this guide, we’ll focus on the classic compost pile/bin method, as it’s the most common for home gardens.

Essential Tools (Keep it Simple!)

You don’t need a whole shed full of tools, but a few things will make your composting journey much smoother:

  • A Pitchfork or Garden Fork: This is your best friend for turning and aerating your compost pile. It helps mix the materials and introduce air, which is crucial for decomposition.
  • A Garden Hose or Watering Can: Your compost needs to stay moist, like a wrung-out sponge. You’ll need a way to add water.
  • Optional: A Compost Bin: As mentioned, a bin keeps things neat and can help maintain optimal conditions.
  • Optional: A Thermometer: A compost thermometer can help you monitor the temperature, ensuring the decomposition is happening efficiently and killing weed seeds/pathogens. You can find these online or at garden centers.

The Recipe for Great Compost: Greens and Browns

Composting is all about balancing two main types of materials: “Greens” and “Browns.” Think of it like a balanced diet for your compost microbes!

Understanding “Greens” (Nitrogen-Rich Materials)

Greens are your nitrogen-rich ingredients. They are typically moist and help heat up the compost pile, which speeds up decomposition. Think of them as the fuel!

  • Fruit and vegetable scraps
  • Coffee grounds and tea bags
  • Grass clippings (in thin layers to avoid matting)
  • Plant trimmings (non-diseased)
  • Eggshells
  • Manure (from herbivores like chickens, cows, horses, rabbits – avoid pet waste!)

Understanding “Browns” (Carbon-Rich Materials)

Browns are your carbon-rich ingredients. They are usually dry and provide the necessary carbon for the microbes and help to add bulk and air to the pile. Think of them as the bedding and air supply!

  • Dry leaves
  • Straw or hay
  • Shredded newspaper or plain cardboard (avoid glossy or colored inks)
  • Twigs and small branches (chopped or shredded)
  • Sawdust (from untreated wood only)
  • Pine needles and cones

The Ideal Ratio: Aim for Balance

The magic happens when you get the ratio of Greens to Browns right. A good starting point is roughly 2 to 3 parts Browns to 1 part Greens. This isn’t an exact science, and your pile will tell you if it’s out of balance. If it’s too wet and smelly, add more Browns. If it’s dry and not heating up, add more Greens.

Here’s a handy table to give you a clearer picture:

Greens (Nitrogen) – What They Do Browns (Carbon) – What They Do
Provide nitrogen for microbes to multiply. Provide carbon for energy.
Add moisture to the pile. Add bulk and allow air circulation.
Help heat the pile. Prevent the pile from becoming too wet and slimy.
Examples: Fruit/veg scraps, coffee grounds, grass clippings. Examples: Dry leaves, shredded paper, twigs.

Step-by-Step: Building Your Compost Pile

Ready to get your hands dirty? Building your first compost pile is straightforward. Let’s break it down:

Step 1: Choose Your Location Wisely

Find a spot that’s convenient for you to access but also good for the compost itself. Ideally, it should be:

  • Level ground: So your pile doesn’t wash away.
  • Partially shaded: This helps retain moisture. Too much sun can dry it out quickly, and too much shade might keep it too cool.
  • Accessible: You’ll be adding materials and turning the pile, so make sure you can get to it easily with your wheelbarrow or fork.
  • Near a water source: If possible, it makes watering much easier.
  • A good starting size is about 3 feet wide by 3 feet deep by 3 feet high. This size helps the pile generate and retain heat effectively.

Step 2: Start with a Base Layer of Browns

Begin by putting down a 4-6 inch layer of coarse Browns. This could be twigs, small branches, or straw. This layer is important because it helps with drainage and aeration from the bottom up.

Step 3: Add Your First Layer of Greens

Now, add a layer of your “Green” materials on top of the Browns. Don’t worry about chopping everything up super fine at this point, but smaller pieces will break down faster. Aim for about a 2-3 inch layer.

Step 4: Add a Layer of Browns

Cover your Green layer with a similar or slightly thicker layer of Browns (like dry leaves or shredded newspaper). This helps to cover up food scraps, reduce odors, and manage moisture.

Step 5: Repeat and Moisten

Continue alternating layers of Greens and Browns. As you build, lightly sprinkle each layer with water. The goal is to have your compost pile consistently moist, like a wrung-out sponge. If you squeeze a handful, only a drop or two of water should come out.

Pro Tip: If you have some finished compost lying around, adding a few shovelfuls to your new pile can introduce beneficial microbes and speed things up!

Step 6: Turn Your Compost Regularly

This is where your pitchfork comes in handy! Turning your compost pile introduces oxygen, which the microbes need to work. It also helps to mix the materials, distribute moisture, and speed up the decomposition process. Aim to turn your pile:

  • Once a week: For faster composting.
  • Once every 2-4 weeks: For slower, less labor-intensive composting.

When you turn, try to move the outer materials into the center and the inner materials to the outside. This ensures everything gets a chance to decompose evenly.

Step 7: Be Patient!

Composting isn’t instant. Depending on the materials you use, the ratio of Greens to Browns, how often you turn it, and the temperature, the process can take anywhere from a couple of months to a year. You’ll know your compost is ready when it’s dark, crumbly, smells earthy (like a forest floor), and you can no longer recognize the original materials.

Troubleshooting Common Composting Problems

Even with the best intentions, sometimes your compost pile might act up. Don’t get discouraged! Here are some common issues and how to fix them:

Problem: My compost pile smells bad (like rotten eggs or ammonia).

Why it’s happening: This usually means your pile is too wet and doesn’t have enough air, leading to anaerobic decomposition (rotting without oxygen). Ammonia smell can also mean too many Greens.

The Fix:

  • Add more Browns to absorb excess moisture and improve air circulation.
  • Turn the pile thoroughly to introduce oxygen.
  • Avoid adding too many “Greens” at once.

Problem: My compost pile is taking forever to break down.

Why it’s happening: It could be too dry, too cold, or lacking enough Greens (nitrogen).

The Fix:

  • Check the moisture level. If it’s dry, water it thoroughly.
  • Add more Greens (like kitchen scraps or grass clippings) to introduce nitrogen and moisture.
  • Chop materials into smaller pieces. This increases surface area for microbes to work on.
  • Ensure your pile is large enough (around 3x3x3 feet) to generate heat.
  • In colder weather, insulation (like a temporary cover or more Browns) can help.

Problem: My pile is attracting pests (flies, rodents).

Why it’s happening: Exposed food scraps or the wrong types of materials can attract critters.

The Fix:

  • Always bury food scraps in the center of the pile, covering them with a layer of Browns.
  • Avoid adding meat, dairy, oily foods, or pet waste, as these are major pest attractors and can harbor pathogens.
  • Use a compost bin with a lid if pests are a persistent problem.
  • Tumbling composters can also deter some pests.

A well-maintained compost pile shouldn’t smell bad or attract unwanted guests. If you encounter issues, remember to go back to the basics: balance of Greens and Browns, moisture, and aeration.

What to Compost and What to Avoid

Knowing what goes in is just as important as knowing how to manage your pile. Here’s a quick rundown:

Compost (YES!)

  • Fruits and vegetables (scraps, peels, cores)
  • Coffee grounds and paper filters
  • Tea bags (remove staples if possible)
  • Eggshells (crushed)
  • Grass clippings (thin layers)
  • Leaves and yard trimmings
  • Shredded newspaper and plain cardboard
  • Straw and hay
  • Sawdust and wood chips (from untreated wood)
  • Houseplant trimmings
  • Hair and fur (from humans and pets)

Do NOT Compost (AVOID!)

  • Meat, fish, and bones
  • Dairy products (milk, cheese, yogurt)
  • Oily or greasy foods
  • Diseased plants or weeds that have gone to seed
  • Pet waste (dog or cat feces)
  • Treated wood or sawdust from treated wood
  • Coal or charcoal ash
  • Glossy or coated paper/cardboard
  • Synthetic materials

The main reason to avoid meat, dairy, and oils is that they can attract pests and create foul odors, as well as potentially harbor harmful bacteria. Diseased plants can spread their problems through your garden via the compost. You can learn more about what’s safe to compost from the U.S. Environmental Protection Agency (EPA), a great resource for all things recycling and waste reduction.

The Magic of Finished Compost

Your patience will be rewarded! When your compost is ready—dark, crumbly, and smelling like rich earth—it’s time to use it. It’s a highly valuable soil amendment. Here’s how to use it:

  • Mix into garden beds: Spread a 2-4 inch layer of compost over your garden soil and gently till it in. This is great before planting vegetables, flowers, or shrubs.
  • Top-dress around plants: Apply a 1-2 inch layer around existing plants (keeping it a few inches away from their stems). This feeds them and helps retain moisture.
  • Use in potting mixes: Mix compost with perlite, peat moss, or coconut coir to create your own nutrient-rich potting soil for containers and houseplants. A ratio of 1 part compost to 2 or 3 parts other ingredients is a good start.
  • Start seeds: A fine, screened compost can be part of a germinating mix for seeds, providing gentle nutrients for young seedlings.

Screening compost (passing it through a sieve or hardware cloth) can give you a finer texture, especially useful for seed starting or very formal gardens.

Quick Summary: Your Compost Checklist

Here’s a super quick recap to keep handy:

  1. Choose: A good location and a composting method (pile or bin).
  2. Gather: Your Greens (nitrogen sources) and Browns (carbon sources).
  3. Balance: Aim for about 2-3 parts Browns to 1 part Greens in your layers.
  4. Layer: Start with coarse Browns, then alternate Greens and Browns.
  5. Moisten: Keep the pile as damp as a wrung-out sponge.
  6. Aerate: Turn the pile regularly to add oxygen.
  7. Avoid: Meat, dairy, greasy foods, and diseased plants.
  8. Wait: Patience is key! It’s ready when dark, crumbly, and earthy-smelling.
  9. Use: Mix into soil, top-dress, or use in potting mixes.

Frequently Asked Questions About Organic Composting

What is the fastest way to make compost?

The fastest method involves chopping materials into very small pieces, maintaining the ideal Green-to-Brown ratio (around 1:2 or 1:3), keeping the pile consistently moist but not soggy, and turning it frequently (every few days to once a week). A well-managed compost pile can be ready in 1-3 months.

Can I compost kitchen scraps without the smell and pests?

Yes! The key is to bury all kitchen scraps (your “Greens”) deep within the compost pile and

Leave a Comment