Ever looked at your kitchen scraps and thought, “There’s got to be a better way than the trash can?” You’re not alone! Many folks in rural areas want to get more out of their food waste and live a little greener. Luckily, turning those scraps into super-rich fertilizer for your garden is totally doable, even if you’re new to composting. It’s called vermicomposting, and it uses the magic of earthworms! Let’s break it down so you can get started easily. We’ll cover exactly what you need and how to do it, step-by-step, proving that this worm-powered gardening trick is simpler than you think!
Vermicomposting in Rural Areas: Your Essential How-To Guide
Hello there! Troy D Harn here, your go-to guy for making home projects and garden tasks a breeze. If you’re living a bit off the beaten path, you probably appreciate nature and want to tread lightly on the earth. Vermicomposting is a fantastic way to do just that. It’s all about using earthworms to transform your kitchen and yard waste into a nutrient-packed fertilizer called worm castings, or “black gold.” This stuff is amazing for your garden, boosting plant growth naturally. Don’t worry if you’ve never done this before; I’ll walk you through every step, making it super simple and rewarding.
Why Vermicompost? The Big Benefits
Before we grab our shovels (or, well, worm bins!), let’s chat about why vermicomposting is such a smart move. It’s not just about making fertilizer; it’s about reducing waste, improving your soil, and connecting with your garden in a new way.
Saving Your Landfill Space
Did you know that food scraps and yard waste make up a big chunk of what we throw away? Vermicomposting diverts this from landfills, where it can create methane, a potent greenhouse gas. It’s a small act that makes a real difference for the environment right in your backyard.
Creating “Black Gold” for Your Garden
Worm castings are a gardener’s dream. They are packed with nutrients that plants love, released slowly so your plants get a steady supply. This leads to healthier, more vibrant plants and better blooms. It’s natural, organic fertilizer that’s hard to beat.
Boosting Soil Health
Beyond just nutrients, worm castings improve your soil’s structure. They help sandy soil retain water and make clay soil drain better. This means healthier roots and stronger plants, especially important for growing veggies or flowers in rural settings.
A Fun, Educational Project
For families or anyone curious about nature, vermicomposting is a fascinating hands-on activity. You’ll learn about the life cycle of worms and the decomposition process. It’s educational and genuinely enjoyable!
What You Need to Get Started: Your Vermicomposting Toolkit
To begin your vermicomposting journey, you don’t need much. The key is to create a cozy home for your worms and give them the right food. Here’s a rundown of the essentials:
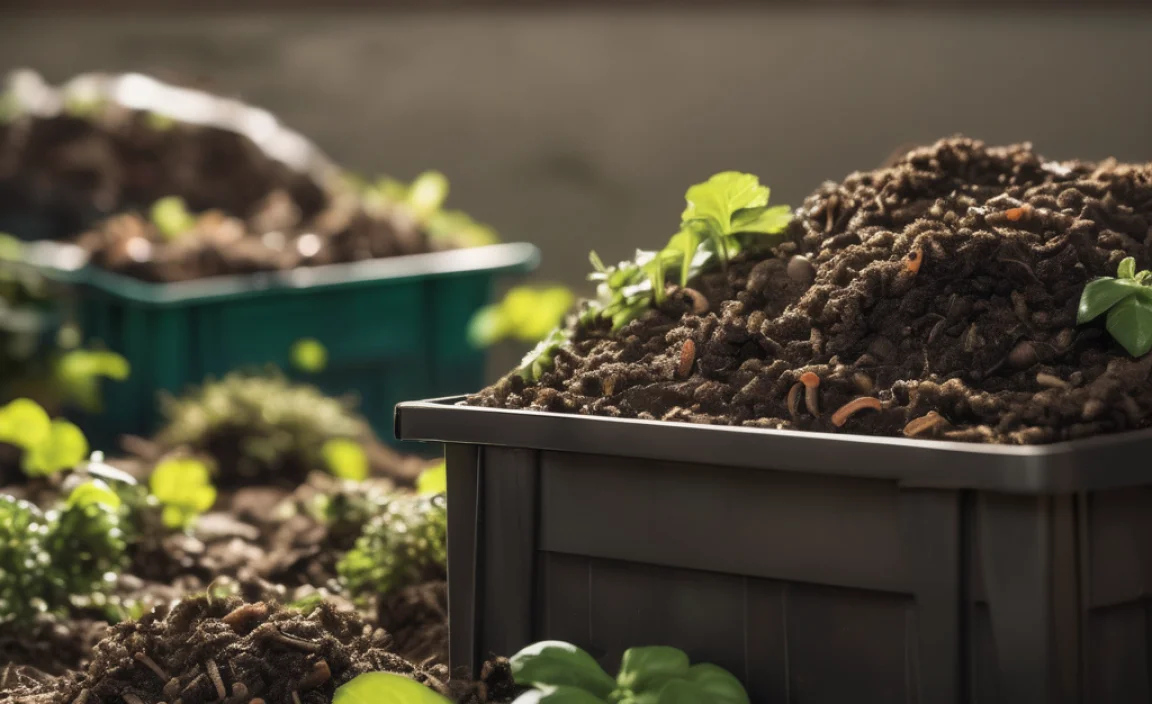
The Worm Bin: A Wormy Mansion
You have a few options here:
- DIY Bin: This is a popular choice for budget-conscious folks. You can make a simple bin from an opaque plastic storage container (about 10-20 gallons is a good starting size). Just drill plenty of air holes – about 20-30 holes on the sides and lid, and a few at the bottom for drainage. Make sure the lid fits snugly but isn’t airtight.
- Pre-made Bin: You can buy worm composting bins online or at garden stores. These often have built-in features like trays for harvesting castings and better ventilation. They are easier but cost more upfront.
- Outdoor Options: For rural settings, you might have more space. Some people build larger wooden bins or use repurposed items like old bathtubs (with drainage) or galvanized trash cans. Ensure they are kept out of direct sun and extreme temperatures.
The Bedding: A Comfy Worm Home
Your worms need a place to live, burrow, and lay their eggs. Think of it as their bedding. Nice, fluffy bedding is key! Good options include:
- Shredded newspaper (black and white print only – avoid glossy ads!)
- Shredded cardboard (plain brown cardboard is best)
- Coconut coir (often sold as “coir bricks” at garden centers)
- Peat moss (use sustainably sourced if possible)
- Straw or dried leaves (chopped up well)
You’ll want to moisten the bedding until it’s as damp as a wrung-out sponge. It should feel moist but not dripping wet.
The Worms: Your Compost Crew
Not just any earthworm will do! You need specific types called “composting worms” or “red wigglers.” The most common and highly recommended is Eisenia fetida (also known as redworms or brandling worms). These little guys are voracious eaters and thrive in decomposing organic matter. You can buy them online from specialized worm farms or sometimes at local bait shops or garden centers. A pound of worms to start is usually plenty for a medium-sized bin.
Your Food Scraps: What Worms Love to Eat
Worms are picky eaters, but they enjoy a good variety. Stick to:
- Fruit and vegetable scraps (bits of apple, banana peels, carrot tops, lettuce leaves)
- Coffee grounds and tea bags (remove staples from bags)
- Crushed eggshells (a good source of grit and calcium)
- Small amounts of cooked pasta, rice, or bread (avoid greasy or heavily seasoned items)
Avoid:
- Meat, fish, and dairy products (these can attract pests and create odors)
- Oily or greasy foods
- Spicy foods
- Citrus peels in large quantities (can make the bin acidic)
- Onions and garlic in large quantities (worms don’t seem to like them much)
A Spray Bottle: For Moisture Control
You’ll need this to keep the bedding nice and moist, especially in warmer or drier climates. A simple squirt bottle works perfectly.
A Small Trowel or Scoop: For Handling Materials
Useful for adding food scraps, fluffing bedding, and eventually harvesting your worm castings.
Tip: Always chop up your food scraps into smaller pieces. This helps the worms and microbes break them down faster.
Getting Your Worm Bin Set Up: Step-by-Step
Now that you have your supplies, let’s get this cozy worm condo ready!
Step 1: Prepare Your Bin
If you’re DIYing, ensure your plastic bin has plenty of air holes drilled. If you bought a pre-made bin, just follow the manufacturer’s instructions.
Step 2: Add the Bedding
Take your chosen bedding material (shredded newspaper, coir, etc.) and put it in the bin. Add enough so it’s a few inches deep. Mix in some water until it’s damp like a wrung-out sponge. It should clump slightly when squeezed but not drip water. Fluff it up so there are air pockets.
Step 3: Introduce the Worms
Gently place your composting worms on top of the bedding. They are sensitive to light, so they will likely burrow down into the bedding quickly. This is a good sign!
Step 4: Add a First Meal (Optional but Recommended)
You can gently bury a small amount of food scraps (about a cup or two for a pound of worms) under the surface of the bedding. This gives them something to munch on and helps them settle in. Don’t overfeed!
Step 5: Cover the Bin
Put the lid on your bin. If your bin is outside or in a shed, make sure the lid is secure to prevent critters from getting in. If the bin is inside, the lid helps contain any potential odors (though a well-maintained bin shouldn’t smell bad).
Feeding and Maintaining Your Worms: The Ongoing Care
Caring for your worm bin is pretty straightforward. Think of it like caring for a small pet or a mini garden system.
Feeding Schedule: How Often and How Much
Start slowly! For the first week or two, just let your worms settle in. After that, you can start adding food scraps. A good rule of thumb is to add food scraps about once or twice a week. The amount depends on your worm population and how quickly they eat. A good starting point is to feed them about half their weight in food scraps per day. So, if you have 1 pound of worms, you can feed them about half a pound of scraps daily. You’ll learn to gauge by how quickly they disappear. It’s better to underfeed than overfeed, especially when you’re starting out. Overfeeding can lead to odors and attract pests.
Where to Put Food Scraps
You can either bury the food scraps in a different spot in the bin each time, or create a “feeding trough” by pushing aside some bedding, adding food, and then covering it back up. This helps prevent waste from sitting on top and potentially going anaerobic (rotting without air).
Moisture Control: The Damp Sponge Rule
Your bin should always feel like a wrung-out sponge. If it’s too dry, mist it with your spray bottle. If it’s too wet, you can add more dry bedding to absorb the excess moisture, or ensure your drainage holes are clear.
Temperature: Keeping Worms Happy
Composting worms, like Eisenia fetida, prefer temperatures between 55°F and 75°F (13°C – 24°C). Avoid placing your bin in direct sunlight or areas that get too hot or too cold. If you live in a rural area with extreme climates, you might need to bring your bin indoors during harsh weather or provide insulation. Sheltered areas like garages, sheds, or under porches are often good locations.
Aeration: Letting Them Breathe
Worms need oxygen! Gently fluff the bedding with a trowel every few weeks to ensure good air circulation. This also helps mix in new food scraps.
Troubleshooting Common Vermicomposting Issues
Even with the best intentions, you might run into a few hiccups. Don’t fret; most issues are easily fixed!
Foul Odors
Cause: Usually too much food, not enough air, or a bin that’s too wet.
Fruit Flies or Gnats
Cause: Exposed food scraps or an overly wet bin.
Worms Trying to Escape
Cause: The bin conditions are unfavorable – too wet, too dry, too acidic, too hot, or not enough food. Or, you just added them and they’re exploring.
Slugs or Pests in the Bin
Cause: The bin might be too wet or attracting unwanted visitors from outside.
Harvesting Your Worm Castings: The “Black Gold” Reward
After a few months, your worms will have munched their way through the bedding and food scraps, leaving behind nutrient-rich worm castings. Here’s how to collect your prize:
Method 1: The “Push and Harvest”
When you’re ready to harvest, stop adding new food scraps to one side of the bin. Gradually start adding all new food scraps to the opposite side. The worms will migrate towards the fresh food over a few weeks. Once most of the worms have moved, you can scrape away the finished castings from the now nearly worm-free side of the bin. Repeat this process on the other side.
Method 2: The Light Method
Dump the contents of your bin onto a plastic tarp or shallow tray under a bright light (sunlight or a lamp). Worms are photophobic (they dislike light). They will try to burrow deeper into the material. After a few minutes, scrape off the top layer of castings, and wait for the worms to burrow down again. Repeat this process, layer by layer, until you are left with mostly worms and uncomposted material.
Method 3: Screening
For finer, more uniform castings, you can use a screen. You can buy or build a simple sieve with a mesh size of about 1/8 to 1/4 inch. Dump your harvested material onto the screen and gently agitate it. The fine castings will fall through, leaving behind larger uncomposted bits and any stray worms. You can add these back to your bin.
Using Your Worm Castings: Feed Your Garden
Now you have your amazing “black gold”! Here’s how to put it to use:
- As a Soil Amendment: Mix castings directly into your garden soil at a rate of about 1-2 inches per square foot. This is great for established beds or when preparing new ones.
- As a Top Dressing: Sprinkle a thin layer (about 1/2 inch) around the base of plants and gently scratch it into the soil surface.
- In Potting Mix: Add castings to your potting soil for containers and raised beds. A ratio of about 1 part castings to 3-4 parts potting mix works well.
- To Make “Compost Tea”: You can steep worm castings in water (often with an aquarium pump to aerate) to create a liquid fertilizer that you can spray on leaves or use to water plants.
Table: What Vermicomposters Eat vs. What to Avoid
| What Worms Love (Feed Them!) | What to Avoid (Feed Them Sparingly or Not At All) |
|---|---|
| Fruit scraps (apple cores, banana peels, berries) | Meat, fish, bones |
| Vegetable scraps (leafy greens, carrot tops, potato peels) | Dairy products (milk, cheese, yogurt) |
| Coffee grounds and filters | Oily or greasy food scraps |
| Tea bags (remove staples) | Spicy foods (chilies, hot sauces) |
| Crushed eggshells (rinsed and dried) | Citrus peels in large quantities (can make bin acidic) |
| Cooked grains (pasta, rice, bread) in small amounts | Onions and garlic in large quantities |
| Plain paper and shredded cardboard | Pet waste (dog/cat feces) |
Choosing the Right Worms for Your Bin
It’s crucial to select the correct type of worm for successful vermicomposting. Not all worms are created equal when it comes to munching through your kitchen scraps!
Red Wigglers (Eisenia fetida)
These are the superstars of the vermicomposting world. They are small, reddish-brown, and live in the top layers of organic matter. They reproduce rapidly under ideal conditions and are excellent at breaking down waste. They are hardy and can tolerate slight fluctuations in temperature and moisture.
European Nightcrawlers (Eisenia hortensis)
These are larger than red wigglers and can also be used for composting, especially in larger bins or outdoor situations. However, they are sometimes less active decomposers than red wigglers and might be more prone to escaping if conditions aren’t perfect. They also tend to prefer slightly cooler temperatures than red wigglers.
Avoid: Earthworms from Your Garden
The common earthworms you find digging in your garden soil (like nightcrawlers that burrow deep) are usually not suitable for bin composting. They are adapted to living in the soil and don’t thrive as well in the confined environment of a worm bin with a lot of decaying food.
You can find a great overview of composting and worm types from the U.S. Environmental Protection Agency’s composting guidelines.
Vermicomposting Bin Placement: Location, Location, Location
Where you put your worm bin can make a big difference in its success, especially in a rural setting where you have more options.
Indoor Options
Under the Sink: A small bin can fit here and is conveniently located for kitchen scraps. Ensure it’s not

I am passionate about home engineering. I specialize in designing, installing, and maintaining heating, ventilation, and air conditioning systems. My goal is to help people stay comfortable in their homes all year long.