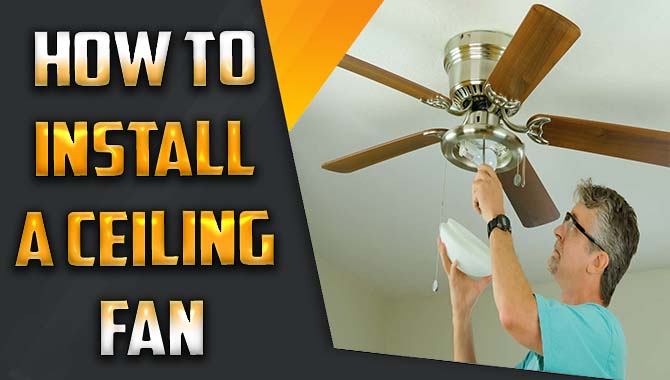
Have you ever felt a room become stuffy during summer? A ceiling fan can change that! But how do you make it work? You need to install a ceiling fan bracket first. It may sound tricky, but it’s easier than you think.
Imagine walking into a room where the air feels fresh and cool. That’s what a ceiling fan can do for you! Installing its bracket is the first step. With the right tools and steps, you’ll be done in no time.
Did you know that ceiling fans can also save you money on energy bills? They use less power than air conditioning. Plus, they keep air circulating, making any space comfortable. So, why not learn how to install a ceiling fan bracket today?
In this article, we will guide you through the process. Soon, you will have your new fan spinning and making your room just right. Let’s dive in!
How To Install Ceiling Fan Bracket: A Step-By-Step Guide

How to Install Ceiling Fan Bracket
Installing a ceiling fan bracket is easier than you think! Start by turning off the power to the area. Next, attach the bracket to the ceiling, ensuring it’s secure. Use a stud finder to locate beams for better support. Did you know that a well-installed fan can save energy? Finally, hang the fan and connect the wires, following the manual. This simple project can provide comfort and style to your space! Enjoy your new fan!Tools and Materials Needed
List of essential tools for the installation process. Recommended materials for mounting and securing the bracket.Before you start, gather your tools and materials. You’ll need some basics to install your ceiling fan bracket correctly. Here’s what you should have ready:
- Drill
- Stud finder
- Screwdriver
- Level
- Measuring tape
Also, you will need the right materials. Securely mounting the bracket is very important. Consider using:
- Mounting screws
- Wall anchors
- Safety goggles
Having these tools and materials will make the job easier and safer. Ready to get started?
What tools do you need to install a ceiling fan bracket?
You’ll need a drill, screwdriver, stud finder, and measuring tape to install a ceiling fan bracket safely. These tools make the process smoother and ensure everything is secure.
Preparing for Installation
Steps to ensure safety before starting the installation. How to identify the right location for the ceiling fan bracket.Before diving into the fun of installing a ceiling fan bracket, let’s make sure everything is safe and sound. First, turn off the power at the circuit breaker. You don’t want to give yourself a shocking surprise! Next, find a sturdy spot on the ceiling. This spot should not only look good but also hold the fan’s weight. Use a stud finder for this; it’s like treasure hunting in your ceiling. Look for a spot that’s away from any beams or pipes. Those aren’t as friendly as they sound!
| Step | Action |
|---|---|
| 1 | Turn off the power |
| 2 | Find a sturdy location |
Remember, safety first! Now, you’re ready for the next exciting stage of the fan installation!
Understanding Ceiling Structures
Explanation of different ceiling types and their implications for installation. Importance of locating ceiling joists.Ceilings come in various types, each with its own quirks. You might have a flat ceiling that’s perfect for a fan, or a vaulted one that may require special support. Knowing your ceiling type matters because it affects how securely you can install the fan bracket. Always find those ceiling joists! Missing them might leave your ceiling fan swinging like a ride at the fair. Did you know that joists can be spaced 16 to 24 inches apart? That’s fun math for fan safety!
| Ceiling Type | Implications for Installation |
|---|---|
| Flat | Easy installation, standard brackets work well. |
| Vaulted | May require angled brackets for secure mounting. |
| Tiled | Additional support needed; be careful not to crack tiles! |
Installing the Ceiling Fan Bracket
Detailed stepbystep guide on how to install the bracket. Common mistakes to avoid during installation.Before you start, gather your tools. You’ll need a drill, screws, and a bracket. First, turn off the power to avoid becoming a human lightning rod. Next, use a stud finder to locate a ceiling joist—your fan’s future resting place. Mark this spot! Then, hold up the bracket and drill it into the joist. Don’t skip the level; you don’t want your fan looking like it’s on a tilt! Remember, the only time a ceiling fan should spin sideways is in a cartoon. Finally, double-check your work before turning the power back on—safety first!
| Common Mistakes | How to Avoid Them |
|---|---|
| Not finding a joist | Use a stud finder |
| Improperly leveling the bracket | Always check with a level |
| Forgetting to turn off power | Double-check the circuit |
Connecting Electrical Wiring
Instructions for safely connecting the wiring to the ceiling fan. Importance of adhering to electrical codes.Connecting the electrical wiring for your ceiling fan is key to making it work safely. First, turn off the power at the circuit breaker. Then, match the wires from your ceiling to the fan: black to black, white to white. Use wire nuts to secure them. Always follow local electrical codes to ensure safety. Not following these rules can lead to dangerous situations.
How do I safely connect the wiring?
To safely connect wiring, remember to turn off the power first and match the wires by color.
Important steps:
- Turn off power supply.
- Match wire colors: black to black, white to white.
- Secure connections with wire nuts.
- Check electrical codes for safety.
Testing Your Installation
Steps to ensure the bracket is secure and the fan operates correctly. Tips for troubleshooting common installation issues.After you set up the bracket, it’s time to check your work. Make sure the bracket is tightly fastened. Give it a little shake; it should feel strong. Next, hang the fan. Turn it on and listen closely. Does it spin smoothly? If it wobbles or makes noise, something might be wrong. Check these points:
- Are all screws tight?
- Is the fan balanced?
- Is the power connected correctly?
If it still doesn’t work well, follow the troubleshooting steps again. Remember, a well-installed fan keeps your home cool and safe!
What should I do if my ceiling fan wobbles?
Adjust the blade alignment and tighten loose screws. Balancing the blades can fix the wobble.
Maintenance Tips for Ceiling Fans
Recommendations for maintaining the ceiling fan and bracket. Safety checks to perform regularly after installation.Keeping your ceiling fan in top shape is easier than you think! Regular dusting is a must. Dust clings like your cat on laundry day—really stubborn! Check the fan blades for wear and tear. They shouldn’t wobble like a puppy chasing its tail. Make sure all screws and brackets are tight. Safety first! You don’t want your fan pulling a magic trick by falling. Here’s a quick table for helpful checks:
| Maintenance Task | Frequency | Notes |
|---|---|---|
| Dust blades | Monthly | Use a soft cloth or duster |
| Check for wobbling | Monthly | Tighten screws if needed |
| Inspect wiring | Every 3 months | Look for wear and loose connections |
| Clean light bulbs | Every 6 months | They can get dusty! |
Regular checks can help you avoid big issues. Imagine your fan turning into a ceiling hugger—it won’t be happy! So, keep that bracket safe and your fan spinning happily.
Conclusion
In conclusion, installing a ceiling fan bracket is simple and rewarding. Start by choosing the right location and tools. Follow safety tips to stay safe while you work. Remember to check your ceiling structure for support. Once you finish, enjoy your new fan! For more tips on installation, read our other articles to enhance your DIY skills.FAQs
What Tools And Materials Do I Need To Install A Ceiling Fan Bracket?To install a ceiling fan bracket, you need a few tools and materials. First, get a screwdriver to help you tighten screws. You’ll need a drill to make holes if necessary. Also, have a ladder to reach the ceiling safely. Lastly, make sure you have the mounting bracket that came with your ceiling fan.
How Do I Determine The Correct Location For Installing A Ceiling Fan Bracket?To find the right spot for a ceiling fan bracket, first look for the ceiling joists. These are strong wooden beams that hold up the ceiling. Use a stud finder to locate them. Mark where you want the fan, making sure it’s in the center of the room. Finally, make sure the bracket is at least 7 feet above the floor for safety.
What Safety Precautions Should I Take Before Installing A Ceiling Fan Bracket?Before you install a ceiling fan bracket, make sure to turn off the power at the switch. We should remove any old fan or light fixture carefully. Use a sturdy ladder to reach the ceiling safely. Check that the area is clear of any tools or materials that could trip you. Always wear safety goggles to protect your eyes.
How Do I Properly Secure The Ceiling Fan Bracket To The Ceiling Joist?First, find a ceiling joist, which is a strong beam in your ceiling. Hold the fan bracket against the joist. Use a drill to make pilot holes for the screws. Then, drive the screws into the holes to secure the bracket tightly. Make sure it’s really sturdy before putting up the fan!
Are There Specific Types Of Ceiling Fan Brackets For Different Ceiling Types (E.G., Flat, Sloped)?Yes, there are different types of ceiling fan brackets for different ceiling types. If your ceiling is flat, you use a flat bracket. If your ceiling is sloped or angled, you need a special bracket designed for that. Choosing the right bracket helps the fan work well and stay safe. Always check what your ceiling needs before installing a fan.