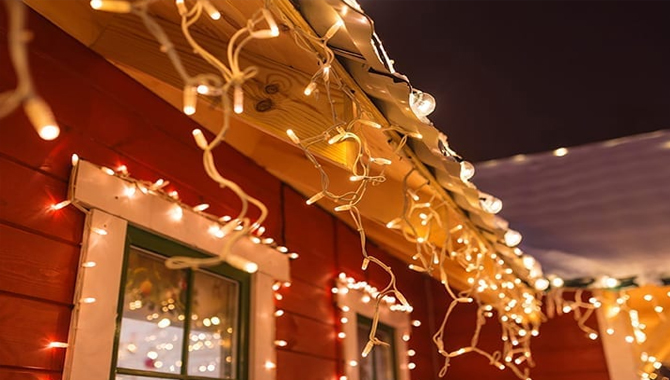
Icicle lights are a lovely addition to winter. However, they are infamous for getting kinked along the light strands as they come out of the box owing to being folded up in the box.
So, how to straighten icicle lights? The light strands’ harsh bends distract significantly from the elegance of this lighting. So, you might feel the need to straighten the icicle lights you’re hanging around your house.
Straightening icicle lights is simple to perform and doesn’t need any additional equipment. It will, however, take some time and careful attention to ensure that no water comes into touch with any electrical outlets. With this guide to straightening icicle lights, you can bring bright, seasonal happiness to your family and passers-by.

5 Simple Steps To Straighten Icicle Lights
Straightening icicle lights can be frustrating, but with a little patience and effort, you can get them looking as good as new. One method is to gently stretch the wires that hold the lights in place, being careful not to pull too hard or damage the wires. Another option is to use hot water to soften the plastic and straighten the lights by hand.
You can also try using a hair dryer on low heat to warm up the plastic before straightening. Whatever method you choose, take your time and work slowly to avoid damaging the lights or wires.
With a little effort, your icicle lights will be hanging perfectly straight in no time. Luckily, with these simple steps, you can straighten your icicle lights in no time:
- Untangle the lights – carefully untangle any knots or twists in the lights.
- Lay out the lights – spread out the lights on a flat surface to help straighten them.
- Apply heat – use a hairdryer or heat gun to apply gentle heat to the areas that are curled or bent.
- Let cool – after applying heat, let the lights cool down completely before handling them again.
- Ang the lights – once they are straightened, hang the lights up and adjust them as needed to ensure they are even and straight.
Cost
Straightening icicle lights can be a cost-effective way to spruce up your holiday decor. Instead of purchasing new lights, you can save money by simply straightening out any tangled or twisted strands. To do so, start by unplugging the lights and untangling any obvious knots or tangles.
Then, gently work your way down each individual strand, using your fingers to straighten out any kinks or bends. If the lights are still not straight, you may need to use a hair dryer on low heat to warm up the plastic and make it more pliable. With a little patience and effort, your icicle lights will look as good as new without breaking the bank.
Time
Straightening icicle lights can be a tedious task, but with the right technique and some patience, you can have them look perfect in no time. The amount of time it takes to straighten your icicle lights will depend on how many strands you have and how tangled they are.
However, a good rule of thumb is to set aside at least an hour or two for the process. It’s important to take your time and be gentle when untangling the lights, as pulling too hard can cause them to break or become damaged. With a little effort and careful maneuvering, your icicle lights will be hanging straight and shining bright in no time.
Depending on the number of strands of lights, straightening icicle lights will take 30 minutes to an hour or two.
Materials
Straightening icicle lights can be a frustrating task, but with the right materials, it can be made easier. You will need a ladder, gloves to protect your hands, and a hairdryer. Start by carefully climbing the ladder to reach the area of the lights that need straightening. Wear gloves to protect your hands from sharp edges or loose wires.
Then, use the hairdryer on a low heat setting to warm up the plastic casing around any twisted or bent areas of the lights. As you apply heat, gently straighten out any kinks or twists in the wires using your gloved hands. Be careful not to apply too much pressure or force, as this can cause damage to the lights.
- Fishing weights
- Scissors
- Fishing line
- Hair dryer
Steps Of Cleaning Icicle Lights

Before straightening your icicle lights, it’s important to give them a thorough cleaning to ensure that they’re in good condition. By following these simple steps, you can help extend the lifespan of your icicle lights and ensure that they’re ready to use whenever you need them. Here are the steps you can follow to clean your icicle lights:
- Turn off the lights and unplug them.
- Gently remove any debris or dirt from the lights using a soft brush or cloth.
- Fill a bucket with warm water and add a small amount of mild detergent.
- Dip a clean cloth into the soapy water and gently wipe down each icicle light, being careful not to apply too much pressure.
- Rinse the lights with clean water and dry them thoroughly before storing or hanging them up.
- To warm the wires, use a hair dryer on low heat to warm each light strand for a few seconds.
- Check with your hands every few seconds to make sure the wires aren’t getting too hot. Plastics can melt if they are exposed to too much heat.
- Pull the heated wires straight and keep them there until they cool off. Continue down the string until all of the lights are straight.
- At the end of the lights, tie a fishing line.
- Now, at the icicle’s end to one of the fishing lines, try attaching a fishing weight.
- Hold the icicle in the air to see if just a fishing weight is enough to keep the wire straight. If not, you’ll need to add additional to get the right amount of fishing weights.
- Tie additional fishing weights and trim the extra fishing line with a scissor.
What To Consider Before Installing Icicle Lights?
Before installing icicle lights, there are a few important factors to consider. First, you will need to determine if your home’s electrical system can handle the additional load of the lights. It is important to make sure that your circuits are not overloaded, as this can be a fire hazard. You may want to consult with an electrician before installing icicle lights to ensure that your electrical system is safe and up-to-code.
Another factor to consider is the weather conditions in your area. Icicle lights can be heavy and may not hold up well in high winds or heavy snowfall. If you live in an area with harsh weather conditions, you may want to consider alternative types of outdoor lighting that are better suited for your climate.
Lastly, it is important to have a plan for how you will install and take down the icicle lights. This can be a time-consuming process, so it is best to have a clear plan in place before starting the installation process. By considering these factors ahead of time, you can ensure that your icicle light installation goes smoothly and safely.
These weather-resistant, long-lasting acrylic plastic lights consume very little energy and produce very little heat. So, they are an ecologically responsible LED lighting option adaptable enough to be used all year! Let’s see what else you can consider before installing icicle lights.
Fix A Design
If you’re looking to straighten out your icicle lights, there are a few things you can do to fix the design. One option is to use clips or zip ties to secure the lights in place and prevent them from hanging at odd angles. You can also try using a level to ensure that the strings of lights are hanging evenly.
If you’re dealing with tangled wires or bulbs that have fallen out of place, carefully untangle the wires and reattach any loose bulbs. With a little patience and attention to detail, you can straighten out your icicle lights and create a beautiful, uniform design for your holiday decor.
Find A Focal Point
Straightening icicle lights can be a frustrating task, but with a little patience and the right technique, you can have your lights looking perfectly aligned in no time. One helpful tip is to find a focal point on your house or building where you want the lights to hang straight down.
This could be a window, doorframe, or other prominent feature. Start by attaching the lights to this point and then work outwards, making sure each strand is evenly spaced and hanging straight down. You may need to adjust the tension of each strand to ensure they are all at the same angle. By taking this approach, you can achieve a professional-looking display that will impress all those who see it.
Do A Proper Measuring
You should measure the lines where you wish to hang the lights. Measurements can help you determine how many strands you’ll need to produce a straight, clean, and crisp line that isn’t drawn too tight or hanging too loosely, resulting in unattractive droops. Also, make sure you know how far away your power supply is. You wouldn’t want a lovely light show that you can’t turn on.
Pick A Number
The amount of lights you’ll need to adorn your house or roof is a personal choice. But, it’s always a good idea to buy more lights than you actually need.A reasonable trick is to keep at least 20 feet of additional lighting on hand, just in case. Even if you don’t need them, you’ll have a lot of lights to adorn the rest of your house with.
Unpack The Lights With Safety

Unpack your precious icicle lights carefully if you don’t want any accidents before the holidays. Look out for any broken plastic or glass and bring the lights out of the box with care. Before you start straightening your icicle lights, it is important to unpack them safely. This will help prevent any damage or injuries during the process.
Start by carefully opening the box and removing the lights one section at a time. Be gentle when handling the lights, as they can be fragile and easily tangled. As you remove each section, inspect the wires and bulbs for any signs of damage or wear. If you notice any issues, set those sections aside and address them separately. By taking these precautions, you can ensure that your icicle lights are in good condition and ready for straightening.
Pro Tips To Remember
Choose icicle lights that are weatherproof and don’t use interior Christmas lights. A UL sticker (Underwriter’s Laboratory) should be attached to outdoor lights. It indicates that your light set complies with UL’s national safety requirements and quality.
Make sure the light kit is rated for outside usage by checking the box. When hanging lights from the ceiling, use a sturdy ladder positioned securely on a level platform. Don’t decorate trees near power lines with lights, and turn off any outdoor lighting when you leave the house. Alternatively, invest in an outside outlet timer.
If you have extra length, you can just run it back over the ends. Icicle lights are beautiful since they blend in organically and can be stacked to produce a stunning appearance!
Only utilize extension cords that are certified for outdoor use. Wrap electrical tape over connections to keep them dry.If you need to power a long continuous string by a single outlet, warm white LED icicle lights should be preferred over incandescent icicle lights.
You can link anywhere from 20 to 45 LED icicle lights while most of the incandescent light sets only enable you to join 3-5 strings on one run, depending on the light count and design.
It is not inexpensive to decorate your home in the style of Las Vegas. Calculate the extra money you’ll spend on power bills to support your holiday display with an energy cost calculator. Icicle lights are damaged by rain, sun, snow, and wind. After Christmas, the longer you keep them on, the sooner you’ll have to replace them.
Final Words
Icicle lights are a popular decoration for homes, offices, and other places, and they look amazing when they’re straight. And that concludes the discussion on how to straighten icicle lights. Icicle lights are a great addition to holiday accessories. Take proper care of them and clean them as well to make them last longer. With this thorough guide, we hope you will feel at least slightly better prepared for the holiday season.
This simple procedure won’t damage the lights in any way, and you can do it while they’re still plugged in. If you’re looking to add a touch of sparkle to your holiday decor, then icicle lights are the perfect option. These decorative lights are easy to set up and require minimal maintenance, making them a great choice for busy homeowners. We have taught you how to straighten icicle lights so they look their best. And hope this will work for you.
