Doorbells are a great way to add security to your home. They can also be a great way to add a decorative touch to your home’s entrance. Here are a few tips on how to install a doorbell:
- Choose a location for your doorbell. It should be placed near the entrance to your home and at a height that is comfortable for you to reach.
- Drill a hole in the chosen location. The hole should be big enough to accommodate the doorbell’s wires.
- Run the doorbell’s wires through the hole.
- Connect the doorbell’s wires to the appropriate terminals on your home’s electrical panel.
- Mount the doorbell’s button on the exterior of your home.
- Test your doorbell to make sure it is working properly.

How Do You Install A Doorbell?
Installing a doorbell is a fairly simple process that most people can do without too much difficulty. However, if you’ve never installed a doorbell or are not particularly handy, you may want to hire an electrician to do the job for you.
The first step is to remove the old doorbell, if there is one. To do this, unscrew the doorbell from the wall. If there are wires attached to the doorbell, carefully disconnect them. Next, you’ll need to drill a hole in the wall for the new doorbell. The size of the hole will depend on the size of the doorbell you’re installing.
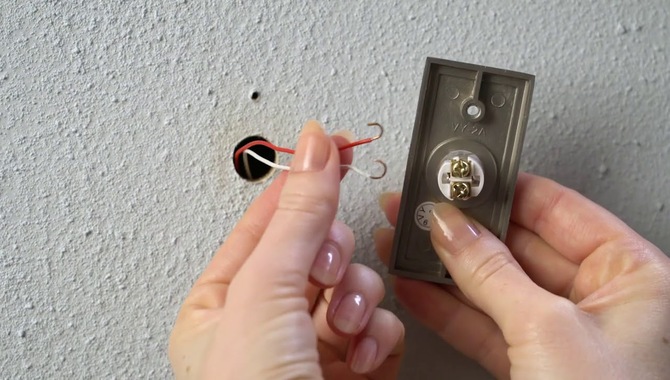
Once the hole is drilled, feed the wires through it and into the back of the doorbell. Now it’s time to connect the wires to the doorbell. Most doorbells have two wires, a positive and a negative. The positive wire is usually red, and the negative wire is usually black.
Connect the wires to the appropriate terminals on the doorbell, being careful not to mix them up. Finally, screw the doorbell into the hole you drilled and turn on the power. Your new doorbell should now be working!
What Tools Do You Need To Install A Doorbell?
If you’re thinking about installing a doorbell, you’re in luck. It’s a relatively easy project that most people can do in the afternoon. Here’s what you need to know.
Tools:
• Drill
• 1/8″ drill bit
• Level
• Tape measure
• Screwdriver
• Hammer
• Chisel
• Saw
Materials:
• Doorbell
• Mounting bracket
• Wire
• Wire connectors
• Tape
- Start by turning off the power to the circuit you’ll work on. Then, use the drill to make a hole in the wall where the doorbell will be mounted. The hole should be big enough to accommodate the mounting bracket.
- Insert the bracket into the hole and use the screws to secure it in place.
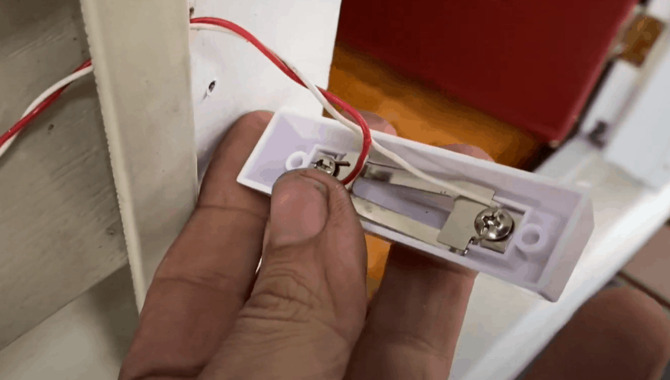
- Once the bracket is in place, you can start running the wire. Begin at the transformer and run the wire to the hole in the wall. Then, fish it through the hole and attach it to the terminals on the back of the doorbell.
- Use wire connectors to join the wires, then tuck everything into the wall and put the cover plate back on.
- Finally, turn the power back on and test your doorbell to ensure it works properly.
Where Do You Need To Place The Doorbell?

When choosing where to place your doorbell, there are a few things to consider. First, you’ll want to ensure it’s in a location that is easy for guests to spot and reach. You’ll also want to consider wind direction and the amount of sunlight the area gets, as both can affect the doorbell’s performance. Here are a few tips to help you choose the best spot for your doorbell:
- Choose a location that is easy for guests to spot and reach. The front door is usually the best spot, but you may also want to consider placing the doorbell near a side or back door if that’s where people typically enter your home.
- Consider wind direction. If your home is in an area with high winds, you’ll want to place the doorbell on the s, s side of the house sheltered from the wind.
- Take sunlight into account. If the area where you want to place the doorbell gets a lot of direct sunlight, you may choose a spot in the shade to prevent the sun from interfering with the doorbell’s performance.
- Make sure the area is level. The doorbell should be mounted on a flat surface to ensure proper operation.
- Test the doorbell before finalizing the installation. Once you’ve chosen the location, test the doorbell to ensure it works properly. Then, mark the spot and drill the holes for the mounting hardware.
What Are The Steps To Install A Doorbell?
Installing a doorbell is a relatively simple process that anyone can do with little time and patience. Here are the basic steps:
- Gather your materials. You will need a doorbell, a drill, screws, and wire.
- Drill a hole in the doorframe where you want the doorbell installed.
- Run the wire from the doorbell through the hole and to the inside of the house.
- Connect the doorbell to the wire.
- Screw the doorbell into the doorframe.
That’s it! You should now have a working doorbell.
Conclusion
The process is quite simple if you’re wondering how to install a doorbell. All you need is a screwdriver and a few minutes. Just follow the instructions that come with your doorbell, and you’ll have it up and running in no time. If you still have any questions about how to install a doorbell, feel free to comment below.
Installing a doorbell can be simple and straightforward if you have the right tools and follow the steps carefully. With the tips and guidelines outlined above. You should be able to install a doorbell quickly and easily however, if you encounter any challenges during the installation process. It’s always advisable to seek professional help to avoid damage or complications. Safety should always be a top priority when working with electrical equipment.
FAQs
[rank_math_rich_snippet id=”s-ab6b5464-d981-4ad3-8e66-3703ba4f2192″]
