Have you ever wondered where is the water shut off valve for outside faucet? Maybe you saw water leaking from your garden hose. Or perhaps you want to protect your pipes in winter. Knowing where to turn off the water is very important. It can save water and prevent damage. Let’s find out more about these important valves.
Outdoor faucets help us water our gardens. They also help wash our cars. But what happens if they break? What if they start leaking? You need to know how to stop the water fast. That’s why knowing where is the water shut off valve for outside faucet is key.
Sometimes, things go wrong with our outdoor water. Maybe a pipe bursts. Or a faucet handle breaks. When this happens, water can spray everywhere! It is like a small indoor rainstorm. But don’t worry! There is a way to stop it. The answer lies in finding the shut-off valve.
Key Takeaways
- Knowing where is the water shut off valve for outside faucet can prevent water damage.
- The shut-off valve is usually inside your house, near the outside faucet.
- Check for the valve in your basement, crawl space, or utility room.
- Turning off the water valve can save water and money.
- Regularly inspect your outdoor faucets to avoid problems.
Finding Your Outside Faucet Shut-Off Valve
Finding the shut-off valve for your outside faucet is not hard. Usually, it is inside your house. It is often in the basement or crawl space. Look for a small valve on a pipe near the outside faucet. This valve controls the water flow to that faucet. Sometimes, it is in a utility room. Follow the water pipe from the outside faucet inside. The shut-off valve is usually somewhere along that pipe. Knowing where is the water shut off valve for outside faucet means you can quickly stop leaks. You can also prevent frozen pipes in winter. Remember, every house is different. Your valve might be in a different place than your neighbor’s. Always take a few minutes to find it. It’s a good idea to show your family members too. Then everyone knows what to do in an emergency.
- Look in your basement or crawl space first.
- Check utility rooms or near the water heater.
- Follow the pipes from the outside faucet inward.
- The valve is usually small and easy to turn.
- Make sure everyone in the family knows its location.
Once you find the valve, try turning it off and on. This makes sure it works. Sometimes, valves get stuck from not being used. If it’s hard to turn, don’t force it. You might need to call a plumber. Knowing where is the water shut off valve for outside faucet is just the first step. You also need to make sure it works correctly. It is also wise to label the valve. Use a tag or marker to show which faucet it controls. This will save time in an emergency. Regular checks and simple maintenance can prevent big problems later. Also, consider insulating your outdoor faucets. This helps prevent freezing during the winter months. This protects your pipes from bursting. This can save you a lot of money and trouble.
Why Knowing the Location Matters
Imagine a scenario. You are enjoying a sunny day. Suddenly, you notice water gushing from your outside faucet. The hose has burst! Water is spraying everywhere. What do you do? If you know where is the water shut off valve for outside faucet, you can act fast. You run inside, find the valve, and turn it off. The water stops. Crisis averted! But what if you don’t know where the valve is? You might waste precious time searching. Water damage can occur in the meantime. This simple story shows why knowing the valve’s location is so important. It’s not just about convenience. It’s about being prepared for emergencies. It’s about protecting your home from costly damage.
Tips for Marking Your Valve
Marking your shut-off valve is a smart idea. It makes it easy to find in a hurry. Use a bright-colored tag or label. Write “Outside Faucet” on it clearly. Attach it to the valve with string or wire. Another idea is to use a waterproof marker. Write directly on the pipe near the valve. Make sure the writing is big and easy to read. You can also take a picture of the valve with your phone. Add notes to the picture about its location. Keep the picture in a safe place. This can help you remember even if the label falls off. Consider using different colors for different valves. For example, blue for cold water and red for hot water. This can help avoid confusion. These simple steps can save you time and stress in an emergency.
How to Handle a Stuck Valve
Sometimes, shut-off valves get stuck. This can happen if they haven’t been used for a while. Don’t force it if you find a stuck valve. You could break it. Try spraying the valve with a penetrating oil. Let it sit for a few minutes. Then, try turning the valve gently. If it still won’t turn, try tapping it lightly with a hammer. This can help loosen any corrosion. If none of these things work, call a plumber. A plumber has the tools and skills to fix a stuck valve. They can replace it if needed. Regular maintenance can prevent valves from getting stuck. Turn them on and off a few times a year. This keeps them working smoothly. Remember, safety first! Don’t risk breaking the valve or injuring yourself.
Fun Fact or Stat: Did you know that a leaky faucet can waste gallons of water every day? Finding and fixing leaks fast is important. Knowing where your shut-off valve is helps!
Understanding Different Types of Valves
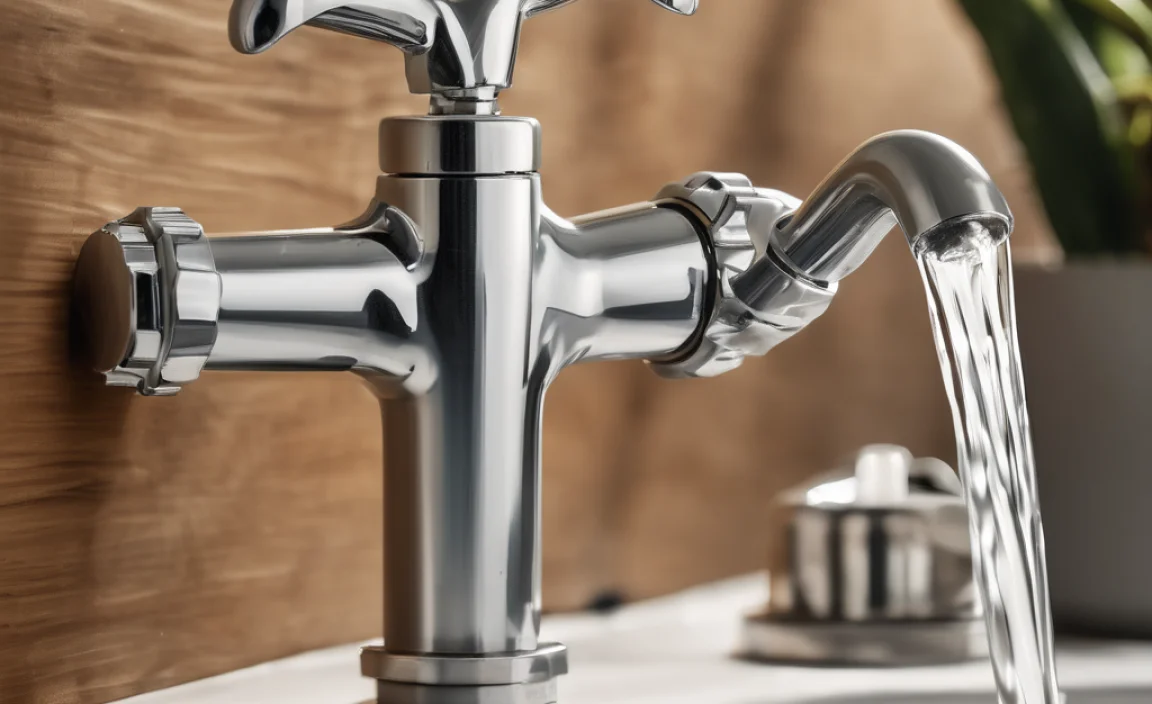
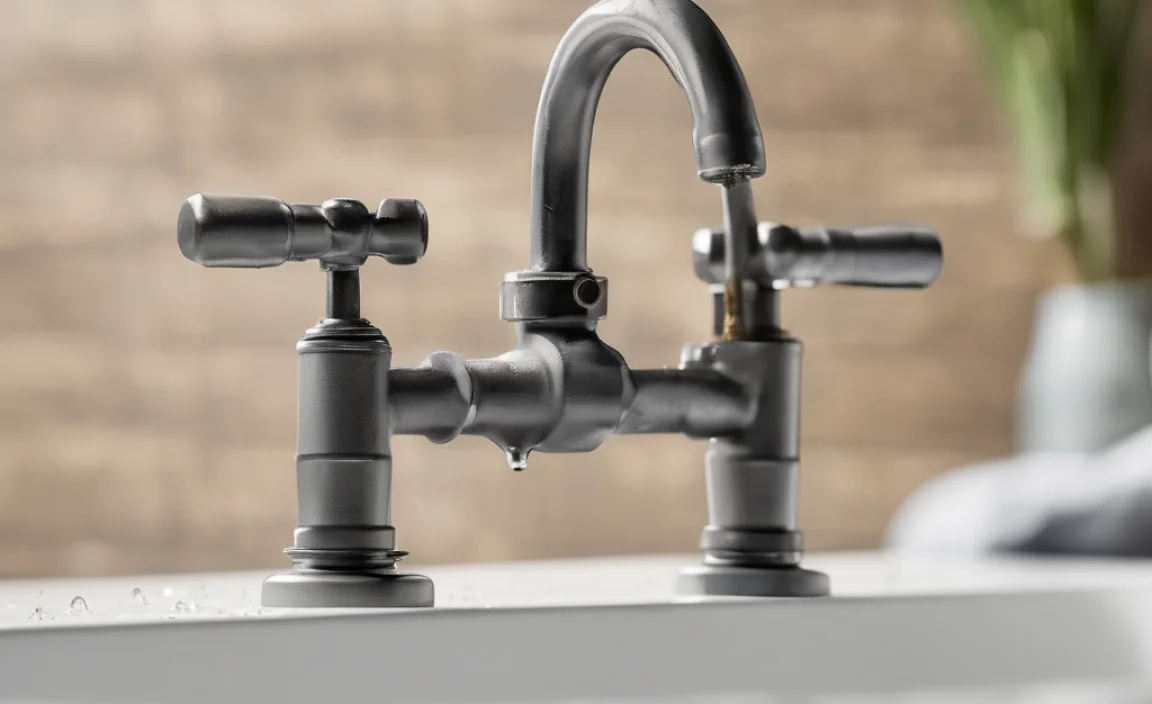
There are different types of shut-off valves. Knowing the type you have is helpful. The most common type is a gate valve. Gate valves have a round handle that you turn. This raises or lowers a gate inside the valve. Another type is a ball valve. Ball valves have a lever handle. You turn the lever a quarter turn to open or close the valve. A third type is a globe valve. Globe valves are less common for outdoor faucets. They have a knob that you turn to control the water flow. Knowing where is the water shut off valve for outside faucet is important. But knowing what kind of valve you have is also useful. This helps you understand how it works. It also helps you know how to fix it if it breaks. Always check your valves regularly to make sure they are in good working order.
- Gate valves have a round handle.
- Ball valves have a lever handle.
- Globe valves have a knob.
- Know which type you have.
- Regularly inspect your valves.
- Replace old or damaged valves.
Each type of valve has its pros and cons. Gate valves are good for fully opening or closing the water flow. But they can be slow to operate. Ball valves are quick to open and close. But they may not be as precise in controlling the flow. Globe valves offer good control over water flow. But they can restrict the flow somewhat. When you know where is the water shut off valve for outside faucet, take a moment to see what kind it is. This knowledge can help you troubleshoot problems. It can also help you decide if you need to replace the valve. If you are not sure which type you have, ask a plumber. They can help you identify it. They can also give you advice on maintaining it.
Gate Valves: How They Work
Gate valves are very common in older homes. They work by raising or lowering a gate. This gate blocks the water flow. The handle is usually round. You turn it many times to open or close the valve. Gate valves are good for situations where you want the water fully on or fully off. They are not ideal for controlling the flow partially. Over time, gate valves can corrode. This can make them hard to turn. Sometimes, the gate can break off inside the valve. If this happens, you will need to replace the valve. Regular use can help prevent gate valves from getting stuck. Turn them on and off a few times a year. This keeps the gate moving freely.
Ball Valves: A Quick Solution
Ball valves are very popular in newer homes. They use a ball with a hole in it. Turning the lever rotates the ball. This either allows water to flow or blocks it. Ball valves are quick to operate. A quarter turn of the lever opens or closes the valve. They are also less likely to leak than gate valves. However, ball valves may not be as precise in controlling water flow. They are either fully open or fully closed. Sometimes, debris can get stuck in the ball valve. This can prevent it from closing completely. If this happens, you may need to clean the valve. Turn off the water supply first. Then, disassemble the valve and remove any debris.
Globe Valves: Fine-Tuning Water Flow
Globe valves are less common for outdoor faucets. They are often used in industrial settings. They allow for fine control of water flow. The water flows through a winding path inside the valve. This allows you to adjust the flow precisely. Globe valves are more complex than gate or ball valves. They are also more expensive. They are not usually needed for simple outdoor faucets. However, if you have a special need for precise water control, a globe valve might be a good choice. They are also more prone to leaks than other types of valves. Regular maintenance is important to keep them working properly. Check for leaks and replace any worn parts.
Fun Fact or Stat: Ball valves are named because they use a ball with a hole to control water flow. They are quick and easy to use!
Preparing Your Faucet for Winter
Winter can be hard on outdoor faucets. Freezing temperatures can cause pipes to burst. This can lead to costly water damage. Preparing your faucet for winter is important. First, turn off the water to the outside faucet. Where is the water shut off valve for outside faucet? Find it and turn it off. Then, open the outside faucet to drain any remaining water. Disconnect the hose. Store it inside for the winter. Consider using insulated faucet covers. These covers protect the faucet from freezing. You can buy them at most hardware stores. These simple steps can prevent frozen pipes. They can also save you money on repairs. Always check your faucets before winter arrives. Make sure everything is in good working order.
- Turn off the water to the faucet.
- Drain any remaining water from the faucet.
- Disconnect and store the hose indoors.
- Use insulated faucet covers for protection.
- Check faucets before winter for any issues.
Insulating your outdoor faucets is a key step. It helps prevent freezing. Faucet covers are easy to install. Just slip them over the faucet and tighten them. You can also use rags or towels to insulate the faucet. Wrap them around the faucet and secure them with tape. Another option is to install a frost-free faucet. These faucets have a longer stem. The valve is located inside the house where it is warmer. This helps prevent freezing. Knowing where is the water shut off valve for outside faucet is important even with frost-free faucets. You still need to turn off the water in case of a leak. Regular maintenance can help you avoid problems. Inspect your faucets for leaks or damage. Fix any issues before winter arrives.
Why Winterizing Is Important
Imagine this: It’s a very cold winter night. The temperature drops below freezing. Water inside your outdoor pipes starts to freeze. As it freezes, it expands. This expansion puts pressure on the pipes. Eventually, the pipes can burst. This can cause a lot of water damage inside your home. The cost to repair this damage can be very high. Winterizing your outdoor faucets prevents this from happening. By turning off the water and insulating the faucets, you protect your pipes from freezing. This simple step can save you a lot of money and stress. It’s a small investment that pays off big in the long run.
Choosing the Right Faucet Cover
There are many different types of faucet covers available. Some are made of foam. Others are made of insulated fabric. Choose a cover that fits snugly over your faucet. Make sure it covers the entire faucet, including the handle. Some covers have a Velcro closure. Others have a drawstring. Choose the one that is easiest for you to use. Consider the climate in your area. If you live in an area with very cold winters, you may need a more heavy-duty cover. Read reviews before you buy a faucet cover. This can help you choose a good quality product. A good faucet cover will last for many years.
Dealing with Frozen Faucets
What if you forget to winterize your faucets? What if they freeze anyway? Don’t panic! There are things you can do. First, try to thaw the frozen pipe. You can use a hair dryer to gently warm the pipe. Don’t use a torch or open flame. This could damage the pipe or cause a fire. You can also wrap the pipe with warm towels. Once the pipe thaws, check for leaks. If you find a leak, turn off the water immediately. Then, call a plumber. Prevention is always better than cure. But knowing how to deal with frozen faucets can save you from a major disaster.
Fun Fact or Stat: Water expands by about 9% when it freezes. This expansion can create enough pressure to burst pipes!
Checking for Leaks Around the Faucet
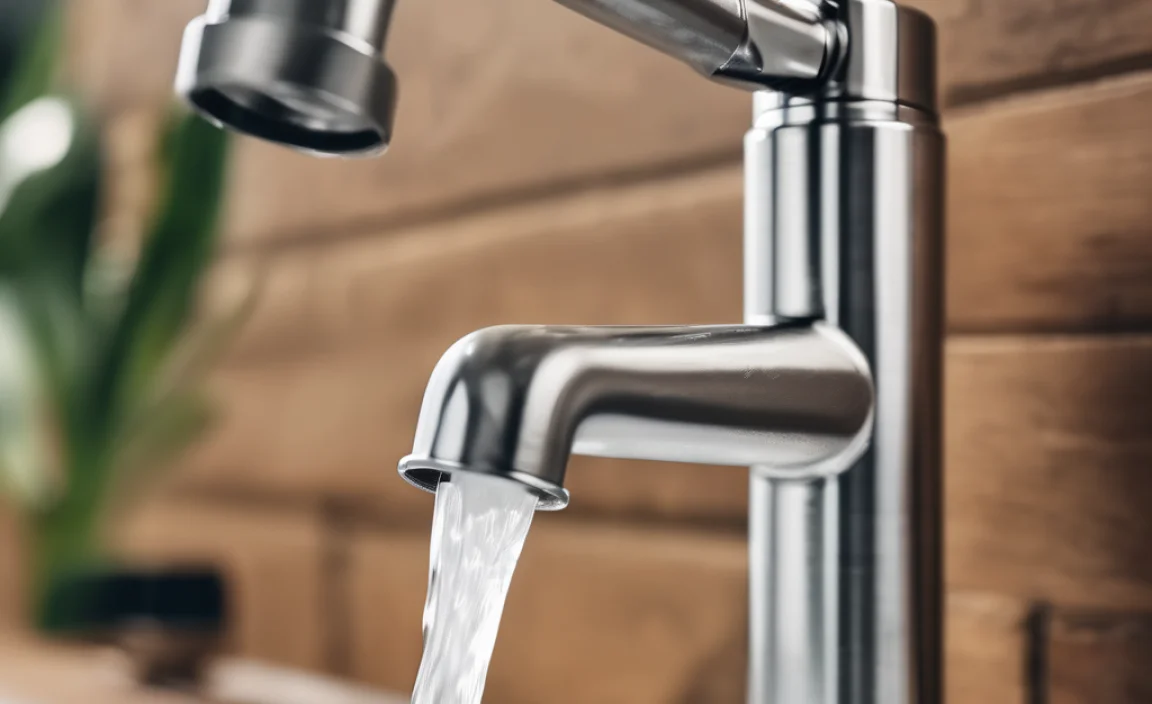
Leaks around your outdoor faucet can waste water. They can also damage your home. Check your faucet regularly for leaks. Look for water dripping from the faucet. Check around the handle and the base of the faucet. If you see any leaks, try tightening the packing nut. This is the nut behind the handle. Use a wrench to tighten it gently. If that doesn’t work, you may need to replace the packing. The packing is a small ring that seals the handle. You can buy it at most hardware stores. Knowing where is the water shut off valve for outside faucet is important before you start any repairs. Turn off the water before you work on the faucet. This will prevent water from spraying everywhere.
- Look for water dripping from the faucet.
- Check around the handle and base.
- Tighten the packing nut gently.
- Replace the packing if needed.
- Turn off the water before repairs.
Sometimes, leaks can be hard to find. They might be small and slow. Check your water bill for unusually high usage. This could be a sign of a leak. You can also use a water meter to check for leaks. Turn off all the water in your house. Then, check the water meter. If it is still moving, you have a leak. Knowing where is the water shut off valve for outside faucet helps you isolate the problem. You can turn off the water to the faucet to see if the leak stops. If it does, the leak is likely in the faucet or the pipe leading to it. If the leak continues, it is somewhere else in your house. Call a plumber to help you find and fix the leak. Early detection can save you money and prevent damage.
Why Small Leaks Matter
A small drip from a faucet might not seem like a big deal. But those drips can add up over time. A single dripping faucet can waste gallons of water every day. This wasted water costs you money on your water bill. It also wastes a precious resource. Small leaks can also cause damage to your home. Water can seep into walls and floors. This can lead to mold and mildew growth. Mold and mildew can cause health problems. They can also damage the structure of your home. Fixing small leaks promptly prevents these problems.
How to Tighten the Packing Nut
The packing nut is the nut behind the faucet handle. It holds the packing in place. The packing seals the handle and prevents leaks. Over time, the packing can wear out. This can cause leaks around the handle. Tightening the packing nut can often stop these leaks. Use a wrench to tighten the nut gently. Be careful not to over-tighten it. Over-tightening can damage the packing or the faucet. If tightening the nut doesn’t stop the leak, you may need to replace the packing. The packing is a small, inexpensive part that is easy to replace.
Replacing the Packing
Replacing the packing is a simple repair. First, turn off the water to the faucet. Then, remove the handle from the faucet. You may need to loosen a screw to remove the handle. Once the handle is off, you can access the packing nut. Loosen the packing nut and remove the old packing. Install the new packing. Then, tighten the packing nut. Reinstall the handle. Turn the water back on. Check for leaks. Replacing the packing can stop leaks and extend the life of your faucet.
Fun Fact or Stat: A faucet that drips once per second can waste over 3,000 gallons of water per year!
Repairing or Replacing a Damaged Faucet
Sometimes, faucets get damaged. The handle might break. The faucet body might crack. Or the threads might strip. In these cases, you may need to repair or replace the faucet. If the damage is minor, you might be able to repair it. You can buy replacement parts at most hardware stores. If the damage is severe, it is usually better to replace the entire faucet. Replacing a faucet is not difficult. But it does require some basic plumbing skills. Knowing where is the water shut off valve for outside faucet is essential before you start. Turn off the water before you remove the old faucet. This will prevent water from spraying everywhere.
- Buy replacement parts if repairable.
- Consider replacing the whole faucet.
- Turn off the water before starting.
- Follow the instructions carefully.
- Test the new faucet for leaks.
When choosing a new faucet, consider the type of faucet you need. Do you need a standard faucet? Or do you need a frost-free faucet? Frost-free faucets are a good choice if you live in an area with cold winters. They help prevent freezing. Also, consider the style of the faucet. Choose a faucet that matches the style of your home. Read reviews before you buy a new faucet. This can help you choose a good quality product. Knowing where is the water shut off valve for outside faucet will help you install the new faucet quickly. Make sure you have all the necessary tools and supplies before you start. This will make the job easier and faster.
When to Repair vs. Replace
Deciding whether to repair or replace a faucet can be tricky. If the problem is a simple one, such as a worn-out washer or O-ring, repairing the faucet is usually the best option. Replacement parts are inexpensive and easy to install. However, if the faucet is old and corroded, or if the damage is extensive, replacing the faucet is usually the better choice. An old, corroded faucet is likely to develop more problems in the future. Replacing it with a new faucet will save you time and money in the long run.
Step-by-Step Faucet Replacement
Replacing a faucet involves several steps. First, turn off the water to the faucet. Then, disconnect the water supply lines from the old faucet. Use a wrench to loosen the connections. Next, remove the old faucet from the sink or wall. Clean the area where the new faucet will be installed. Install the new faucet. Connect the water supply lines. Turn the water back on. Check for leaks. If you find any leaks, tighten the connections. Follow the manufacturer’s instructions carefully. This will ensure that the new faucet is installed correctly.
Choosing the Right Replacement Faucet
When choosing a replacement faucet, consider the following factors: the type of faucet, the style of the faucet, and the quality of the faucet. Choose a faucet that is the same type as the old faucet. This will make installation easier. Choose a style that matches the style of your home. Choose a faucet that is made of high-quality materials. A high-quality faucet will last longer and perform better. Read reviews before you buy a new faucet. This can help you choose a good quality product.
Fun Fact or Stat: Some faucets are designed to save water. They use less water without reducing water pressure!
Inspecting Your Faucet Regularly
Regularly inspecting your outdoor faucet is a good habit. It can help you catch problems early. Look for leaks, cracks, or damage. Check the handle to make sure it turns smoothly. Check the faucet body for corrosion. If you find any problems, fix them promptly. This will prevent them from getting worse. Knowing where is the water shut off valve for outside faucet is important before you start any repairs. Turn off the water before you work on the faucet. This will prevent water from spraying everywhere. Regular maintenance can extend the life of your faucet and save you money on repairs.
- Check for leaks, cracks, or damage.
- Make sure the handle turns smoothly.
- Look for corrosion on the faucet body.
- Fix any problems promptly.
- Regular maintenance saves money.
When inspecting your faucet, pay attention to the small details. Look for water stains around the faucet. These stains can be a sign of a slow leak. Check the faucet spout for mineral buildup. Mineral buildup can restrict water flow. Clean the spout with a vinegar solution. This will remove the buildup. Also, check the faucet for loose parts. Tighten any loose screws or nuts. Knowing where is the water shut off valve for outside faucet allows you to quickly address any issues. This ensures your faucet remains in good working condition. Regular inspections can prevent minor problems from turning into major repairs.
What to Look for During Inspection
When you inspect your outdoor faucet, look for the following: Leaks around the handle, spout, or base of the faucet. Cracks in the faucet body or handle. Corrosion on the faucet body or handle. Loose screws or nuts. Mineral buildup on the spout. Stiff or difficult-to-turn handle. Any signs of water damage around the faucet. By looking for these things, you can identify potential problems early and take steps to fix them.
Creating a Maintenance Schedule
A maintenance schedule can help you remember to inspect your outdoor faucet regularly. Set a reminder on your phone or calendar. Inspect your faucet at least twice a year, in the spring and fall. During the inspection, perform the checks listed above. If you find any problems, fix them promptly. Keep a record of your inspections. This will help you track any recurring problems. A maintenance schedule will help you keep your outdoor faucet in good working order for many years.
The Benefits of Regular Maintenance
Regular maintenance of your outdoor faucet has many benefits. It can prevent leaks and water damage. It can extend the life of your faucet. It can save you money on repairs. It can ensure that your faucet is always working properly when you need it. By taking a few minutes to inspect and maintain your faucet regularly, you can avoid costly problems down the road.
Fun Fact or Stat: Regular faucet maintenance can increase its lifespan by several years. A well-maintained faucet can last for 15-20 years!
Summary
Knowing where is the water shut off valve for outside faucet is a crucial part of home maintenance. It allows you to quickly stop leaks. It also helps prevent frozen pipes in winter. The shut-off valve is usually located inside your house. Look in your basement, crawl space, or utility room. Once you find it, make sure it works properly. Label it clearly for easy access in emergencies. Different types of valves exist, such as gate, ball, and globe valves. Each has its own advantages and disadvantages. Understanding these valves helps in troubleshooting.
Preparing your faucet for winter is essential. Turn off the water, drain the faucet, and insulate it. Check for leaks regularly and repair them promptly. If the faucet is damaged, consider repairing or replacing it. Regular inspections and maintenance can extend the life of your faucet. By taking these steps, you can protect your home from water damage and save money on repairs. Knowing where is the water shut off valve for outside faucet will help you handle any issues quickly and efficiently.
Conclusion
Finding where is the water shut off valve for outside faucet is a simple task. However, it provides significant benefits. It prevents water damage and saves water. Regular maintenance, like checking for leaks and winterizing, extends the life of your outdoor faucets. By taking these precautions, you can protect your home and conserve water. Being prepared for any outdoor faucet emergency is a smart move for every homeowner.
Frequently Asked Questions
Question No 1: Where exactly can I find the shut-off valve for my outside faucet?
Answer: The shut-off valve for your outside faucet is usually located inside your house. Common locations include the basement, crawl space, or utility room. It is often on a pipe that leads directly to the outside faucet. Follow the pipe from the outside faucet inward to find the valve. It might be near the water heater or main water line. Always check these areas first to quickly locate the valve. Knowing where is the water shut off valve for outside faucet is crucial for emergency situations and routine maintenance.
Question No 2: What do I do if I can’t find the shut-off valve for my outside faucet?
Answer: If you cannot find the shut-off valve, try looking near the main water shut-off valve for your house. Sometimes, the outside faucet valve is located close to the main valve. If you still can’t find it, consider checking with your local water company or a plumber. They may have records of your home’s plumbing layout. As a last resort, you might have to shut off the main water supply to your house. This will stop the water to all faucets, including the outside one. But knowing where is the water shut off valve for outside faucet is always the best solution.
Question No 3: Why is it so important to know where the shut-off valve is for my outside faucet?
Answer: Knowing where is the water shut off valve for outside faucet is very important for several reasons. First, it allows you to quickly stop leaks. A burst pipe or damaged faucet can waste a lot of water. Second, it helps you prevent frozen pipes in winter. Turning off the water and draining the faucet prevents freezing. Third, it makes repairs easier. You can turn off the water before working on the faucet. This prevents water from spraying everywhere. Being prepared for any outdoor faucet emergency is a smart move.
Question No 4: How can I prevent my outside faucet from freezing in the winter?
Answer: Preventing your outside faucet from freezing involves several steps. First, turn off the water to the faucet using the shut-off valve. Make sure you know where is the water shut off valve for outside faucet! Then, open the outside faucet to drain any remaining water. Disconnect the hose and store it indoors. Finally, use an insulated faucet cover to protect the faucet from the cold. These steps will help prevent your pipes from freezing and bursting.
Question No 5: What are the different types of shut-off valves I might find?
Answer: There are several types of shut-off valves. The most common are gate valves and ball valves. Gate valves have a round handle that you turn. Ball valves have a lever handle that you turn a quarter turn. Globe valves are another type, but less common. Knowing the type of valve you have can help you understand how it works. It also helps you know how to fix it if it breaks. Always make sure you know where is the water shut off valve for outside faucet, no matter the type.
Question No 6: What should I do if my shut-off valve is stuck or hard to turn?
Answer: If your shut-off valve is stuck, don’t force it. You could break it. Try spraying the valve with a penetrating oil. Let it sit for a few minutes. Then, try turning the valve gently. If it still won’t turn, try tapping it lightly with a hammer. This can help loosen any corrosion. If none of these things work, call a plumber. A plumber has the tools and skills to fix a stuck valve. Remember to regularly check where is the water shut off valve for outside faucet and test it to avoid it getting stuck.