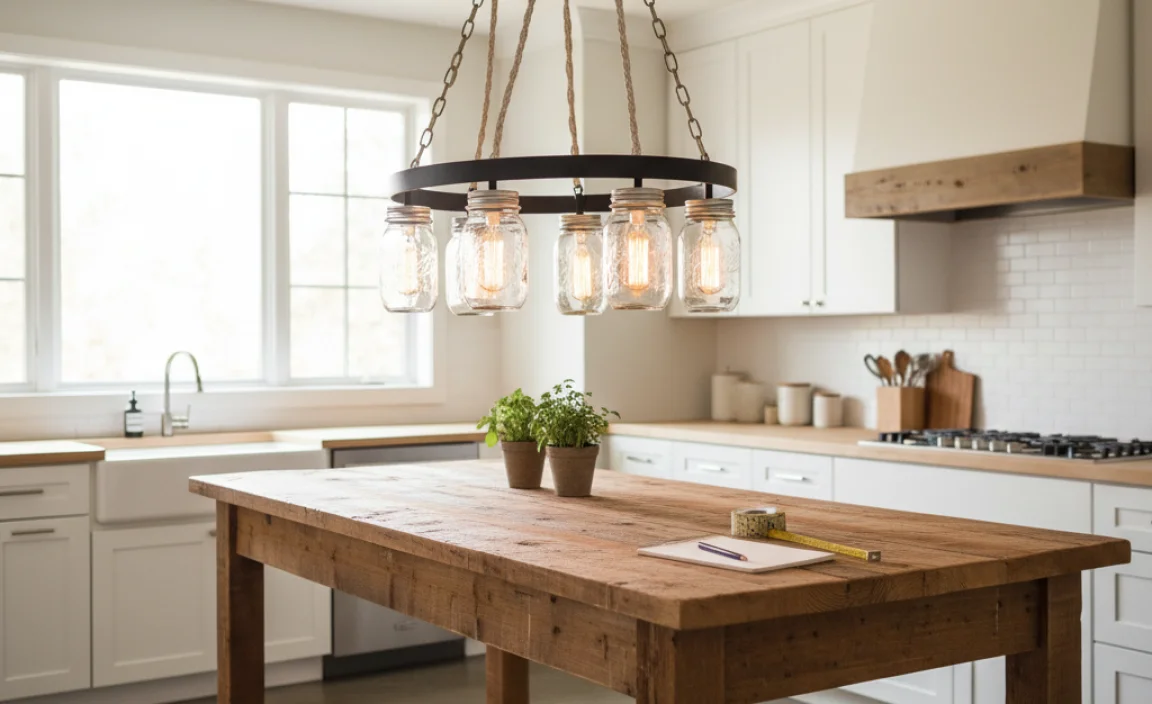
Have you ever looked at a mason jar and thought it could be more than just a container? Imagine transforming those jars into a stunning chandelier that lights up your space! A do-it-yourself mason jar chandelier can add charm and style to any room. It’s a fun project that anyone can tackle.
Did you know that mason jars have been around since the 1850s? They started as a way to preserve food. Now, they are popular in crafts, too! You can find them in kitchens, gardens, and even as trendy decor. Why not use them to brighten up your home?
Making a chandelier from mason jars might sound tricky, but it’s not. With a few jars and some simple tools, you can create something beautiful. Have you ever wanted to impress your friends with your creativity? This project is the perfect way to show off your skills.
Ready to explore how to make your very own do-it-yourself mason jar chandelier? Let’s dive in and discover how easy and fun this project can be!
Create Your Own Do-It-Yourself Mason Jar Chandelier Today!
Do-It-Yourself Mason Jar Chandelier
Create a stunning do-it-yourself mason jar chandelier that brightens your space. Using simple materials found at home, you can craft a beautiful light fixture. Ever thought how unique your room could look with hanging jars? Imagine inviting friends over to show off your creation! This project is not just fun; it sparks creativity. Plus, you can customize colors and styles to match your decor. Dive into crafting and transform your space today!
What is a Mason Jar Chandelier?
Definition and concept of a mason jar chandelier.. Popularity and decorative benefits in home decor..
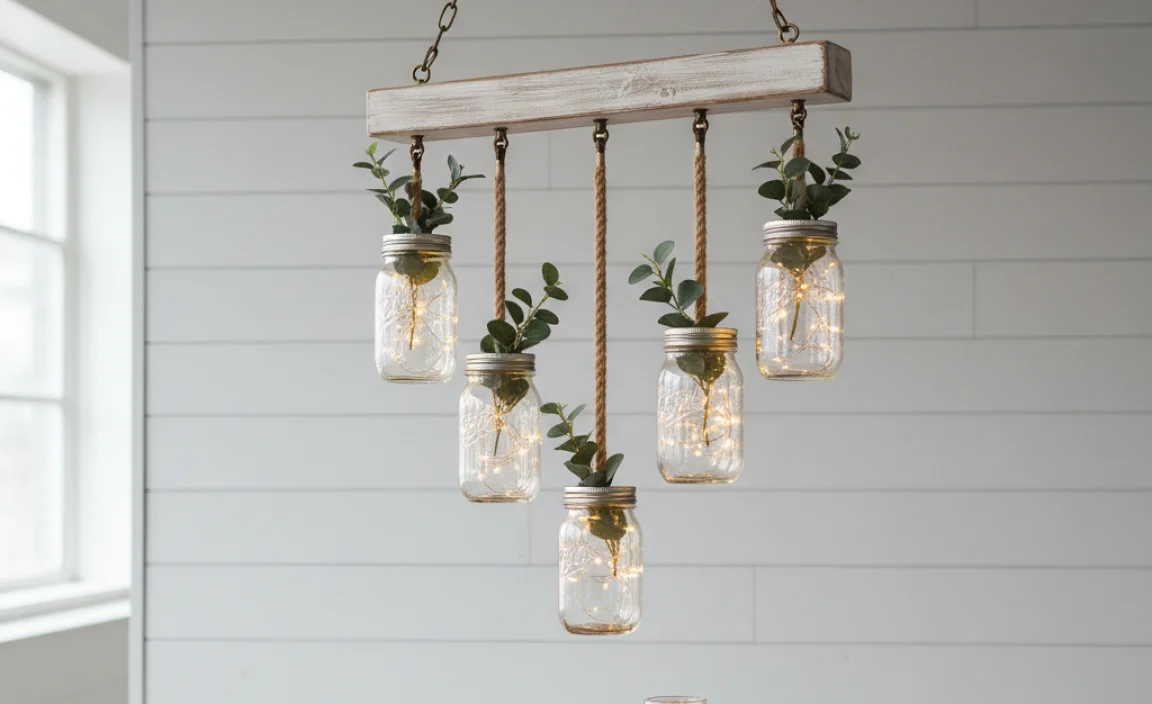
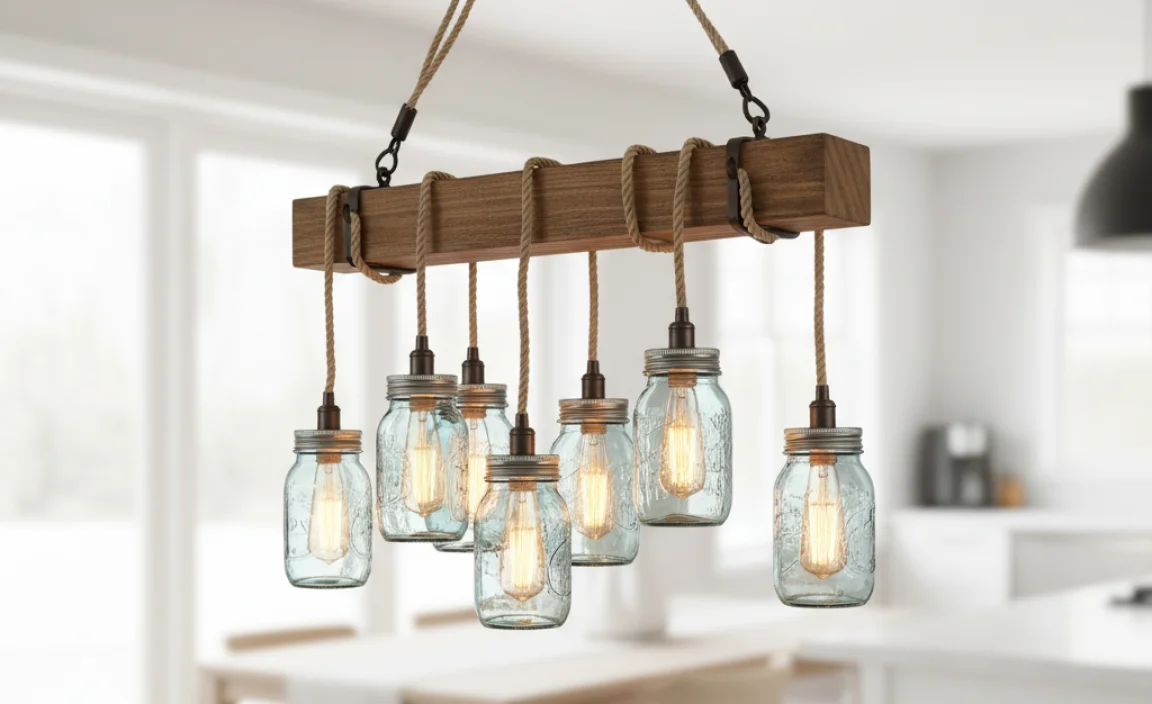
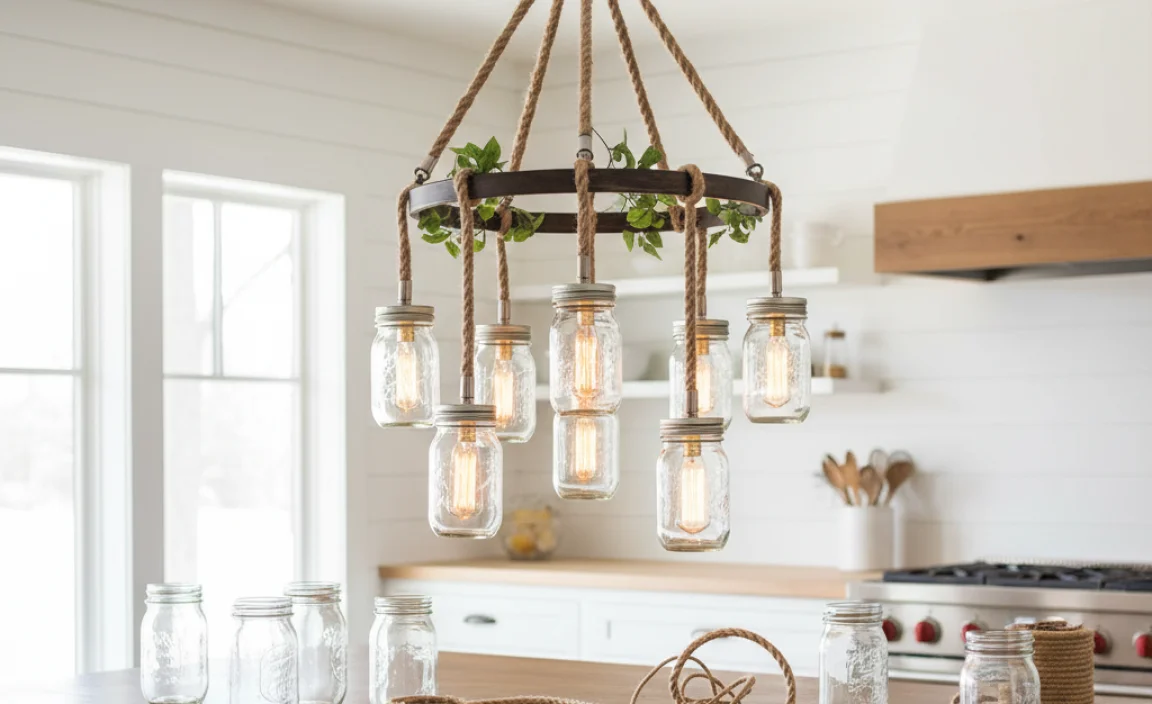
A mason jar chandelier is a creative lighting fixture made from mason jars. These charming lights add warmth and style to any room. People love them because they are unique and easy to personalize. Plus, they fit well in many home styles. They can add a rustic feel or a modern twist, depending on your choice. Many enjoy the simple beauty and warm glow they bring.
- Easy to make at home
- Can be customized with colors
- Adds a cozy atmosphere
- Great for parties or daily use
Why are mason jar chandeliers popular?
People love mason jar chandeliers because they are fun, stylish, and affordable. They bring a special touch to home decor and can be made using items you may already have. These chandeliers make your space feel inviting and warm.
Materials Needed
List of essential materials for building a mason jar chandelier.. Additional tools and safety equipment required..
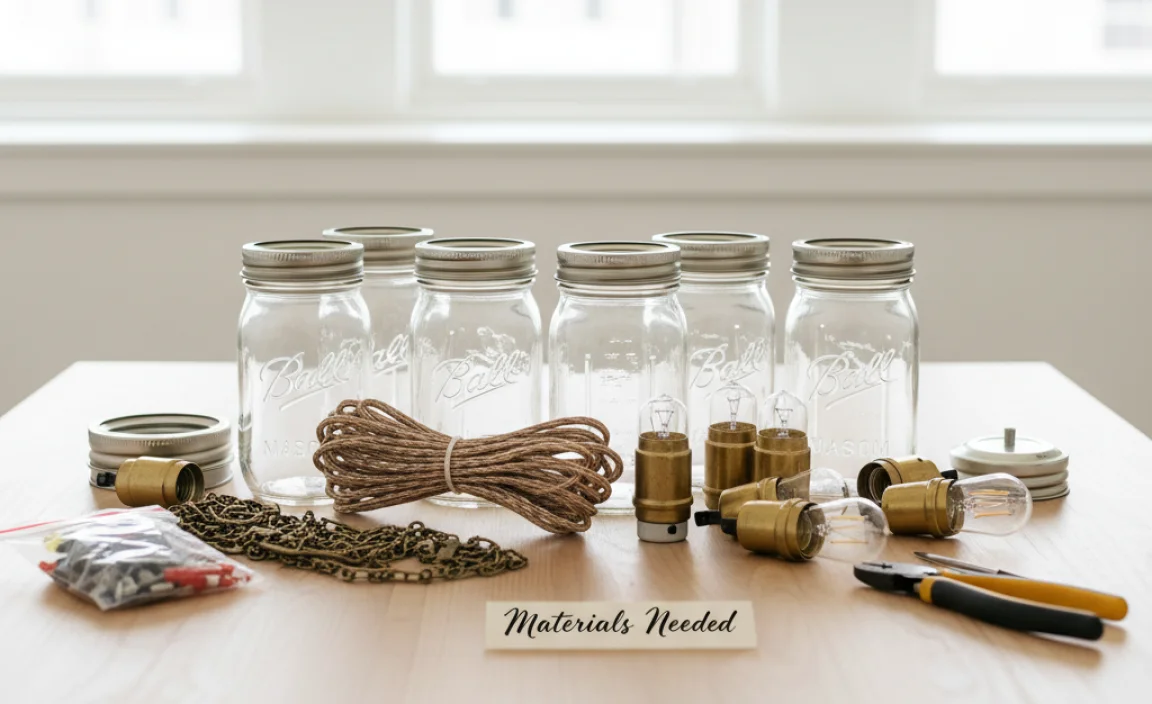
To create your mason jar chandelier, you need some basic materials. Here’s a list of what you’ll need:
- Mason jars
- Light bulbs
- Wire or rope
- Chandelier frame
- Metal hooks
- Electric wire
- Light fixture kit
Safety is also important. Make sure to have:
- Safety goggles
- Gloves
- Wire cutters
- Screwdriver
Gathering these materials will help you build your unique chandelier safely and easily!
What is the best way to cut wire for my chandelier?
Use wire cutters. Cut a piece longer than needed. This helps in adjusting the length easily.
Choosing the Right Location
Ideal settings for hanging your mason jar chandelier.. Considerations for power sources and space dimensions..
Finding the perfect spot for your mason jar chandelier is like picking a place for the school dance—it needs to be bright, fun, and safe! Consider hanging it in areas like your dining room, living room, or even a cozy corner. Think about power sources too; you don’t want your chandelier to be a lamp that never turns on! Measure your space so that it fits well—no one wants an overgrown jellyfish hanging too low. Remember, safety first!
| Ideal Locations | Considerations |
|---|---|
| Dining Room | Easy access to power |
| Living Room | Space to enjoy without bumping heads |
| Outdoor Patio | Protection from the weather |
So, find your spot and make it shine! Hang it where folks can admire your DIY skills and maybe even steal a few jellybeans from your secret stash!
Step-by-Step Instructions
Detailed guide on assembling the chandelier.. Tips for wiring and securing the mason jars..
Creating your own chandelier is fun and easy! First, gather your mason jars, hangers, wires, and light bulbs. Follow these steps:
- Choose a sturdy base and attach hangers evenly.
- Secure each mason jar with wire, making sure it’s tight.
- Connect the light fixtures to the jar lids.
- Carefully wire each bulb, ensuring safety.
- Hang the chandelier and check for balance.
Test the lights to see if they work! Enjoy your beautiful creation!
How to wire the chandelier safely?
Always turn off power before you start. Use insulated wires and check for loose connections to prevent any accidents.
Creative Design Ideas
Various styles and themes to inspire your design.. How to customize jars with paint, twine, or embellishments..
When planning your chandelier, think about your style. You can go for a rustic feel with twine and burlap, or a modern look using shiny spray paint. Want to be fancy? Add some glitter or beads! Make the jars unique by painting them in bright colors that match your home. Here are some ideas to spark your creativity:
| Style | Materials | Fun Twist |
|---|---|---|
| Rustic | Twine, wood slices | Add a tiny bird or flower! |
| Coastal | Shells, sand | Use blue and white paint! |
| Vintage | Lace, old keys | Spray with a bit of gold! |
Now you’re ready to create a one-of-a-kind chandelier that’ll make everyone say, “Wow!”
Maintenance and Care
Tips for cleaning and maintaining your chandelier.. Advice on bulb replacement and electrical safety..
Cleaning your chandelier keeps it sparkling and bright. Use a soft cloth or microfiber cloth to gently wipe off dust. For tough spots, add water to the cloth. Avoid strong chemicals. They can damage the jars.
When replacing bulbs, make sure the fixture is off. Use the correct wattage to avoid overheating. Safety first! Always check for frayed wires or loose connections. If you find any issues, it’s best to call an electrician.
How do I clean my chandelier safely?
Always turn off electricity before cleaning. Dust with a soft cloth. For glass jars, use a damp cloth and dry immediately.
Quick Care Tips:
- Clean regularly to prevent buildup.
- Replace bulbs as needed.
- Check wiring for safety.
Cost Estimates and Budgeting
Breakdown of potential costs involved in the project.. Budgetfriendly alternatives for materials..
Making a do-it-yourself mason jar chandelier can be fun and affordable. Here’s a quick look at the costs:
- Mason Jars: $1.50 each
- Light Kit: $25
- Wire or Chain: $10
- Paint (optional): $5
Total costs can vary, but you can make one for about $50. For budget-friendly options, try thrift stores. They often have jars at lower prices. You can also use leftover cords from old lamps for a more affordable project.
How can I save money on materials?
To save money, look for items around your home or at garage sales. You can even borrow tools from friends. This helps keep costs down and makes your chandelier unique!
Common Mistakes to Avoid
List of pitfalls commonly encountered in DIY chandelier projects.. How to troubleshoot issues that may arise during the process..
Building a stunning chandelier from mason jars is exciting, but watch out for some common blunders! One mistake is not measuring correctly, which can lead to uneven jars. Another pitfall is skipping safety gear, like goggles—your eyes are precious! When wiring, remember to follow instructions carefully; mixing up wires can dim your sparkle. If your chandelier flickers, check your connections!
| Mistake | Solution |
|---|---|
| Wrong measurements | Double-check your sizes! |
| Not securing jars | Use strong adhesive! |
| Incorrect wiring | Follow the instructions! |
| Forgetting safety gear | Wear goggles and gloves! |
Remember, it’s about creativity, not chaos! So, plan well, stay safe, and your DIY mason jar chandelier will shine bright like your ideas!
Inspirational Examples from Other DIY Enthusiasts
Showcase of unique mason jar chandelier designs online.. Links to social media platforms or blogs featuring user creations..
Many DIY lovers have created stunning mason jar chandeliers that spark joy! From rustic designs to colorful creations, there’s something for everyone. Check out social media like Instagram and Pinterest for amazing ideas. You might spot a chandelier made from glittering jars or twinkling fairy lights. Follow these chains of creativity as you explore the limitless possibilities:
| Platform | User Creations |
|---|---|
| #MasonJarChandelier | |
| Mason Jar Ideas | |
| Blogs | DIY Mason Jar Blog |
These examples show how simple jars can turn into dazzling lights. So grab your jars and get inspired! Who knew lighting could be so fun? Your home will shine, and your friends might be a little jar-joking jealous!
Conclusion
In conclusion, a do-it-yourself mason jar chandelier can brighten your space creatively and affordably. You can customize it to match your style using simple tools. This fun project boosts your DIY skills and makes a beautiful statement piece. Gather your materials, follow easy tutorials, and start crafting today! For more tips and ideas, keep exploring DIY resources online.
FAQs
What Materials Do I Need To Create A Do-It-Yourself Mason Jar Chandelier?
To make a mason jar chandelier, you need a few basic materials. Get some mason jars, wire, and lights like fairy lights or small bulbs. You will also need a wooden board for the base and hooks to hang everything. Don’t forget tools like scissors and pliers to help you. Lastly, pick a spot in your home where you want to hang your new chandelier!
What Is The Best Way To Hang And Support A Mason Jar Chandelier Safely?
To hang and support a mason jar chandelier safely, start by using strong chains or wire. First, attach the mason jars to the chains securely. Next, hang the chandelier from a ceiling hook that can hold the weight. Make sure everything is tight and check it before turning on the lights. Always ask an adult for help if you’re unsure!
How Can I Add Lighting Options, Such As Led Fairy Lights Or Candles, To My Mason Jar Chandelier?
You can add LED fairy lights by putting them inside the mason jars. First, get battery-powered fairy lights. Then, carefully place them inside the jars. If you want to use candles, make sure they are battery-operated for safety. You can arrange the jars in your chandelier and turn on the lights or candles to enjoy a nice glow!
What Design Ideas Or Themes Can I Use To Customize My Mason Jar Chandelier For Different Occasions Or Home Decor Styles?
You can make your mason jar chandelier special for any occasion! For holidays, add colored lights or decorations. In spring, use flowers inside the jars for a fresh look. For a cozy winter feel, wrap the jars with twine or burlap. You can also paint the jars to match your room colors or the season!
Are There Any Tips For Wiring And Electrical Safety When Making A Mason Jar Chandelier With Electric Lights?
When making a mason jar chandelier with lights, safety is super important. First, always unplug the lights when you work on them. Next, check your wires for any damage before using them. If you are using a plug, make sure it’s safe for the lights you choose. Lastly, ask an adult for help if you feel unsure about anything!