So, how to remove exhaust studs? “Yes, that sounds like a plan. Let’s go on a long drive” as you make an impromptu plan with your friends and rush towards your car to start it, an unpleasant and tapping noise welcomes you.
Not at all welcoming, isn’t it? This is a common phenomenon when your car exhaust is either broken or rusted out and in such cases removing the exhaust stud is the wisest option. Obviously, a professional mechanic will fix it within a snap of a finger.
But in a scenario where you are in a hurry, calling the mechanic, waiting for the mechanic to come and fix, is indeed a long drawn out process. That’s when we will swoosh in to save your neck as we will guide you through the process of how you can remove exhaust studs. Don’t let your car engine deceive you at the last moment. Follow this guide and Do it all by yourself.

What Is An Exhaust Stud?

An exhaust stud is a metal or plastic fitting that is inserted into the muffler of a vehicle to prevent backfire and enhance performance. When the exhaust gases from the engine escape through the muffler, they encounter the open end of the stud, which forces them back into the engine.
This action helps to reduce heat buildup and noise levels, and it also helps to distribute air evenly throughout the engine. Here’s how to remove exhaust studs safely and properly:
- Remove the exhaust system – Start by removing the exhaust system from the car. This can be done by removing the bolts that hold it in place or by cutting it off at the mufflers.
- Remove the studs – Next, remove the studs from the exhaust system. You’ll need to use a wrench or a monkey wrench to do this, as they’re usually very tight and difficult to remove. Make sure to wear gloves and eye protection when tackling this task!
- Clean and lubricate the studs – Once the studs are removed, make sure to clean them off and apply a light layer of lubricant to them. This will help them move more easily when re-installed.
- Re-install the exhaust system – Finally, re-install the exhaust system and tighten all of the bolts/nuts/clamps securely before testing the noise level of your car – it should now be much quieter!
Why Do Exhaust Studs Break?
Exhaust studs break for a variety of reasons, but the most common ones include overheating, incorrect installation, and over-torquing. Overheating is often caused by using the wrong size studs or failing to properly insulate the exhaust system.
Incorrect installation can be due to a lack of proper knowledge or a lack of proper equipment. Over-torquing can occur when the exhaust system is being installed or when it’s being modified
How To Remove Exhaust Studs – A Complete Step by Step Guide
Estimated Cost: Almost around 300 – 400 dollars
The time needed: 15 minutes – 2 hours
It actually depends on the level of expertise you have. For instance, someone with an experience in removing exhaust studs three or four times can do it faster than a first-timer. Similarly, it depends on the situation as well. For instance, the time needed to remove a rusted stud will be less than the time needed to remove a broken stud.
So now that you have decided to remove the exhaust stud all by yourself, what’s next? Make sure you have few items that will aid you in the stud removal process.
Tools and Materials Needed:
- Hammer
- Two Nuts
- Wrenches
- Pliers
- External Torx Socket adapter set
- Ratchet
- Penetrating Lubricant Spray
- Butane torch
- Ice cubes
- Tongs
- Drilling machine
- Iron pipes
- Stud Removal Kits (Optional)
Now that you have the required tools in your possession, simply follow the steps, and you are good to go.
Steps On Removing Exhaust Studs

Step 1 – Apply A Little Bit Of Force
Sometimes a bit of jolting might do the trick, especially in case of minor rust. Use a hammer and tap it in the area that links the exhaust and stud. This will generate a jolt which can break the link. But make sure not to strike the hammer way too hard. You don’t want to break the exhaust manifold after all.
Step 2 – External Torx Bit Trick / Two – Nuts Method
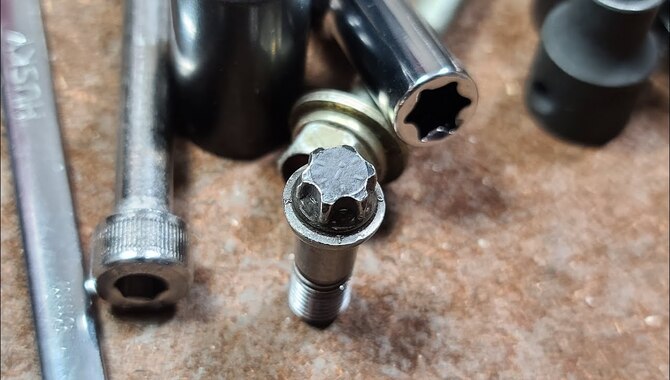
You can simply use an external Torx Socket. Just find the end of the stud that will fit into the pilot hole of the Torx, and you can loosen it like a normal bolt by spinning it counterclockwise. If the exhaust stud is broken above the head or if the stud doesn’t have anything on the end that you can grip, then use the two nuts methods instead.
You need to take two nuts and fix them on the edge of the stud. Remember, both the nuts should have the same size and thread pitch so that you can tighten both together.
Slide both the nuts on the stud as far as you can and tighten using wrenches. Then take one wrench and hold the top nut while spinning the other closer to the threaded side. This spinning will cause the nut to loosen up, causing the entire stud to come out.
Step 3 – Lubrication
Penetrating lubricant spray is another effective method that will work like wonder to release the stud from the exhaust. Penetrant sprays help to loosen a rusty or stuck stud with the exhaust by providing lubrication. It will also help them from getting rusted again shortly. So you can try spraying the area.
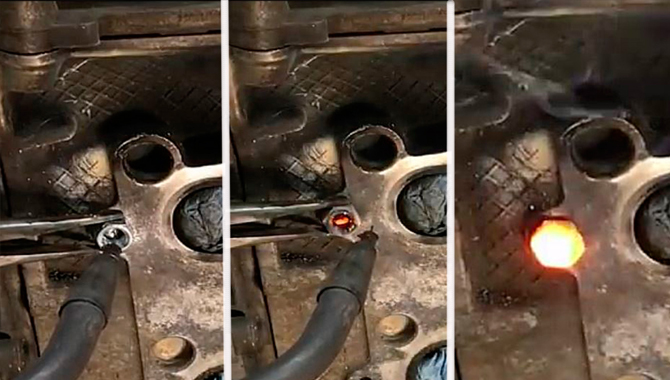
Step 4 – Chemistry Lessons To The Rescue
A solid material expands when heated and contracts when cooled‘ you might have learned about this thermal expansion and contraction of solids back in high school. Now, it’s time for you to implement this lesson in your real life. If you try heating and cooling the exhaust studs simultaneously, the exhaust studs will expand and contract, respectively causing the stubborn stud to loosen a bit.
Once loosened, you can simply use the regular pliers and twist the stud gently in a counterclockwise motion until the stud comes out. For heating, you can use a handheld butane torch and place it near the exhaust. Do not apply heat only in one spot. Apply the heat even. The heat will be transferred to the stud, causing it to expand.
After that, use a pair of tongs to place ice cubes on the heated studs that will cause the stud to contract. This change in size and temperature resulting from simultaneous heating and cooling will cause the bond between the exhaust and stud to break.
Disclaimer: If the head is made of aluminum, be a little more careful because aluminum will form bubbles when heated instead of glowing.
Step 5 – Drilling – Know The Drill

Drilling is another which isn’t highly recommended for you to do on your own without any expert supervision. Yet, this one a good way of removing exhaust studs. In this process, you first need to find the center of the stud and drill precisely at the center using a drilling machine.
It is a reasonably dangerous process as it might lead to an injury if the machine is not handled correctly. Also, it can crack the inside setup of the exhaust as well if not correctly drilled. So, only follow this step when you have mastered using a drilling machine or under professional supervision.
Pro Tip: You do not have to follow all the steps religiously with all this being said. If you see the exhaust stud has been removed successfully after step 1 or step 2, stop right there! Follow all the steps only when needed, for instance, in case of stubborn rust, and utilize your time properly.
Even if after all these attempts you fail to remove the stud, do consult a professional mechanic. It is said ‘practice makes a man perfect.’ It’s okay to fail the first few times. You will ace it the next time!
When To Remove Exhaust Studs?
‘How will I know when I should be changing the exhaust stud? I cannot check the engine parts every now and then to know if anything is wrong inside’. This is something that might pop into your mind while going through this guide. This is why it is important for you to know the signs that will indicate a problem with your exhaust stud.
Noisy Engine

As mentioned above, a noisy engine is like the primary indicator of a faulty exhaust. If you hear a tapping or hissing sound once you start your engine, it means the exhaust stud needs to be removed.
A Burning Smell
Another indicator of a faulty exhaust is a burning smell from the car engine. Any leak from exhaust gas causes the components within the exhaust to heat up, eventually generating a burning smell. If overheated, a faint smoke may be generated. If that happens, then there is a high chance of the exhaust being exploded.
So it is very much important to make sure the studs are not changed from time to time and are prevented from being overheated.
Decreased Engine Performance
If you notice your car isn’t as fast as it is supposed to be, then consider doing a quick check. An exhaust leak can lead to a less efficient engine performance in terms of fuel efficiency, power, and acceleration.
Final Words
Now that you know how and when to remove exhaust studs, you no longer need to wait for your mechanic to come and fix it. The how to remove exhaust studs DIY guide will help you to solve the problem all by yourself. Just remember to keep the necessary items in your car as you may need to remove exhaust studs anytime anywhere. So, it’s better if you know how to do it.
