Have you ever noticed a leak around your toilet? That annoying puddle can mean it’s time to replace the toilet seal. Many people worry about tackling this job themselves. But, what if I told you it’s easier than you think?
Replacing a toilet seal can be a simple DIY project. Imagine fixing something in your home that saves you money and keeps your bathroom dry. Sounds great, right? Picture this: you become the hero in your home. You fix the leak without calling a plumber!
In this guide, we’ll walk you through the steps to replace a toilet seal. You’ll feel more confident with each task. Let’s dive into the details and make your bathroom a better place!
How To Replace A Toilet Seal: A Step-By-Step Guide

How to Replace a Toilet Seal
Replacing a toilet seal can seem tricky, but it’s easier than it sounds! Start by turning off the water supply and emptying the toilet. Carefully remove the toilet from the floor. Once it’s off, remove the old seal and clean the area. Place the new seal correctly before reinstalling the toilet. Did you know that a worn-out seal can cause leaks? Fixing it not only saves water but also money on your bill! With a little effort, you can tackle this home repair easily.
Understanding the Toilet Seal
What is a toilet seal and its function. Common types of toilet seals.
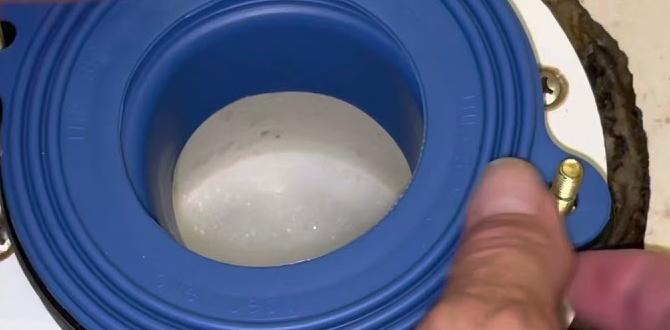
A toilet seal is a ring that keeps water from leaking between your toilet and the floor. It’s like a superhero that fights against messes! When you flush, this seal helps ensure everything goes where it should—down the drain—not onto your floor.
There are a few common types of toilet seals. The most popular is the wax ring, which is as sticky as a candy gummy! Then you have wax-free seals, which are more modern but still do a great job. Understanding these options can keep your bathroom flood-free!
| Type of Seal | Description |
|---|---|
| Wax Ring | Traditional, sticky, and reliable. |
| Wax-free Seal | Modern alternative, easy to install. |
Signs That Indicate a Toilet Seal Replacement is Needed
Visible leaks around the toilet base. Unpleasant odors coming from the bathroom.
Keeping an eye on your toilet is important. Here are some signs to watch for:
- Visible leaks around the base of the toilet can mean the seal is broken. You might see water pooling on the floor.
- Unpleasant odors in the bathroom may come from leaks. A worn seal can let waste escape, causing bad smells.
What should I look for to know if my toilet needs a seal replacement?
Look for wet spots on the floor and any strange smells. These signals usually mean it’s time to check or replace the seal.
Tools and Materials Required for the Replacement
List of essential tools (e.g., wrench, putty knife). Recommended seal types for different toilet models.
To fix a toilet seal, you’ll need some essential tools and materials. Here’s a quick list:
- Wrench – Helps loosen and tighten nuts.
- Putty knife – Good for scraping off old sealant.
- Screwdriver – Needed for removing screws.
- Bucket – To catch water during the process.
- New toilet seal – Choose the right type for your toilet model.
For seals, you can find rubber or wax types. Wax seals are common. A rubber seal works well for modern toilets. Choose wisely to avoid leaks!
What tools do I need to replace a toilet seal?
You need basic tools like a wrench, putty knife, and screwdriver to replace a toilet seal. Also, have a bucket handy!
Step-by-Step Process to Replace the Toilet Seal
Safely shutting off the water supply and draining the toilet. Removing the toilet from its base.
First, turn off the water supply. Look for the valve behind the toilet and give it a twist. Next, flush the toilet to drain the tank. Don’t worry, your bathroom won’t turn into a splash zone—hopefully! Once it’s empty, remove the nuts at the toilet base using a wrench. Be careful; you don’t want to pull a muscle! Now, it’s time to lift the toilet gently. Get ready for some strongman moves!
| Step | Action |
|---|---|
| 1 | Turn off the water supply |
| 2 | Flush and drain the tank |
| 3 | Remove nuts at the base |
| 4 | Lift the toilet carefully |
Installing the New Toilet Seal
Proper techniques for positioning the new seal. Important tips for reinstalling the toilet.
Now that you have a new toilet seal, it’s time to install it. First, place the seal right over the hole on the floor. Make sure it fits snugly and is centered. This helps avoid leaks. Then, lift the toilet and gently lower it onto the seal. Press down evenly to make the seal stick. After that, check the bolts to ensure they are tight, but don’t overdo it, or you might crack the toilet!
- Keep the surface clean where the seal sits.
- Align the toilet over the seal before lowering.
- Tighten bolts evenly to avoid damage.
How do I ensure the toilet is properly positioned over the new seal?
Ensure the toilet sits straight and centered. Lift the toilet carefully. Press down evenly and check that it feels secure.
Testing the New Seal for Leaks
Steps to reattach the water supply and check for leaks. Troubleshooting common issues after installation.
Once everything is back in place, it’s time to reconnect the water supply. Tighten the nut, but not too tight; you don’t want it to feel like it’s giving a bear hug! After turning the water back on, watch closely for leaks. If you see water, don’t panic! It could be a loose connection. Check for any parts that aren’t snug. It’s like a game of hide and seek, but with water! Remember, if everything looks dry, you’ve done a great job!
| Common Issues | Solutions |
|---|---|
| Leak at the bottom | Check the seal and bolts |
| Water pressure problems | Inspect the supply line |
| Cracked toilet | Consider a replacement |
Follow these steps, and you’ll be the hero of your household. A new seal means less mess and more fun flushes!
Maintenance Tips for Toilet Seals
Regular inspection practices to prevent wear. Signs to look for that may indicate future problems.
Check your toilet seals often for wear. This small step can save you from big problems. Look for signs like leaks or bad smells. If the seal feels soft or looks cracked, it’s time to act. Replace it before it causes major damage to your bathroom. Regular checks help keep your toilet running smoothly and prevent costly repairs.
What are common signs of a toilet seal problem?
Check for leaks, strange noises, or water pooling around the base of the toilet.
Signs to inspect:
- Water around the base
- Unpleasant odors
- Loose fittings
- Cracked or worn seals
Conclusion
In conclusion, replacing a toilet seal is a simple task you can do. First, gather your tools and materials. Then, follow the steps to remove the old seal and install a new one. Always check for leaks afterward. If you need more help, look for videos or guides online. You’ll feel proud of your DIY skills!
FAQs
What Tools And Materials Do I Need To Replace A Toilet Seal?
To replace a toilet seal, you need a few tools and materials. First, get a new wax seal; this helps stop leaks. You will also need a wrench to loosen the bolts and a sponge to soak up any water. A putty knife can help you remove the old seal easily. Finally, don’t forget rubber gloves to keep your hands clean!
How Can I Identify If My Toilet Seal Needs To Be Replaced?
You can check if your toilet seal needs replacing by looking for leaks. If you see water around the base, it might be bad. Also, listen for any strange sounds or feel for vibrations when you flush. If the toilet wobbles or is loose, the seal could be broken. If you notice any of these signs, it’s time to get a new seal.
What Are The Steps To Properly Remove The Old Toilet Seal?
To remove the old toilet seal, first, turn off the water to the toilet. Next, flush the toilet to empty the tank. Then, use a sponge to soak up any leftover water in the bowl. After that, unscrew the toilet from the floor and lift it off carefully. Finally, scrape off the old seal from the floor and clean the area.
How Do I Install The New Toilet Seal And Ensure It’S Watertight?
First, lift the old toilet seal and clean the area. Next, place the new seal on the toilet base. Carefully set the toilet back down, making sure it lines up with the bolts. Finally, tighten the bolts evenly to create a tight fit. Check for leaks by flushing the toilet and looking for any water around the base.
Are There Any Common Mistakes To Avoid When Replacing A Toilet Seal?
Yes, there are some mistakes to avoid when you replace a toilet seal. First, make sure to turn off the water before you start. If you don’t, the water will spill everywhere! Also, remember to remove old wax completely. If you leave any behind, it can cause leaks. Finally, don’t forget to tighten the bolts just right. If they’re too loose, your toilet might wobble. If they’re too tight, you can crack the toilet.


